Validation
The Validation group of the Drilling ribbon contains a tool to validate drillhole data.

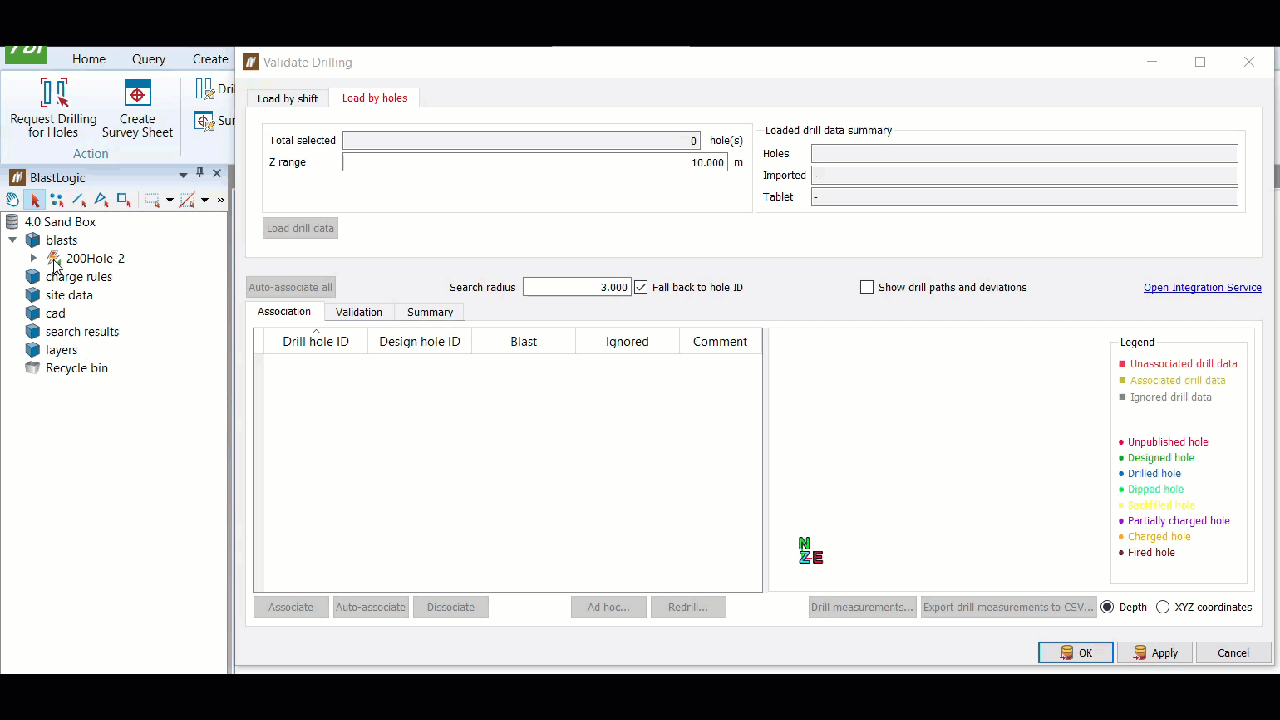
 Validate Drilling
The Validate Drilling tool verifies drillhole data. This tool can validate the following:
-
Drillhole data imported from a CSV file
-
Drillhole data created via the BlastLogic tablet
-
Drillhole data create via the BlastLogic Integration Service (BLIS)
To use this validate drilling tool, follow these steps:
-
On the Drilling ribbon, in the Validation group, select
Validate Drilling.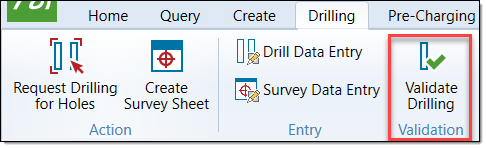
The Validate Drilling panel will appear.
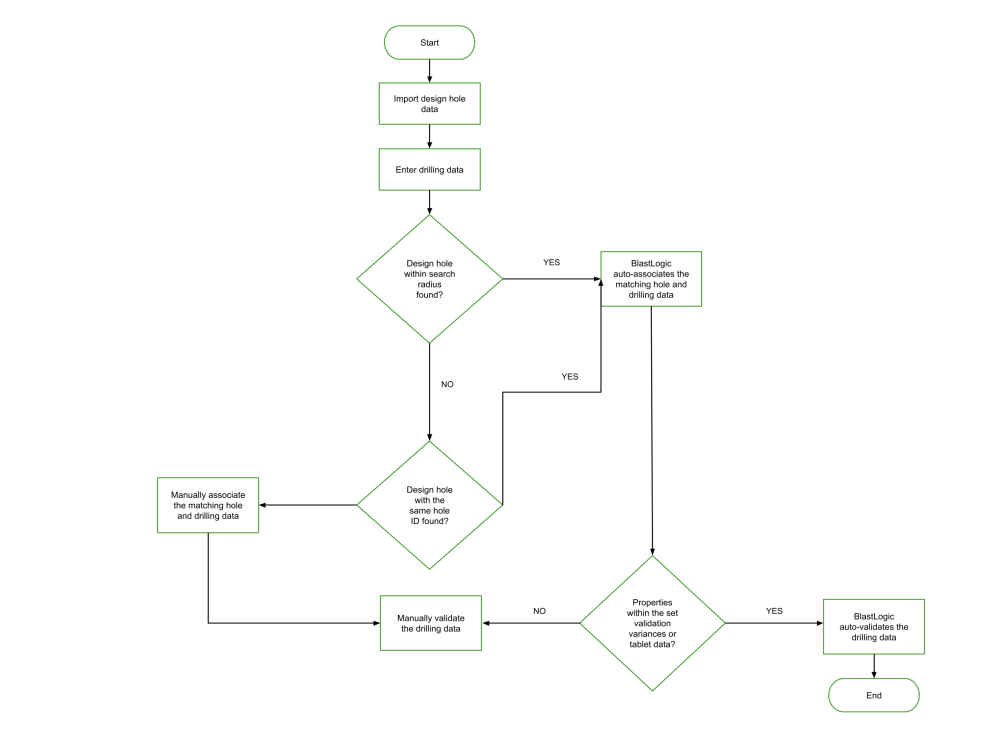
The process
Once you have entered drilling data, you can add it to the Validate Drilling panel. BlastLogic will query its database to find a matching design hole.
Before validation, BlastLogic automatically associates drilling data with the closest published hole found within the set Search radius which is set in the Site Setup panel under Validation Settings. If BlastLogic can’t find a hole within the set Search radius, you can specify that drilling data should be associated with holes of the same hole ID by checking the Fallback to Hole ID checkbox. Otherwise, an automatic association will occur only by the closest distance within the Search radius.

The next step after the association is to validate the hole. If BLIS or CSV drilling data falls within the defined variations, the drilling data is automatically validated. You can set these variations by going to Home > Setup > Site > Validation Settings. BlastLogic automatically validates tablet data even if it falls outside the defined variations.
When drilling data fails to be associated with a hole, you have the option to manually associate drilling data with a hole of your choice. Similarly, if drilling data fails to be automatically validated, you can choose to manually validate the drilling data.
The entire drillhole validation process can be summarised in the flow diagram below:
Searching for drilling data
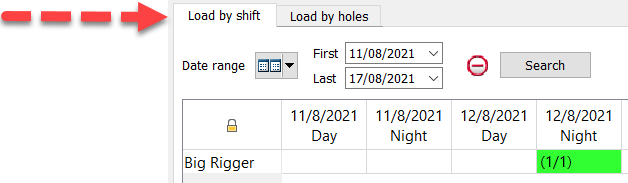
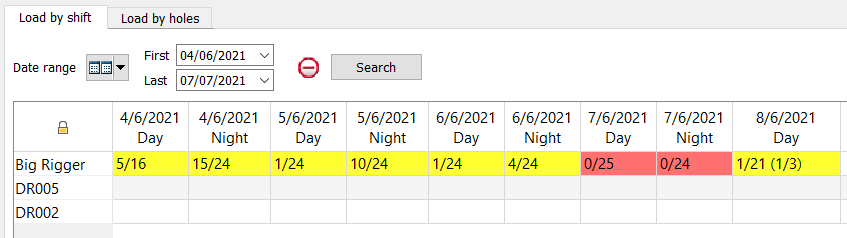
The first step is to populate the Association, Validation and Summary tabs with drilling data. You can do this by either loading drilling data by shift or by loading a set of holes.
Load by shift
To populate the Association, Validation and Summary tabs with drilling data by shift:
-
Select the Load by shift tab.
-
Select the date range to display, then click the Search button. The default range is the last seven days.
-
Select drilled data in a particular shift by a specific drill machine to validate. The drill machine name is shown on the left of the table and the shifts are shown along the top. The cell displays the number of entries validated/number of entries requiring validation. In brackets, the following is displayed: the number of tablet entries validated/number of tablet entries requiring validation. The colouring scheme can be described as follows:
-
Red indicates that no data has been validated.
-
Yellow indicates that some data has been validated.
-
Green indicates that all data has been validated.
-
Load by holes
To populate the Association, Validation and Summary tabs with drilling data by holes:
-
Select the Load by holes tab.
-
Select a set of holes in the Data Explorer.
-
Click the Load drill data button to load the data into the panel.
Associating drilling data with holes
BlastLogic automatically associates drilling data with holes that are within the specified association distance. If you have checked the Fallback on hole ID checkbox, BlastLogic will automatically associate drilling data with a matching hole ID, even if they fall outside of the set association distance.
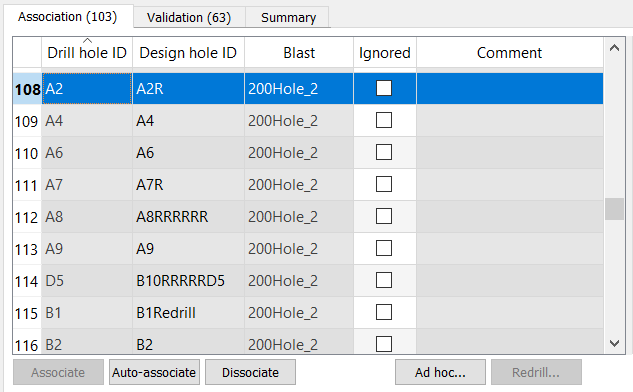
To view holes that have been associated automatically, click the Association tab. The number on the tab label indicates the number of drill holes that need to be associated with design data.
Under the Association tab, you will see a list of drillholes. For holes that have been automatically associated, you will see their matching design hole. You will also see the blast to which the matching hole belongs.
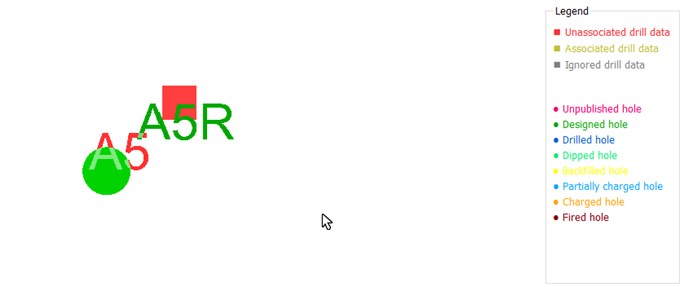
On the right of this tab, you will see a view containing drilling data and design holes. We use squares to represent drilling data and circles to represent design holes.
If the drilling data is dark yellow, that means that it has been associated with a design hole.

If the drilling data is red, that means that it hasn’t been associated with a design hole.
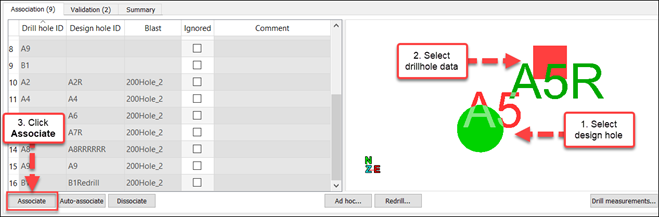
Manually associating drilling data with a design hole
If BlastLogic has failed to automatically associate drilling data with a design hole, you can still perform association by completing the following steps:
-
Select a hole in the view on the right side of the panel.
-
Select a drillhole in the view on the right side of the panel.
-
Click Associate underneath the table on the left side of the panel.
-
Click Apply in the bottom right corner to save changes.
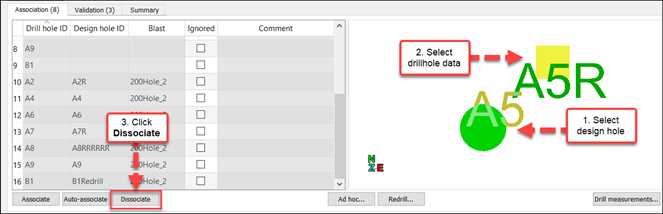
Manually disassociating drilling data with a design hole
If you want to disassociate drilling data and a design hole, you can do so using the following steps:
-
Select a hole in the view on the right side of the panel.
-
Select drilling data in the view on the right side of the panel.
-
Click Disassociate underneath the table on the left side of the panel.
-
Click Applyin the bottom right corner to save the changes.
Validating drilling data
After drilling data is associated with a design hole, we check the drilling data properties against the properties of the design hole. If the properties match or are within the range set in the Validation Settings panel, BlastLogic automatically validates the hole.
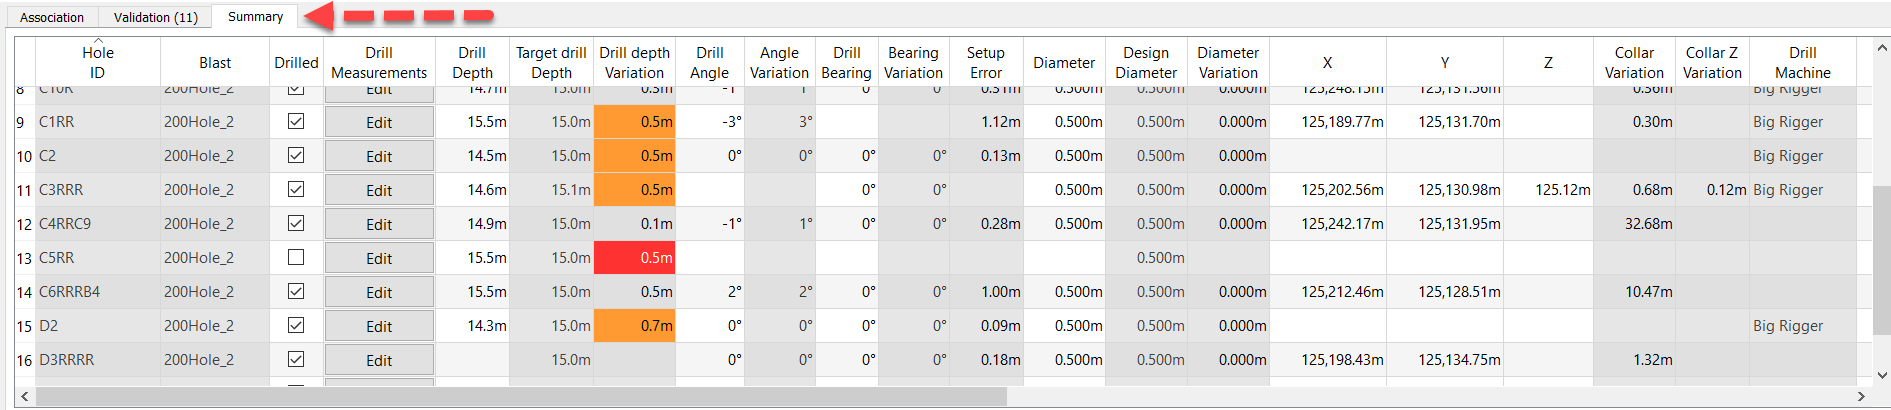
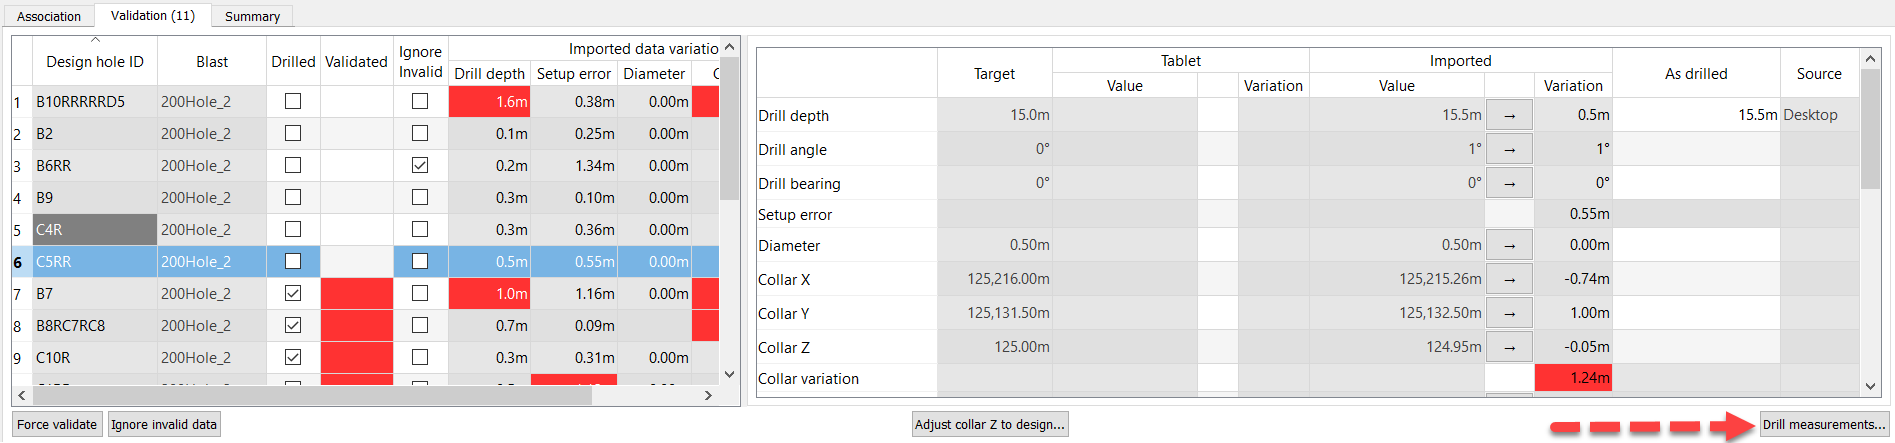
Open the Validation tab to view all design holes and the validation status of their associated drill data. The number within brackets on the tab indicates the number of design holes that require or have failed validation.
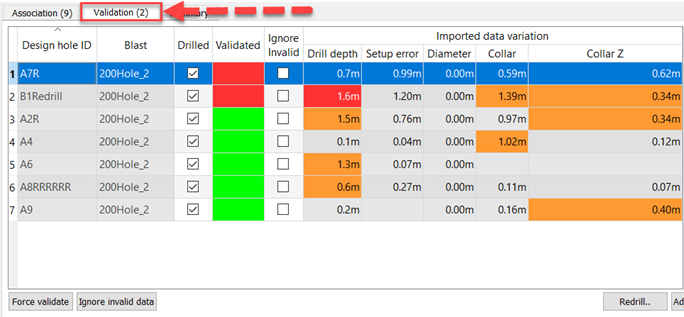
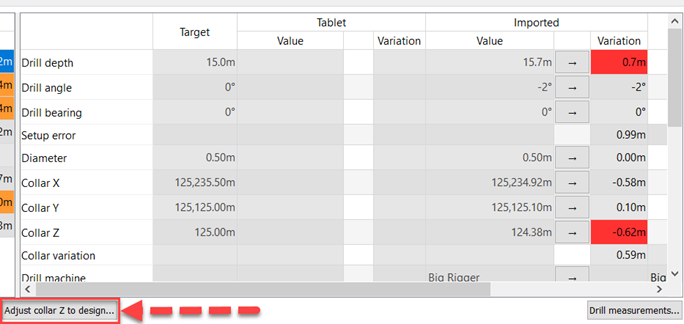
Next to each hole is the Blast it belongs to, its Drilled and Validated statuses, and its drill data variation parameters. There is also an option to ignore any invalid data.

Design holes that have drilled data and that fall within the set process variances have their Drilled status automatically checked. The design hole in the image above is considered drilled, as its Drilled status has been checked but has not been automatically validated, as it contains invalid data (which is highlighted red). To manually validate the data, you will need to check the Ignore Invalid checkbox. The Validated status will then be set to orange, which means that the data has been validated, even though there is drilled data that BlastLogic considers invalid.
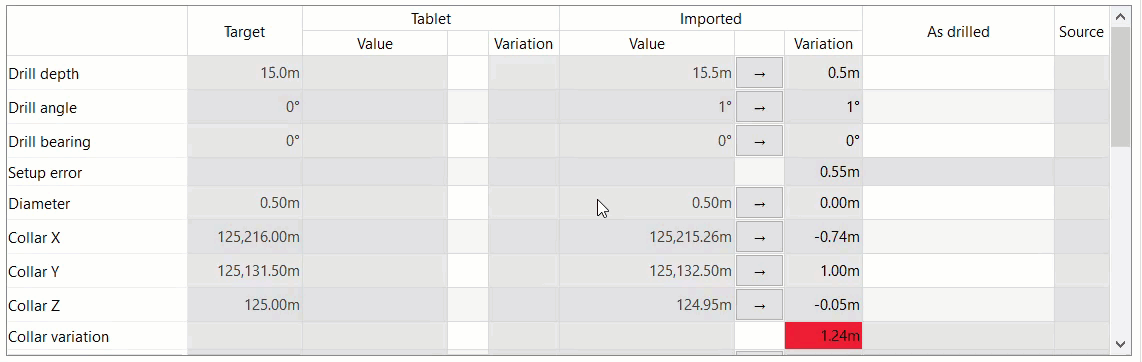
On the right of this list is a panel containing the following columns:
-
Target — Displays the target (plan hole) data
-
Tablet — Displays the drilling data entered from the Tablet.
-
Variation (tablet) — Displays the difference between tablet and target hole data.
-
Imported — Displays data from either BLIS or imported from a CSV file.
-
Variation (imported) — Displays the difference between imported and target hole data.
-
As drilled — Displays as-drilled data automatically generated from the Validation settings in the Site panel.
-
Source — Displays the source of the as-drilled data.
Each column has a preference field of either being tablet or imported. If data for the preferred source exists, it is copied into the as-drilled. If data from a preferred source doesn’t exist, then the non-preferred source data is used. If no data is present, it is left blank.
The only column which is not read-only in this section of the panel is the as-drilled data. You can populate the As Drilled data column by:
-
Entering the as-drilled data manually
-
Copying the Tablet or Imported columns during auto-validation.
-
Copying the Tablet or Imported columns manually.
This is another way to manually validate the drilled data.
Cells with drilling data that are outside the set validation variances and not validated will be coloured red. Cells with drilling data that are outside the set validation variances but validated will be coloured orange.
Manually validating holes
To manually copy the Tablet or Imported values over, double-click the arrow next to the column value, as shown in the image below.
To perform mass validation on multiple holes, select the holes you want to validate in the Validation tab and click the Force validate button below the Association, Validation, and Summary tabs.

Adjusting collar Z to design
When entering as-drilled data, you may want to use the design value. To adjust the as-drilled collar Z value to the design value, click the Adjust collar Z to design button underneath the table.
Then, select to adjust the collar Z using one of two options:
-
Keep drill depth, adjust toe location
-
Keep toe location, adjust drill depth
Summarising drilling data
To view a summary of drilling data per hole, go to the Summary panel.
Drilling data that is outside the set process tolerances and not validated will be highlighted in red.
Drilling data that is outside the set process tolerances but validated will be highlighted in orange.
Note that process tolerances and validation variances are different concepts. Validation tolerances are used to import valid drilling data, while process tolerances are used to highlight outliers but do not affect the validity of data.
Other functions
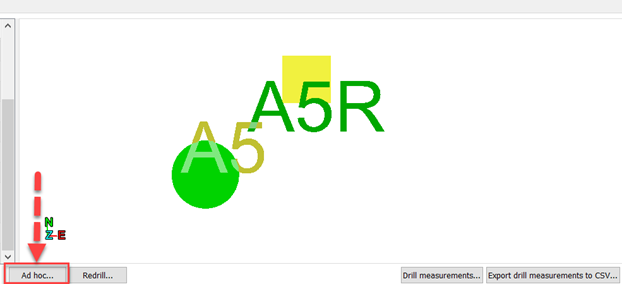
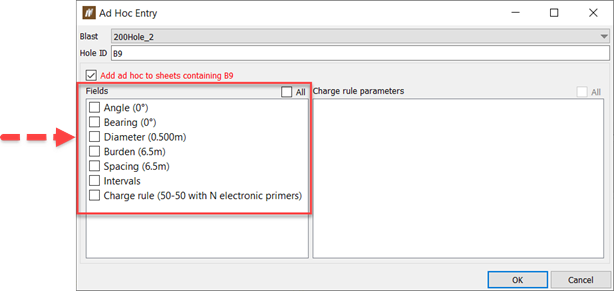
How to create an adhoc hole
To create an Ad Hoc hole:
-
Open the Association tab.
-
Select an unassociated drillhole from the view in the panel.
-
Click Ad hoc underneath the view in the panel. This will open up a new panel.
-
To add the ad hoc hole to existing sheets, check the checkbox Add ad hoc to sheets containing <hole name>.
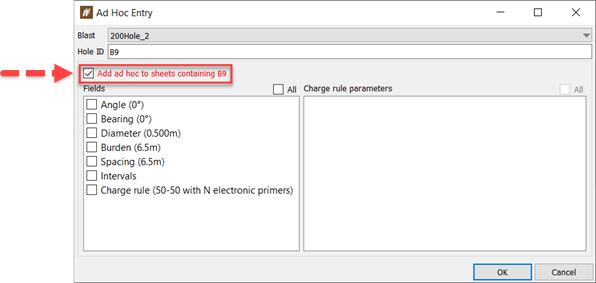
-
To copy hole properties from the current hole to the ad hoc hole, check the checkboxes next to the appropriate hole property.
-
Click OK on the Ad Hoc Entry panel.
-
Click Apply on the Validate Drilling panel to save the changes.
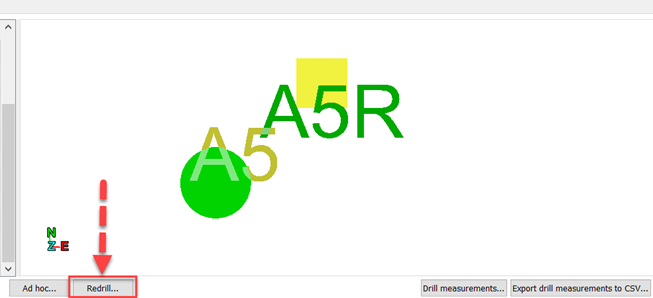
How to redrill a hole
To redrill a hole:
-
Open the Association tab.
-
Select an associated hole that hasn’t been partially charged.
-
Click Redrill underneath the view in the panel. This will open a new panel.
-
Supply a comment explaining why the hole had to be redrilled and provide a name for the redrilled hole.

-
Click OK on the Redrill panel.
-
Click Apply on the Validate Drilling panel to save the changes.
Entering drill measurements
You can enter drill measurement data when you create drilling data. Using the Validate Drilling panel, you can view or modify this data.
To view or modify drill measurements:
-
Open the Validation tab.
-
Select a hole from the list.
-
Click Drill measurements in the bottom right corner of the panel. This will open a new panel containing all of the drill measurements entered for the selected hole.
-
All drillhole measurements are modifiable by clicking the cell and modifying the value. You can also add a row to the data by clicking the
 sign underneath the table. Similarly, you can delete a row by clicking the
  sign underneath the table.
-
Click OK.
-
Click Apply to save your changes.
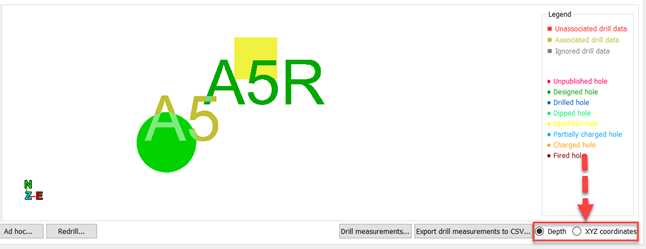
Exporting drill measurements to CSV
To export drill measurements to CSV:
-
Open the Association tab.
-
Choose from the following export options: Depth or XYZ Coordinates.
-
Click the Export drill measurements to CSV button underneath the view in the Validation panel. This will open the File Exporter.
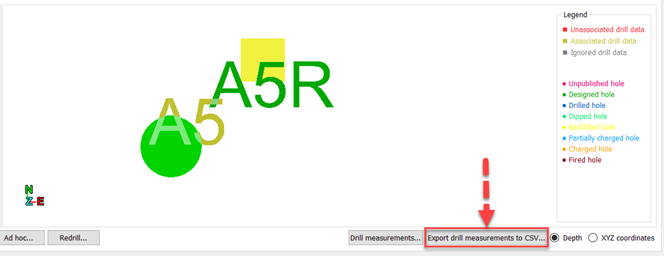
-
Choose a path to save the CSV file to and click Save.
