Action
The Action group of the Pre-Charging ribbon contains tools to create dip and backfill sheets.

 Create Dip Sheet
Dip sheets are an interface which you can use to record and store dip data for a selection of holes. You can create dip sheets using the desktop application. Operators can access and enter data into dip sheets using the tablet application.
To create a dip sheet, follow these steps:
-
Select the desired holes in the view window or data explorer.
Note:The blast containing the selected holes must be published to complete the following steps. See Publish a blast page for more information on publishing blasts to the server.
-
On the Pre-Charging ribbon, in the Action group, select
Create Dip Sheet. The Create Dip Sheet panel will appear.

-
Configure the Action section. You can select either of the following options:
-
To create a new sheet, select the Create a new sheet radio button.
-
To add holes to an existing sheet, select the Append to existing sheet radio button and select a sheet from the drop-down.
-
-
Enter any dip sheet instructions into the Sheet instructions field. BlastLogic will display these instructions on the cover page of the sheet.
-
Configure the sheet properties and options sections. There are three different sheet sections you can configure:
-
PDF sheet properties: Select the properties you wish to include in the sheet using the corresponding checkboxes.
-
Sheet options: Select the desired sheet options using the corresponding checkboxes.
-
Tablet properties: Select the properties you wish to include in the sheet using the corresponding checkboxes.
-
-
Review the messages or alerts in the bottom table.
Note: BlastLogic will cancel existing entries once you create a new sheet.
-
Click OK or Apply. BlastLogic will create a dip sheet, located in the Sheets container for the selected blast in the data explorer.
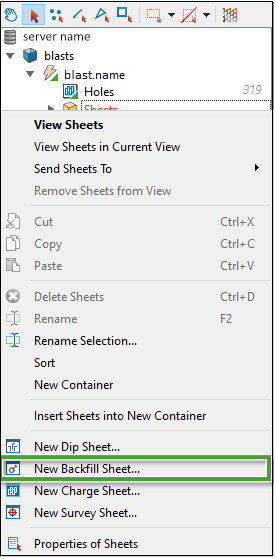
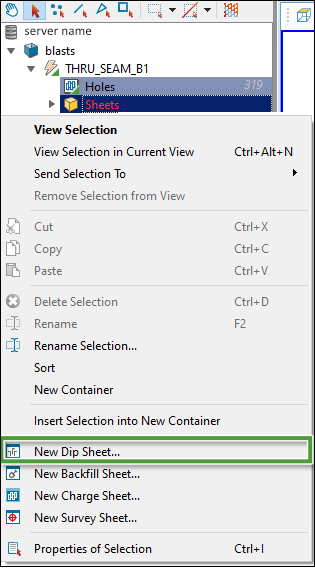
Note:You can also create a new dip sheet for a blast by right-clicking on the blast Sheets container in the data explorer and selecting New Dip Sheet....
 Create Backfill Sheet
Backfill sheets are an interface you can use to record and store backfill data for a selection of holes. You can create these sheets on the desktop application. Operators can access and enter data into dip sheets using the tablet application.
To create a backfill sheet, follow these steps:
-
Select the desired holes in the view window or data explorer.
Note:The blast containing the selected holes must be published to complete the following steps. Refer to the how to Publish a blast page for more information on publishing blasts to the server.
-
On the Pre-Charging ribbon, in the Action group, select
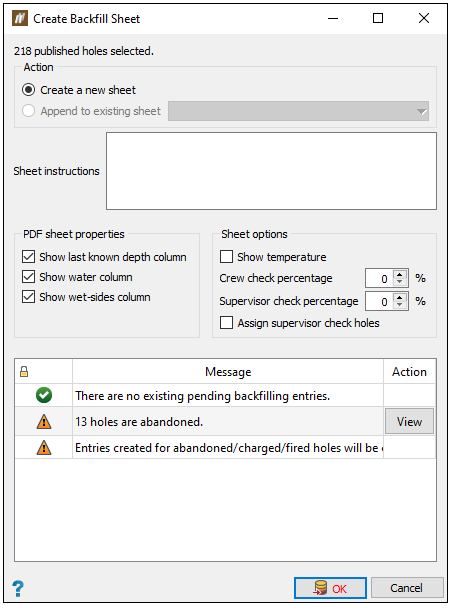
Create Backfill Sheet. The Create Backfill Sheet panel will appear. -
Configure the Action section. You can select either of the following options:
-
To create a new sheet, select the Create a new sheet radio button.
-
To add the holes to an existing sheet, select the Append to existing sheet radio button and select a sheet from the drop-down.
-
-
Enter any dip sheet instructions into the Sheet instructions field. BlastLogic will display these instructions on the cover page of the sheet.
-
Configure the sheet properties and options sections. There are two different sheet sections you can configure:
-
PDF sheet properties: Select the properties you wish to include in the sheet using the corresponding checkboxes.
-
Sheet options: Select the desired sheet options using the corresponding checkboxes.
-
-
Review the messages or alerts in the bottom table.
Note: BlastLogic will cancel existing entries once you create a new sheet.
-
Click OK or Apply. BlastLogic will create a backfill sheet, located in the Sheets container for the selected blast in the data explorer. A PDF version of blank backfill sheet will appear in a new view window. The sheet cover page displays any blast properties you have marked as area of mine alongside the sheet instructions.
Note:You can also create a new backfill sheet for a blast by right-clicking on the blast Sheets container in the data explorer and selecting New Backfill Sheet....