Entry
The Entry group of the Charging ribbon contains tools that allow you to enter charge and timing data as well as edit loaded primers.

 Charge Data Entry
The Charge Data Entry tool enables charge data to be entered against holes in the blast. To manage your charge data, select the holes of your blast in the viewer, and then go to the Charge Data Entry panel (Charging ribbon > Entry group > ![]() Charge Data Entry).
Charge Data Entry).
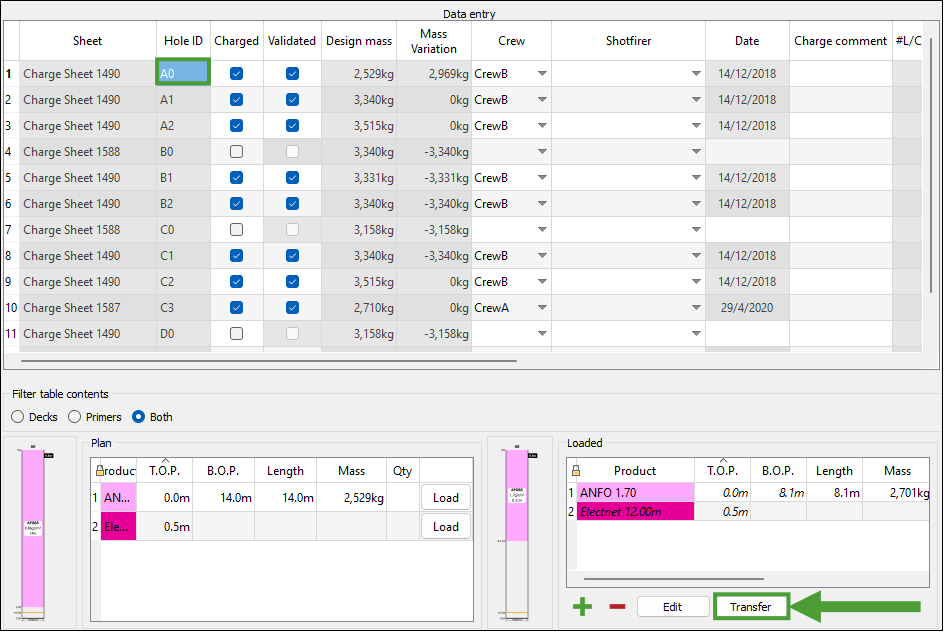
The panel is split into five main sections: Data entry, Last known measurements, Plan, Loaded, and Reconciled. When a field within a row corresponding to a certain hole is selected in the Data entry or Last known measurements table, the Plan, Loaded, and Reconciled tables will be populated with the related data (if such data has been recorded). Planned decks and primers come from the charge plan that has been previously applied. The data is usually loaded on the tablet by operators in the field. However, loaded data can be provided on the desktop application for simulation purposes. This data is then usually confirmed or reconciled on the desktop by either drill and blast (D/B) engineer or a supervisor.
Important! To edit and apply any changes on the Charge Data Entry panel, apply the corresponding settings from the Crew and Shotfirer drop-down menus first.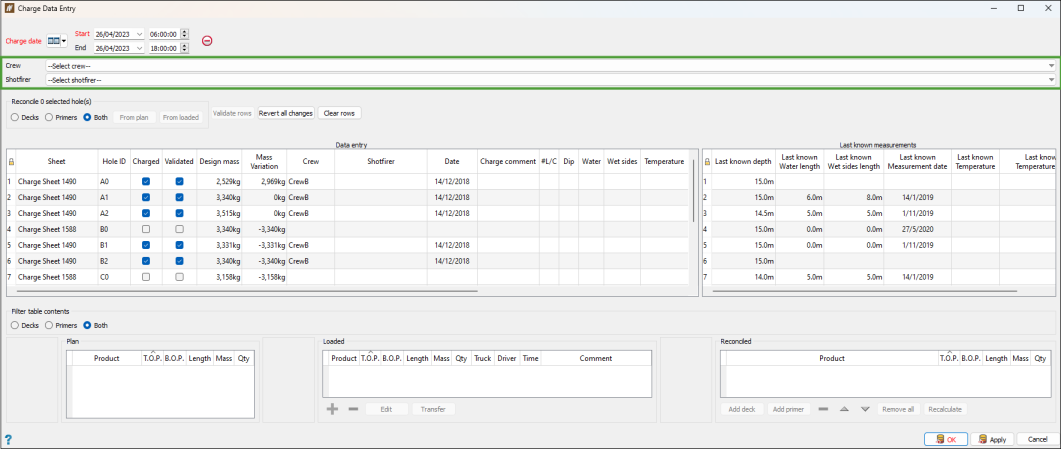
When you click on a row within the Data Entry or Last known measurements table, the information on the decks and primers applied for the hole corresponding to the selected row will be displayed in the Plan, Loaded, and Reconciled tables at the bottom of this panel. These three tables represent the following data states:
-
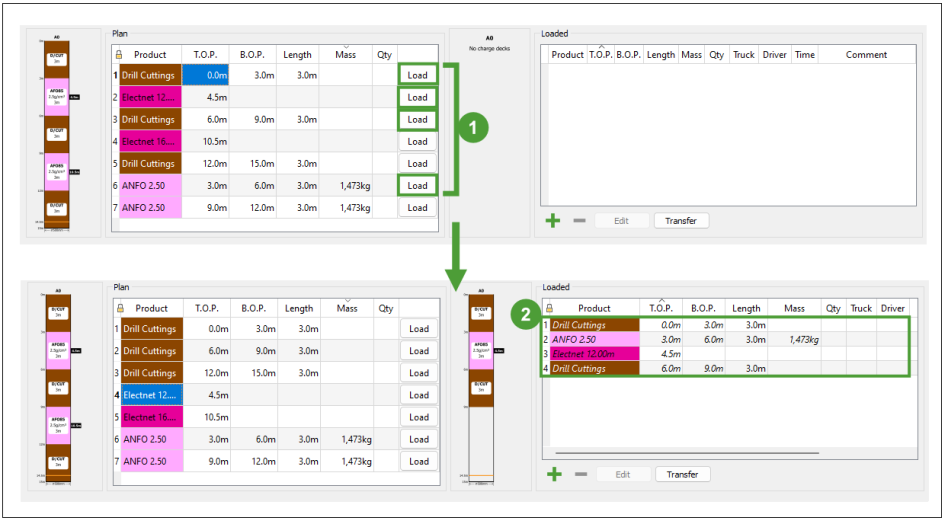
The Plan table shows the charge design data that has been loaded from the applied charge plan.
Note: You can click Load in the Plan table to directly load a product together with its parameters into the Loaded table.
-
The Loaded table shows the real-world data, which is the actual state that has been recorded by the charge truck operator.
-
Add a new deck or primer to this table by clicking
 and inputting the required information. The Shotfirer and Crew fields will be prefilled with the data you selected in the main Charge Data Entry panel.
-
Remove an item from the Loaded table by selecting it and clicking
 .
. -
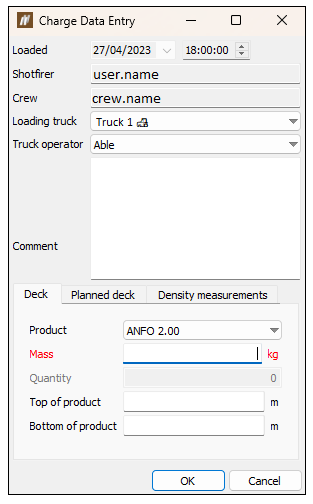
Edit an item in the Loaded table by selecting it and clicking Edit. Next, apply the necessary changes in the new Charge Data Entry window and click OK. The non-editable items will be greyed out.
-
Transfer charge data from one hole to another by selecting a hole with loaded data, clicking Transfer and applying the transfer settings in the new window.
-
The Reconciled table shows the validated charge data.
-
To add a new deck, click Add deck.
-
To add a new primer, click Add primer.
-
Use the
 and
and  buttons to change the position of a primer or deck within the table. The T.O.P. (Top of product) and B.O.P. (Bottom of product) of the moved product will be changed according to its new placement among other reconciled products.
 -
Click
 to remove a product from the table.
 -
Click Remove all to delete all products from the table.
-
After editing the length or mass of a product, click the Recalculate (length/mass) button below the table to ensure that the density of the deck adheres to the known density of the deck's product.
Note: If you apply any changes to a product's length or mass, you will need to validate the row corresponding to the hole in which the changes were made. To do so, select this row and click the Validate rows button, or select the Validated checkbox that exists within that row.
-
-
Validate rows: Allows you to validate data in the selected rows.
Note: The selected rows must be charged before they can be validated.
-
Revert all changes: Rolls back all changes that have been made since the last save.
-
Clear rows: Erases all data from the selected row, except for the design mass and mass variation.
-
By using the Reconcile [n] selected hole(s) radio buttons

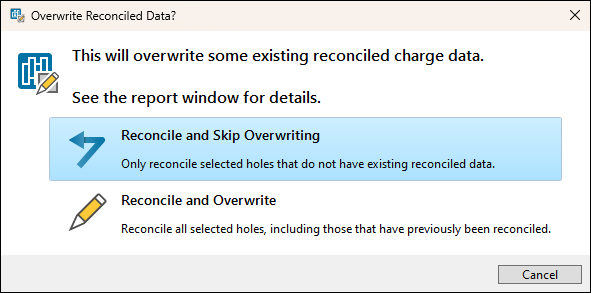
This method enables you to select which layers (decks, primers, or both) should be reconciled and which source charge they should be reconciled from: either the plan charge data or loaded charge data. The number of reconciled holes will correspond to the rows you select in the Data entry table. You can select a single row, multiple rows, or all rows.Note: The following dialog window will appear if the rows selected for reconciliation contain charge data that has already been reconciled. Select the desired behaviour to proceed.
 Tip!
Tip!-
Click ctrl + left mouse button to select multiple rows at once.
-
Click the empty field at the top left of the Data entry table to select all rows.

-
-
By selecting the Charged checkbox in the Data entry table for a hole that has not been marked as charged yet.
-
By editing the Crew, Shotfirer, Date, or Charge comment field of the Data entry table row with a hole that has not been marked as charged yet.

-
Clamp source primer depths to the hole bounds, so that no primers extend above the hole's collar or below its toe.
-
Copy source primers to the reconciled charge.
-
Clamp source primer depths to the hole bounds, so that no primers extend above the hole's collar or below its toe.
-
Copy source primers to the reconciled charge.
-
Clamp source deck depths to hole bounds, so that no decks extend above the hole's collar or below its toe.
-
Copy source decks to the reconciled charge.
-
Clamp source deck depths to hole bounds, so that no decks extend above the hole's collar or below its toe.
-
Merge any adjacent decks that share the same product. If the merged decks are explosive, sum their explosive charge masses.
-
Resolve overlaps: for each pair of overlapping decks, prioritise the one with the highest top-depth (as it is higher in the hole, it was recorded more recently, thus is considered to be more accurate).
-
Fill any remaining empty gaps.
-
If any portion of an empty interval overlaps any portion of an inert deck from the charge plan, fill that overlapping depth interval with the planned inert product.
-
Fill all remaining empty gaps with air.
-
-
Copy source decks to the reconciled charge.
-
The reconciled charge decks are continuous from the hole's collar (0.0m) to its last known depth, and contain no gaps.
-
The reconciled charge contains the entire range of products present in the source charge (though their depths may change to resolve overlaps).
-
The reconciled charge has the same explosive charge mass per product as the source charge.
-
Every source deck will have a corresponding reconciled deck that:
-
Contains the same product.
-
Covers the same depth interval down the hole (unless an overlap needs to be resolved, in which case the reconciled deck will cover as much of the source depth interval as it is permitted without causing overlaps).
-
Follow these steps to transfer charge data from one hole to another:
1. Select a hole with loaded data.
2. Click the Transfer button below the Loaded table. This will open a new panel.
3. Transfer the product.
In the panel that appears, the upper table represents the hole to transfer from, and the lower table represents the hold to transfer to.
a) In the upper table, select a deck or a primer from the hole to transfer from.
b) In the lower table, from the Hole ID drop-down for the lower table, select the hole to transfer to.
c) Click the ![]() button in between the tables on the right-hand side of the panel to transfer the product.
button in between the tables on the right-hand side of the panel to transfer the product.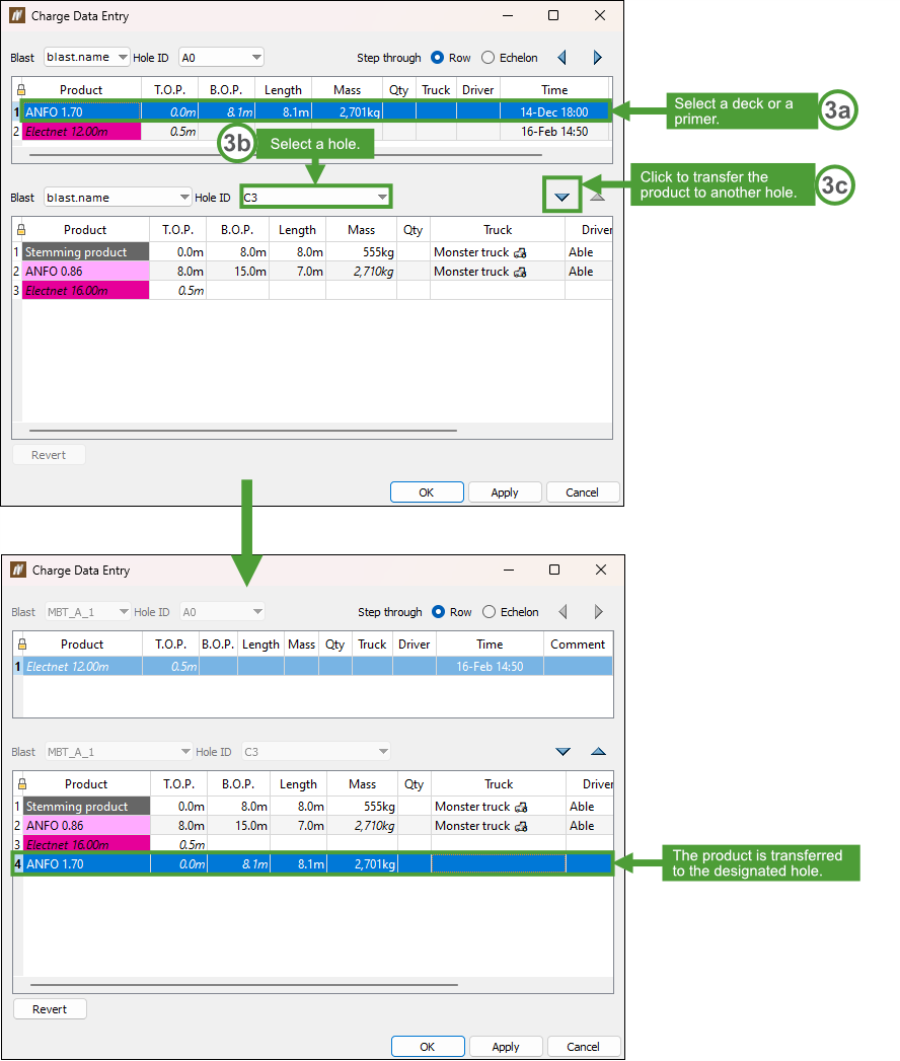
4. To transfer the product back to the previous hole, select a product and then click the right-hand side ![]() button in between the tables.
button in between the tables.
5. Click OK or Apply to save changes.
The three buttons placed above the Data entry table allow you to manage the data existing in the Charge Data Entry panel. These buttons are:
Charge data reconciliation
Reconciliation is a process that leads to confirming that the recorded charge data is valid. During this process, errors and anomalies that exist in the recorded data are removed. The Charge Data Entry panel allows you to reconcile your data in the following ways:
Charge reconciliation algorithm
The charge reconciliation algorithm operates differently in relation to whether primers, decks, or both are being reconciled. Moreover, when a deck is being reconciled, the applied algorithm will depend on the specified source charge — the operation for a loaded deck will be different from the operation performed in case of a planned deck. For more information on the behaviour in each operation scenario, see the below correlation matrix.
| Plan charge data | Loaded charge data | |
| Primer | Reconciliation algorithm:
|
Reconciliation algorithm:
|
| Deck | Reconciliation algorithm:
|
Reconciliation algorithm:
|
No matter which reconciliation path was executed, the reconciliation postconditions are as follows:
 Initiation Time Data Entry
The Initiation Time Data Entry tool enables you to add actual initiation timings to primers in a tie-up.
To add initial timings to primers in a tie-up, follow these steps :
-
Go to the Entry group on the Charging ribbon and select the
 Initiation Time Data Entry option. This will open a new panel.
 -
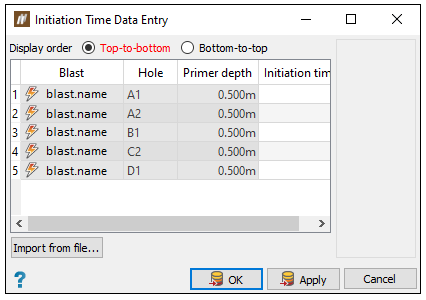
Select a blast in the data explorer that contains holes with reconciled primers. To reconcile primers, go to Charging ribbon > Entry group >
 Charge Data Entry, select holes with charge plans and click Charge as Design. The Initiation Time Data Entry panel will be populated with reconciled primers at the depth at which they are positioned and their corresponding hole.
-
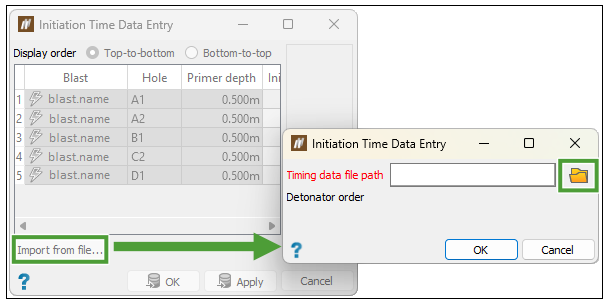
Initiation times can be entered for each reconciled primer or imported from an AXXIS logger file (.mlf). To do so, select the Import from file button and choose a timing data file path by clicking the
 button:
-
After choosing an *.mlf file, open it and select an actual tie-up design.
-
Confirm your selection by clicking OK.
 Bulk Edit Loaded Primers
The Bulk Edit Loaded Primers tool allows you to manually add and remove loaded primers to explosive columns in multiple holes that already contain a charge plan. Typically, loaded primers are added via the tablet application by operators, however this gives you the option of also adding and removing loaded primers. The tool can also be used to reset the number of loaded primers set in the original charge plan.
Note: The loaded primers cannot be changed for charged, fired, or abandoned holes.
Loading holes with primers as per the charge plan
- Select holes either from the view window or the data explorer.
-
On the Charging ribbon, in the Entry group, select
 Bulk Edit Loaded Primers
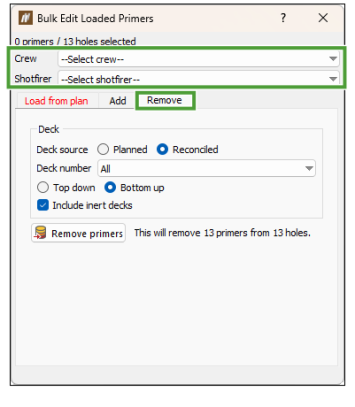
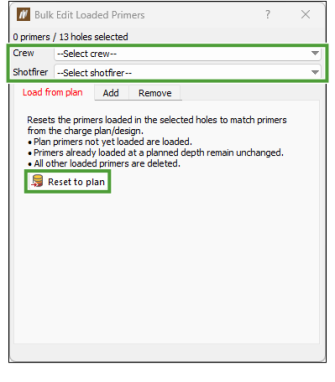
- Choose Crew and Shotfirer. On the Load from Plan tab, select Reset to plan. Primers will be loaded according to the charge plan.
Adding loaded primers
-
Select holes in the view window.
-
On the Charging ribbon, in the Entry group, select
 Bulk Edit Loaded Primers.
 -
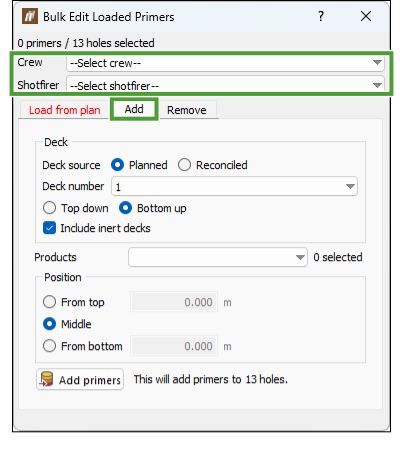
Choose Crew and Shotfirer.
- Select the Add tab.
-
Specify the Deck source:
-
Planned: Load data from the charge plan.
-
Reconciled: Load data that was first entered on the tablet and then validated in the desktop application.
-
-
Specify the Deck number to add the primer to and the location (Top down or Bottom up).
-
Optionally, select the Include inert decks checkbox.
-
Select the Products to add from the drop-down list.
-
Select the Position in the deck.
-
The panel will show how many primers will be added to the selected holes.
-
Click the Add primers button.
Removing primers
- Select holes in the view window.
-
On the Charging ribbon, in the Entry group, select
 Bulk Edit Loaded Primers.
 - Choose Crew and Shotfirer.
- Select the Remove tab.
- Specify the Deck source:
-
Planned: Load data from the charge plan.
-
Reconciled: Load data that was first entered on the tablet and then validated in the desktop application.
-
Specify the Deck number to remove primers from and the location (Top down or Bottom up).
-
Optionally, select the Include inert decks checkbox.
-
The panel will show how many primers will be removed from the selected holes.
- Click Remove primers.
