Entry
The Entry group of the Drilling ribbon contains tools that allow you to enter drill and survey data.

 Drill Data Entry
If you wish to bypass the autovalidation process, it is possible to create drill data entries on the desktop application. BlastLogic then uses these drill data entries to load as-drilled data onto the server. When using this method, BlastLogic does not perform autovalidation, however it still applies process tolerances. This involves comparing current measurements with design values. If the difference between the measurements is greater than the specified process tolerance, BlastLogic highlights the table cell in red.
To create drill entries, follow these steps:
-
Select the desired holes in the view window or data explorer.
-
On the Drilling ribbon, in the Entry group, select
Drill Data Entry. BlastLogic opens a new Data entry view window which contains the selected holes. The Drill Data Entry panel will also appear.

-
Select the desired times in the Drill date and Drill shift drop-downs.
-
Select the appropriate personnel in the Operator and Supervisor drop-downs.
-
Select the desired drill from the Drill drop-down and enter the diameter in the Drill diameter field.
-
Double click the desired cell in the Data entry table and enter the appropriate information. BlastLogic highlights the hole associated with the line of data selected in the data entry view. Alternatively, clicking on a hole in the data entry view highlights it in the table.
Note:BlastLogic highlights the drill depth cell in red if the difference between the entered data and the last known depth is outside the set tolerance. The specification tolerance definition is set in the Process tolerances tab of the Site Setup panel (Home > Setup >
 Site). For information on setting process tolerances, see the Process tolerances section on the Setup page.
-
Optionally, you can add ad hoc holes by clicking Ad hoc. You can then fill out the information fields in the Add Ad Hoc Entry panel and click OK. You can copy charge rule parameters of another hole to the ad hoc hole by selecting a location in the view. BlastLogic automatically transfers the nearest hole's charge rule parameters to the ad hoc hole. BlastLogic then adds the ad hoc hole to the bottom of the table on the left side of the panel.

-
Optionally, you can specify holes that have been redrilled by selecting the desired holes in the view window or in the panel and clicking Redrill. The redrilled holes are added to the bottom of the table on the left side of the panel and BlastLogic abandons the original holes once you save the data.
-
Click OK or Apply to save the data entries. BlastLogic displays the data entries on the right-hand side of the panel and highlights the holes in the view with drilled status colour.
Note: If the holes already have an incomplete drill sheet, BlastLogic will add the data to this sheet. Otherwise, BlastLogic will create a new drill sheet.
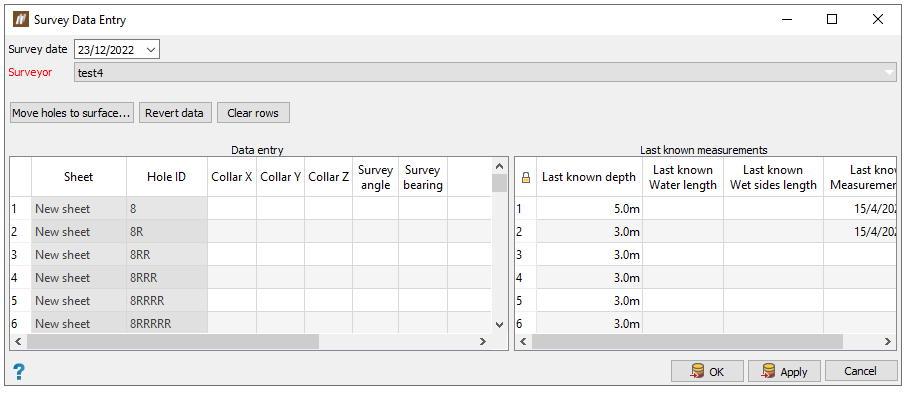
 Survey Data Entry
The Survey Data Entry tool allows you to create individual survey data entries. BlastLogic automatically creates linked survey sheets when you create survey data entries.
To create survey data entries, follow these steps:
-
Select the desired holes in the view window or data explorer. If the holes already have an incomplete survey sheet, BlastLogic will add the data to this sheet. Otherwise, BlastLogic will create a new survey sheet.
BlastLogic opens a new Data entry view window which contains the selected holes. The Survey Data Entry panel will also appear.
-
Select the appropriate information from the Survey date and Surveyor drop-downs.
-
Double click the desired cell in the Data entry table and enter the appropriate information. BlastLogic highlights the hole associated with the line of data selected in the data entry view. Alternatively, clicking on a hole in the Data entry view highlights it in the table.
-
Optionally, you can realign selected holes using a surface, according to the following steps:
-
Select Move holes to a surface.... The Survey Data Entry panel will appear.
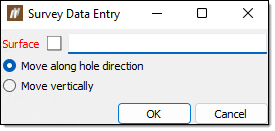
-
Specify the desired surface in the Surface field. To do this, either drag and drop the surface from the data explorer using the middle mouse button or specify the surface location using the format /cad/<surface name>.
Note: To create a surface, see the Surfaces page.
-
Select from the radio button options and click OK. BlastLogic will populate the survey table with the surface data. You can visualise this process of holes realignment with the following diagram:

-
-
Click OK or Apply to save the data entries.
Note: If the holes already have an incomplete survey sheet, BlastLogic will add the data to this sheet. Otherwise, BlastLogic will create a new survey sheet.