Observation History
Source file: modelling-observation-history.htm
The ![]() Observation History tool displays the history of vibration observations for a site.
Observation History tool displays the history of vibration observations for a site.
To open and use the Observation History panel, follow these steps:
-
On the Analysis ribbon, in the Modelling group, select
 Observation History. The main Observation History panel will appear.
-
There are four filter types that you can apply to filter the data presented in this table. You can either apply a single or multiple filters at the same time. Clicking Filter when all filters are unchecked will cause all observations to be displayed.
-
Filter by monitoring station: You can select multiple stations from the drop-down menu and only observations from those stations will be displayed.
-
Filter by tag: When you enter text in the Tag field, the list will be filtered to only include observations that have a tag containing the entered text.
-
Filter by detonation location: This will display all observations with detonation coordinates within the specified filter radius of the provided location.
-
Filter by date: This will display only the observations that were recorded between the first and the last date you provide.
-
-
To enter data, click the Add entry... button. This will open a new panel.
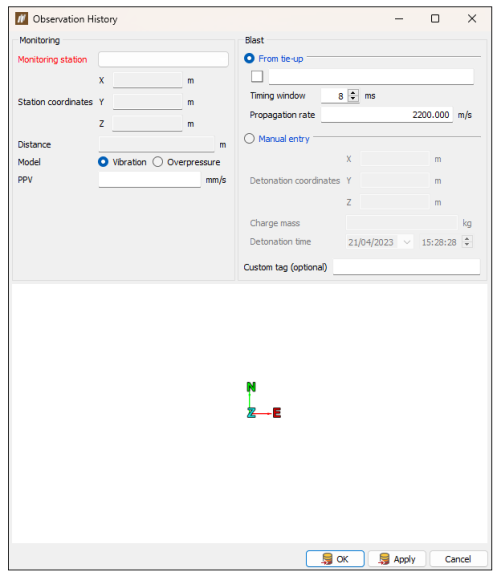
In this new panel, specify the following fields:
-
In the Monitoring section, select a monitoring station from the drop-down menu. This list features the locations for this site as defined in Locations (Home ribbon > Setup group >
 Site).
 -
Define at least one of either Vibration or Overpressure.
-
In the Blast section, use one of the two methods to enter an observation result: From tie-up or Manual entry. Using the From tie-up option requires a valid tie-up object to be middle-mouse dragged from the explorer to the tie-up field. BlastLogic will then calculate the detonation coordinates, maximum instantaneous charge (MIC) and detonation time from this tie-up using a Timing window and Propagation rate that you input. The detonation coordinates are defined as the collar location of the closest hole to the monitoring station that contributed to the MIC.
-
You can optionally enter a custom tag to help identify this vibration observation.
-
Click OK to save the vibration observation and close the panel.
-
The main Observation History panel also allows you to perform the following operations:
-
Click
 Delete row to remove the selected observation from the table. This also removes the vibration observation from the BlastLogic server database.
 -
Click
Import from CSV... to load vibration observations from a CSV file. -
Click Export table to CSV... to save the vibration observations that are currently filtered in the table to a CSV file.
-
You can edit the Vibration Observation table by double-clicking an editable cell. Any changes made can be saved by clicking
 Save changes.
