Blast Product Catalogue
The ![]() Blast Product Catalogue tool allows you to add a variety of blast product families to a drill and blast process. To open this tool, navigate to the Home ribbon > Setup group and select
Blast Product Catalogue tool allows you to add a variety of blast product families to a drill and blast process. To open this tool, navigate to the Home ribbon > Setup group and select ![]() Blast Product Catalogue. This will open the Blast Product Catalogue panel.
Blast Product Catalogue. This will open the Blast Product Catalogue panel.

Searching for a product
To find the required product in the catalogue, you can either:
-
Type its name in the Search field. BlastLogic will show all names containing the string of characters you have entered.

Or
-
Navigate through the list of saved products. Click
 to expand the given group and select the required product.
Tip: Click
 to expand all list groups or click
  to collapse all group items to display only the group names on the list.
Tip: Click on the group name to view the description of properties and possible applications of the given group of products.

Importing and exporting catalogue data
The Blast Product Catalogue panel allows you to import the blast product data into BlastLogic and export your blast product catalogue in a generated file.
Importing data
To import data into the blast product catalogue, click the Import button at the bottom of the panel. The file explorer will appear, allowing you to select the file you wish to import. Click Open to import the product.
You can also import a density table (in CSV format) for a family of bulk explosive products. To do so, follow these steps:
-
Select the parent product in the left side bar.
-
Select the Densities tab.
-
Click Import. The file explorer will appear.
-
Select an appropriate CSV file from the file explorer. The CSV should use the format demonstrated in the table below.
Depth Avg.In-Hole Toe Avg.In-Hole Toe Avg.In-Hole Toe 0 0.9 0.9 0.95 0.95 1 1 1 0.92 0.94 0.97 0.99 1.02 1.04 2 0.94 0.98 0.99 1.02 1.03 1.07 3 0.96 1.01 1 1.05 1.05 1.09 4 0.97 1.03 1.02 1.08 1.06 1.12 5 0.99 1.06 1.03 1.1 1.07 1.14 6 1 1.08 1.04 1.12 1.09 1.15 7 1.01 1.1 1.05 1.14 1.1 1.17 8 1.02 1.12 1.07 1.15 1.11 1.18 9 1.04 1.14 1.08 1.17 1.11 1.2 10 1.05 1.15 1.08 1.18 1.12 1.21 -
Click Open. If you select a child product, you will see the density table populated.

Exporting data
You can also export the blast product catalogue data you have configured in BlastLogic to the selected location on your computer. To do so, click Export at the bottom of the Blast Product Catalogue panel. The file explorer will appear, allowing you to select a location to store the BlastLogic catalogue file. Click Save to save the file to the specified location. You can later load your exported data to the blast product catalogue on the different site.
Adding products to the catalogue
To add new products to your catalogue, right-click on the container to which the given product family should be assigned to and click Add New <container name> (Add New <product name> or Add New <container name> Family in some cases).

Note: For containers where you can add a new product family, right-click on the given family to add multiple products to it.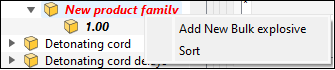
This will create a new product category after the selected container. Specify the properties of the newly added product by entering the related information in the provided fields.
Note: The Current stock level is a read-only field that takes the latest data from the inventory, based on the stocktake, check-in and check-out operations. See Inventory for more information.
After setting the required properties, click OK to apply them in your view and close the Preferences panel, or click Apply to apply your settings and stay in the Preferences panel.
Other operations
The Blast Product Catalogue panel also allows you to perform the following operations:
| Assigning cost to a product |
To assign cost to a product, follow these steps:
|
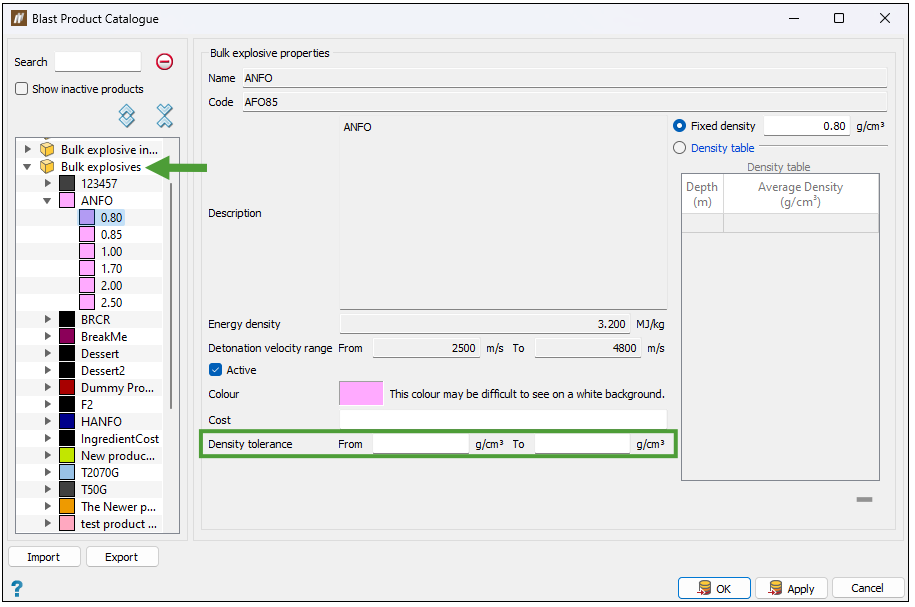
| Setting the range of tolerated density readings for an explosive product |
To set the range of tolerated density readings for an explosive product, follow these steps:
|
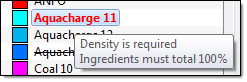
| Reviewing product errors |
To review any product errors, check for red product labels in the left side bar. The red font indicates there is an error with the product details. You can hover over the red product label to view the error and perform the necessary changes to fix the issue.
|
| Checking the state of a product |
To check the state of a product, view the name in the left side bar. BlastLogic emboldens edited blast products and italicises new blast products.
|
| Marking a product as inactive | To mark a product as inactive, select the product from the left side bar and clear the Active checkbox in the <family type> properties section. You cannot delete products, only mark them as inactive. |