Image Render
Source file: high-resolution-image-render.htm
The high-resolution image rendering allows a screen capture of the view window.
To use the image rendering function, follow these steps:
-
Click
 Image Render in the view window toolbar.
The High Resolution Image Rendering panel will appear.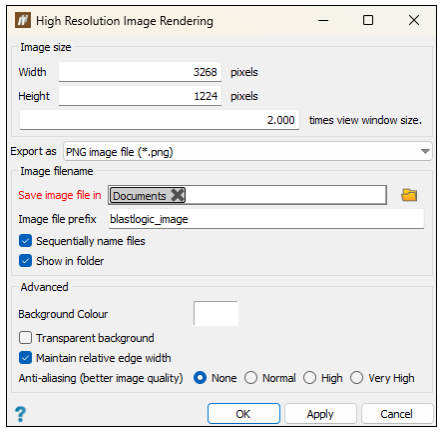
-
Input the required data:
-
Set the desired Width and Height of the image. To increase the size of the captured image, enter a number greater than 1 in the times view window size field.
-
Select the format (PNG, JPEG, or BMP) in which the file should be exported.
-
Select the location where the image should be saved by inputting the file path in the Save image file in field.
-
Give the file an Image file name or Image file prefix.
If you select the Sequentially name files checkbox, the images will be automatically named in sequence. In this case, you must specify the Image file prefix. If you do not select the checkbox, you must specify a unique Image file name. -
The more advanced settings are as follows:
-
Setting the background colour or applying the transparent background.
-
Maintaining the relative edge width.
-
Specifying anti-aliasing to achieve the required image quality.
Apply these settings as required.
-
-
- Click OK or Apply. The view window will be rendered to the specified file.
