Job Hub
The Job Hub is the DomainMCF interface for managing jobs. It appears as soon as you launch DomainMCF. From here you see all your DomainMCF jobs and their details, as well as create and run new DomainMCF jobs.
Tip: If you close the Job Hub window for any reason, you can get it back via the File > Job Hub menu option.
Overview
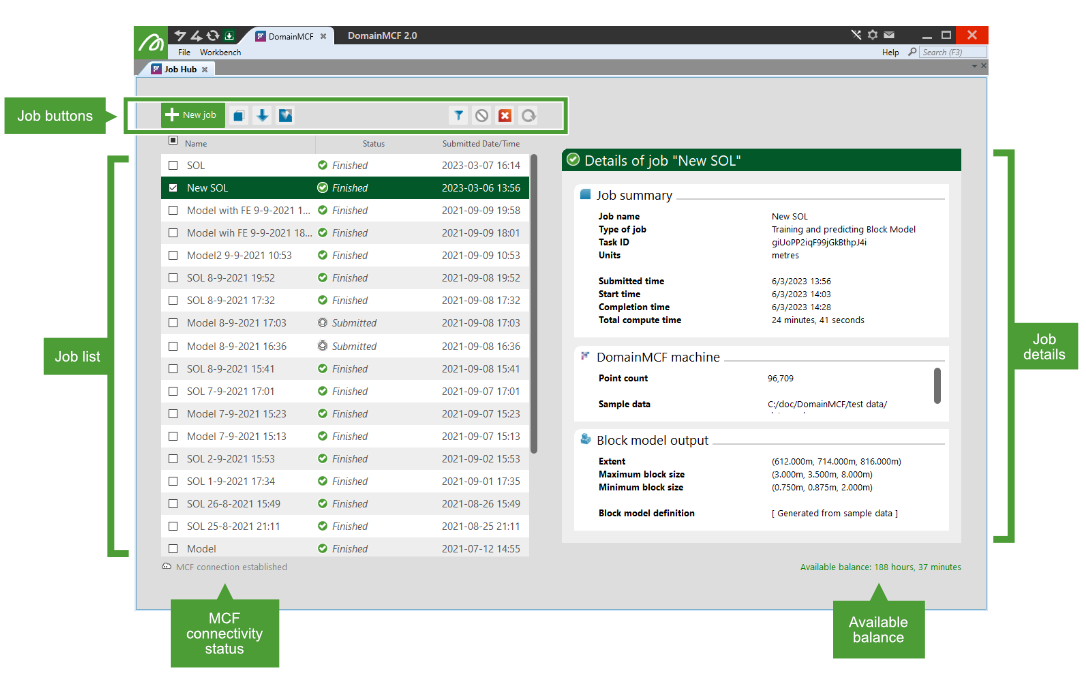
The Job Hub consists of the following main elements:
- Job list: This lists every job in the system in order of when the job was created, with the most recent job appearing at the top.
- Job details: This displays the details for the job highlighted in the job list. You can configure new jobs here, or view the details of submitted jobs.
- Job buttons: These allow you to perform various tasks related to jobs. See Managing jobs below for details.
- MCF connectivity status: This indicates whether a connection to the MCF The Maptek Compute Framework (MCF) is a cloud-based service that performs the computationally intensive parts of the DomainMCF process. This includes the tasks of training a machine learning model on a potentially large input dataset, and predicting domain boundaries based on this input. is established or unavailable.
- Available balance: This indicates the remaining number of hours on your MCF balance or the end date of your DomainMCF subscription.
Managing jobs
Jobs in the job list can be selected, highlighted, or selected and highlighted. A job is selected when a check mark appears in the checkbox in the left-most column of the job in the job list. A job is highlighted when its row has a solid background colour. See below for examples.

|
A selected job |

|
A highlighted job |

|
A selected and highlighted job |
-
To highlight a job in the list, click anywhere on the job’s row. Only one job can be highlighted at a time. The details of the currently highlighted job are shown in the job details area.
-
To select a job, you must click within its checkbox in the left-most column of the job list. Selecting a job will also highlight it. You can select multiple jobs at a time by clicking multiple job check boxes.
Important: Job operations using the tool buttons described below operate on the currently selected (checked) job or jobs, not the highlighted job. Some operations require a single selected job. These operations will be disabled if multiple jobs are selected.
You can manage jobs and the job list using the buttons located above the job list. These buttons are summarised below:

|
Create a new job See Creating a new job on this page for more information. |
|
|
Copy selected job A copy of the job will appear at the top of the job list with the same name as the original with - Copy appended. You can rename the job in the job details area. The copy will contain the same input data as the original (if available). |
|
|
Download selected job You can choose to download the output block model as either a block model file (.bmf) or comma-separated values file (.csv). Alternatively, you can download the trained DomainMCF machine. See Finished Jobs > Downloading a job for more information. |
|
|
View input data in a new GeologyCore project A new, temporary project will be created in GeologyCore. A container with the matching job name is created containing the following data:
Note
For this feature to work, the following conditions must hold:
|
|
|
Filter visible jobs This opens the Filtering Jobs dialog. You can filter jobs in the job list according to their state. To only show jobs of a particular state in the job list, click the |
|
|
Cancel selected jobs If you want to stop a job from running, you can cancel the job while it is uploading, in the queue, or in progress. To cancel a job, select the job’s checkbox in the job list and click |
|
|
Delete selected jobs You can delete a job at any time, unless the job is uploading, in the queue, or in progress. Deleting a job means that its contents (both input and output data) will be removed from the server. Deleting a job in the Draft state will remove the job from the job list. Uploaded Jobs that have finished processing will have their contents deleted, but the details of the job will still be maintained in the job list. You can hide such jobs from the job list using the filter option if desired.
|
|
|
Resume upload for selected Jobs Use this to rerun cancelled jobs. Cancelled jobs are listed as Submitted in the status column. |
Tip: You can clear the job list via the File > Clear Job List menu option. This will temporarily clear the job list of all jobs; however, jobs on the server that have not been deleted will reappear the next time the list is updated.
Creating a new job
DomainMCF automatically creates a new job for you whenever the job list is empty. Otherwise, to create a new job, click ![]() New Job located in the top-left corner of the Job Hub.
New Job located in the top-left corner of the Job Hub.

The new job will appear at the top of the job list. A job that has been created but never submitted for processing is marked as being in the draft state.
Configuring a draft job
You can configure the details of any job in the draft state by highlighting it in the job list and modifying its details in the details pane on the right.

For detailed information on configuring a job, see Configuring and Running a Job.
