Resource Codes
The Resource Codes tab allows you to assign resources to all of your pits and stockpiles. To manage the pit and stockpile areas, Evolution uses the concept of resource codes. In this tab, you can first set a pit attribute and a stockpile attribute. The pit attributes you can select from are shared by all of the pits in your setup and the stockpile attributes you can select from are shared by all of the stockpiles. The resource codes are the values of the pit attribute and stockpile you select.
You can then link the equipment to the pit and stockpile areas by assigning resources to each resource code. The equipment you assign to a resource code can work on all of the pit solids that have the corresponding resource code.
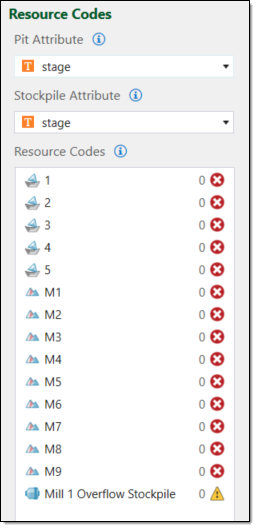
A pit may contain a stage attribute which consists of five stages with values 1, 2, 3, 4, 5. If you select stage as your pit attribute, the values of each stage are the resource codes. Each code is unique which allows you to easily assign resources to each stage. If you assign two diggers to the stage with resource code 1, these diggers will work on every pit solid with a stage attribute value of 1.
To assign resources to the pit and stockpile, follow these steps:
-
From the Configuration Setup Tabs, in the 2. Resource drop-down, select Resource Codes.
-
Select the attribute you wish to use from the Pit Attribute drop-down. Typical selections for the pt attribute include lithology type, stage and area.

The resource codes of the pit attribute you select will appear in the Resource Codes field.
-
Select the attribute you wish to use from the Stockpile Attribute drop-downs. If you do not have a stockpile in your setup, Evolution will disable the Stockpile Attribute drop-down.
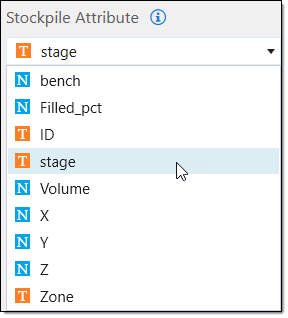
The resource codes of the stockpile attribute you select will appear in the Resource Codes field.
 Note:
Note:You can distinguish between the resource codes of each attribute by the following icons in the Resource Codes field:
- The
 icon represents a pit resource code.
 - The
 icon represents a stockpile resource code.
 - The
 icon represents an overflow stockpile.
The Resource Codes field will also contain Overflow Stockpile entries. Evolution creates an overflow stockpile for every mill in your setup and names the entry according to the corresponding mill. For example, a mill named Mill 1 will have an associated overflow stockpile resource code, named Mill 1 Overflow Stockpile. You can then assign these codes the resources required to move material to and from the overflow stockpile.
- The
-
Select a resource code from the Resource Codes field. Evolution will display the following resource fields in the window:
- The Available Resources field displays all of the resources in your setup. Epoch displays the trucks in terms of fleets and the other resources as individual items. You can then assign these resources to the selected resource code. For more information on the resources and fleets in your setup, see Resource Groups.
- The Associated Resources field displays the resource fleets you have assigned to the selected resource code.
-
Drag the desired resources from the Available Resources field to the Associated Resources field.
 Tip!
Tip!Alternatively, you can add a group of resources using the following keyboard shortcuts:
- To select a contiguous group of resources, use Shift.
- To select a group of non-contiguous resources, use Ctrl.
- To select all of the resources, use Ctrl + A.
- To copy the group of resources, use Ctrl + C .
- To paste the group of resources, use Ctrl + V .
-
Review the validation message. The in-tab validation messages indicate whether the resources you have assigned to a resource code are valid. The following messages can appear:
-
Valid
A valid message appears when all of the resources are able to work in the resource code.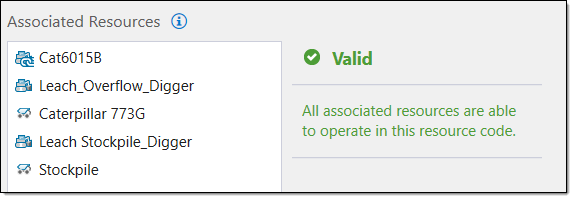
-
Invalid
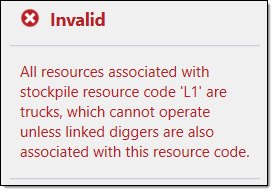
An invalid message can occur because of the following:-
No resources have been assigned to the resource code. In this case, no resources can work in the area defined by the resource code. For a stockpile, this issue produces a warning as no material will be reclaimed from the stockpile. For a pit, this issue results in an error as the area defined by the resource code will not be mined.
To fix this, add the desired resources to the selected resource code.

-
There is an issue with the resources you have assigned. For example, if you assign trucks to a stage, you must also assign diggers to provide the trucks with material to move.
-
Warning
A warning message will occur if the associated resources contain both valid and invalid components. The following warnings can occur:-
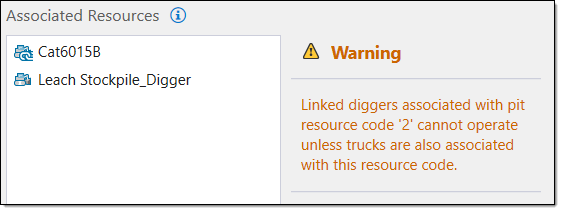
Epoch will provide you with a warning if you assign a linked digger and an unlinked digger to an area, without assigning a truck. This is because a linked digger without a truck is invalid but the configuration is still valid as the unlinked digger can work in the area.
-
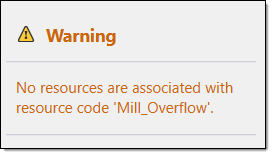
Epoch will provide you with a warning message if a stockpile contains no resources. Stockpiles do not need resources so this configuration is still valid but no material can be reclaimed from the stockpile.
-
-
-
-
Assign resources to the remaining resource codes. You can do this in either of the following ways:
-
Individually select each resource code and assign the desired resources using the Available Resources field and the Associated Resources field.
-
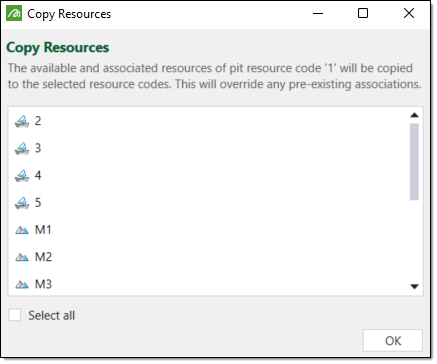
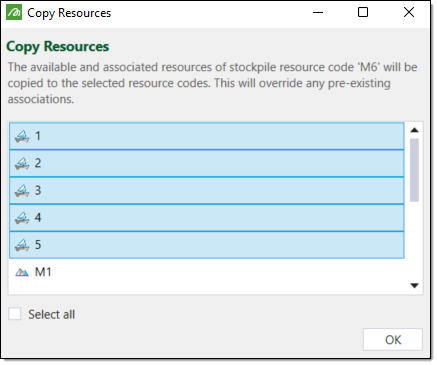
Copy the associated resources of the selected resource code to other resource codes, by following these steps:
-
Select Copy Resources.
The Copy Resources panel will appear, displaying a list of the resource codes.
-
Select the desired resource codes. Evolution will copy the current associated resources to the selected resource codes.
-
Optionally, select the Select all checkbox to copy the associated resources to every resource code.
-
Click OK.
-
-
-
Check for any invalid messages. If all of the resources codes appear in the Resource Codes field with a success icon
 then the codes are valid. If any codes appear with an error icon
  , you may need to review the resources associated with that code.
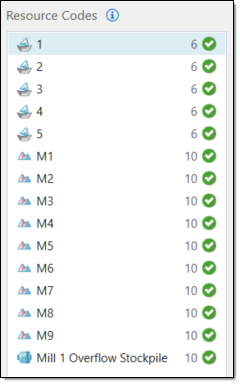 Note:
Note:The values next to the success icons indicate the number of the resources assigned to the corresponding resource code.
