5. View the Schedule
Source file: 5-origin-blocks-schedule-view.htm
Once you have downloaded your schedule, you can analyse the results using pivot reports. See Pivot Reporting for more information.
Tip: Right-click on the schedule in the project explorer and select ![]() Open to enter the schedule animation in the viewer.
Open to enter the schedule animation in the viewer.
Tip: Right-click on the schedule in the project explorer and select ![]() Open Schedule Report to see an overview of your schedule results.
Open Schedule Report to see an overview of your schedule results.
To analyse the violation of the objectives of your setup, see Fitness Charts.
If you would like to export the data and analyse it externally, Evolution also provides a number of export tools for Origin Blocks schedules. These tools are:
-
Export Basic Schedule to CSV... that saves the base material movement data as a CSV file.
-
Export Schedule to CSV... that saves the material movement and haulage data as a CSV file.
-
Export Schedule Triangulations... that saves the pit and waste triangulations of an Origin Blocks schedule.
-
Export Schedule to Microsoft Excel... that saves your schedule as an Excel file.
-
Export Productivity Data to CSV... that saves the schedule productivity outcomes as a CSV file. See Productivity for more information.
You can also generate a report summarising the road network data in your Equipment schedule. See Run Road Network Report for more information.
See also: Stamp Period and Rank to Original Model
To open any of the above tools, right-click on the schedule in the project explorer and select the required tool from the context menu.

Fitness Charts
The ![]() Fitness Charts tool allows you to see the degree of violation of your setup objectives in each period. Violations indicate an inability to achieve the set targets, which means the lower the violation, the better the outcome of your schedule is.
Fitness Charts tool allows you to see the degree of violation of your setup objectives in each period. Violations indicate an inability to achieve the set targets, which means the lower the violation, the better the outcome of your schedule is.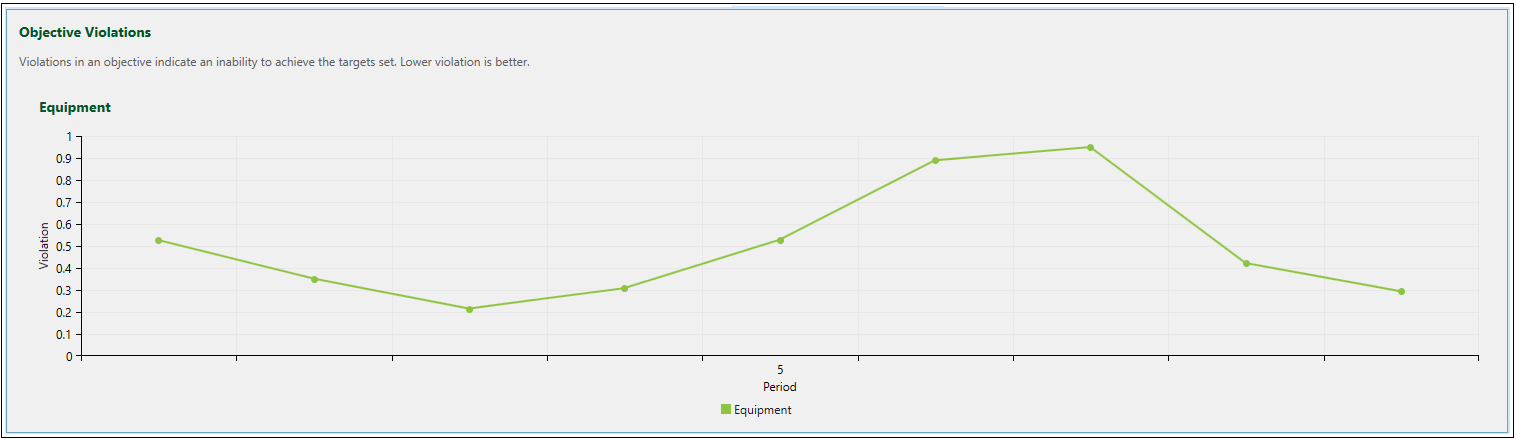
Export Basic Schedule to CSV and Export Schedule to CSV
Follow these steps to export a basic schedule or an overall schedule to a CSV file:
- Right-click a schedule report in the project explorer to open the context menu.
- Click
 Export Basic Schedule to CSV... or Export Schedule to CSV....
 - Choose the location to save the file, specify the file name and click Save.
Export Schedule Triangulations
Follow these steps to export the pit and waste triangulations of an Origin Blocks schedule:
-
Right-click on a schedule report in the project explorer and select
 Export Schedule Triangulations... from the context menu. The panel for applying the triangulation export settings will appear.
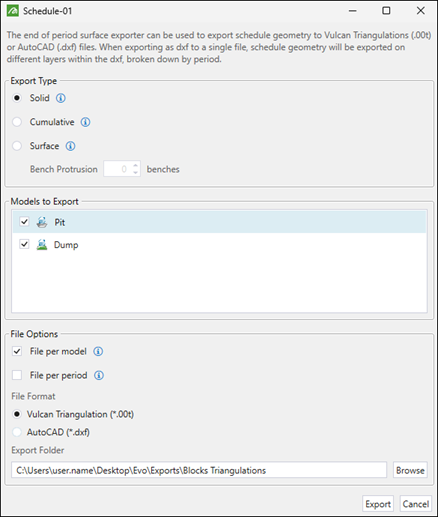
-
In the panel, set the following:
-
Export Type. Select one of the following radio buttons:
-
Solid: The export will have an enclosed shape to include all blocks that were mined or dumped into in a given period. This export type is intended for use with both pits and waste utilities.
-
Cumulative: The export will have an enclosed shape to include all blocks that were mined or dumped into from the start of the schedule up to the given period. This export type is intended for use with both pits and waste utilities.
-
Surface: The export will have an open shape to represent the shell of all blocks that were mined from the start of the schedule up to the given period. This export type is intended for use with pit models. When you select this option, you can additionally set the Bench Protrusion to create an extended collar above the perimeter blocks on the top layer of the model.
-
-
Models to Export. Specify the models that you want to export as triangulations by selecting the corresponding checkboxes.
-
File Options. Specify how the export files should be grouped by selecting the following checkboxes:
-
File per model: Export the period results for each model into separate files.
-
File per period: Export the results for each period into their own file. Models that do not have records for a given period will not have files generated.
-
-
File Format. Select either the Vulcan Triangulation (*.00t) or AutoCAD (*.dxf) radio button to specify the export format.
-
Export Folder. Click Browse to select the location under which you want the file to be saved.
-
-
After applying the required settings, click Export. The files will be saved under the selected location.
To view these individual triangulation files in your model, follow these steps:
-
Open file explorer and navigate to the folder that contains your exported pit or waste solid triangulations.
-
Open the required solid pit model in the viewer.
-
Drag and drop the desired triangulation into the viewer.
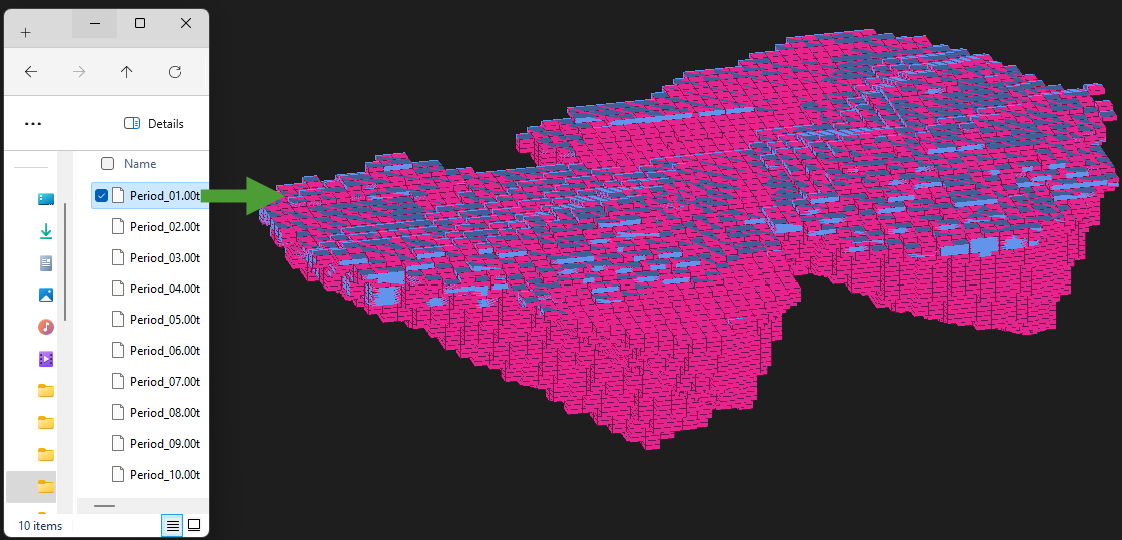
The triangulation will appear in the area corresponding to the blocks within the model in the viewer.
Export Schedule to Microsoft Excel
Follow these steps to export your schedule to an Excel file:
- Right-click a schedule report in the project explorer to open the context menu.
- Click
 Export schedule to Microsoft Excel....
 - Choose the location to save the file, specify the file name and click Save. The file will be saved under the selected location.
Export Productivity Data to CSV
Follow these steps to export your schedule productivity data to a CSV file:
- Right-click a schedule report in the project explorer to open the context menu.
- Click Export Productivity Data to CSV....
- Choose the location to save the file, specify the file name and click Save. The file will be saved under the selected location.
Run Road Network Report
A road network report summarises the time and distances travelled on each bench in a mined pit.
Note: The road network report can only be generated for Equipment setups.
To generate a road network report, right-click on a schedule in the project explorer and select ![]() Run Road Network Report. The report containing road network summary will appear in your workspace as follows:
Run Road Network Report. The report containing road network summary will appear in your workspace as follows: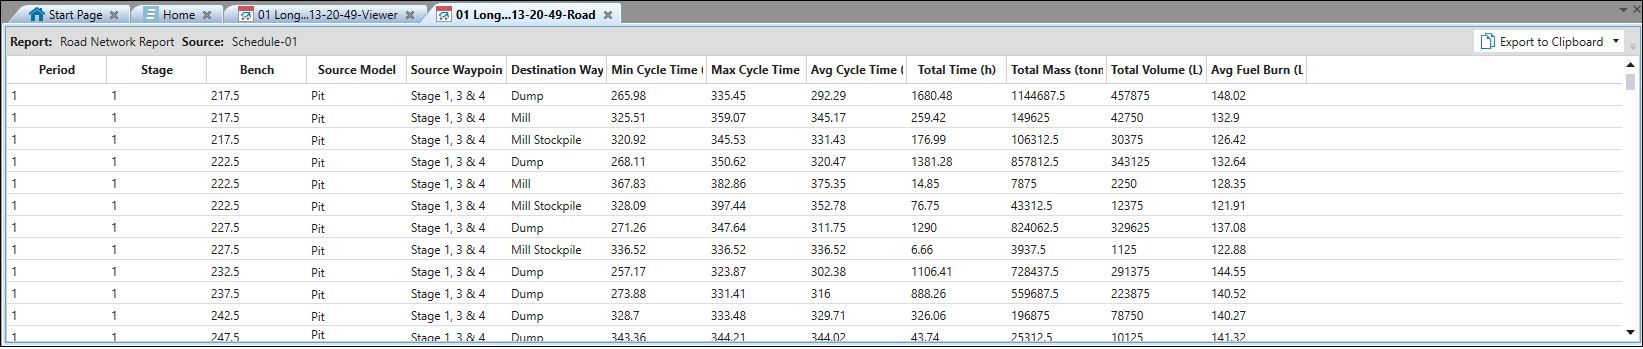
Each row of the report describes all trips required to transport material from every solid that:
-
Is mined in a certain period.
-
Belongs to a certain pit, stage, and bench.
-
Goes through a certain source waypoint and is delivered to a destination waypoint.
Tip: To copy the contents of your road network report, click ![]() Export to Clipboard in the top right corner of the view window. To save the road network report, click
Export to Clipboard in the top right corner of the view window. To save the road network report, click ![]() next to the
next to the ![]() Export to Clipboard, select
Export to Clipboard, select ![]() Export to CSV, and specify where to save the file.
Export to CSV, and specify where to save the file.
