Destination Priority
Each destination in an Epoch setup has an assigned priority. These priorities determine the order in which these locations are considered as potential destinations for material. The ![]() Destination Priority subtab allows you to create a detailed priority timeline.
Destination Priority subtab allows you to create a detailed priority timeline.
Note: When you first create a setup, the priority of each destination will be based on your default Evolution settings (see Assigning default destination priorities in Epoch for more information). Changing these priorities is optional.
Assigning default destination priorities in Epoch
To set the default destination priorities in Evolution, go to the Home ribbon > ![]() Settings and select the Epoch Priorities tab in the Settings panel. Next, assign the priority order to each listed destination.
Settings and select the Epoch Priorities tab in the Settings panel. Next, assign the priority order to each listed destination.
Important: A lower number indicates a higher priority, with 1 being the highest priority.
Note: These settings will be automatically applied to each new project you create.
You can also select a default colour scheme that will be applied to the destinations featured in the ![]() Destination Priority subtab.
Destination Priority subtab.
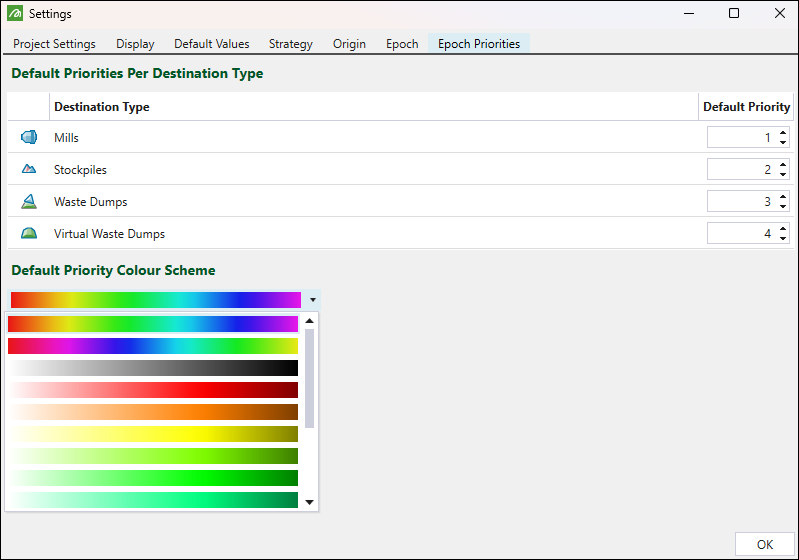
After configuring the required settings, click OK to apply them in your project setups.
Note: You can change these settings for each individual setup in the ![]() Destination Priority subtab.
Destination Priority subtab.
Assigning destination priorities in an individual setup
The ![]() Destination Priority subtab, nested under the
Destination Priority subtab, nested under the ![]() Process Setup tab, allows you to create, customise, and manage the timeline items for each destination of your setup.
Process Setup tab, allows you to create, customise, and manage the timeline items for each destination of your setup.
When you first enter the ![]() Destination Priority subtab, the priorities and colour scheme that you have specified in the
Destination Priority subtab, the priorities and colour scheme that you have specified in the ![]() Settings panel will be applied (see Assigning default destination priorities in Epoch for more information).
Settings panel will be applied (see Assigning default destination priorities in Epoch for more information).
You can change the default priority of each destination by assigning it with a new priority number.
Note: A new priority number assigned to a destination will override your default settings (see Assigning default destination priorities in Epoch for more information).
Destination Priority toolbar
The Destination Priority toolbar allows you to generate and customise the destination priority timeline for your setup.

The toolbar contains the following buttons:
|
|
Removes the selected priority item, reverting to the default destination priority.
See Changing the priority of timeline items for more information. |
|
|
Generates items on the destination priority timeline.
|
|
|
Generates colour schemes that are assigned to the priorities in your setup.
See Generating priority colour schemes for more information. |
|
|
Clears all existing items on the destination priority timeline. After clearing the timeline, each destination will revert to its default priority. |
|
|
Generates a CSV file that contains information on each destination, its priority, start and end dates of the timeline. You can save the file under the selected location on your machine. |
|
|
Imports destination priority data from the selected CSV file. To populate the timeline, the CSV file must contain the following columns:
|

Generating destination priority items
You can generate different priority items for each destination in your setup, or generate the same priority item for multiple setup destinations.
-
Click the
 button to add destination priority items to a single destination.
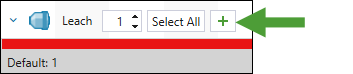
-
Click the
 (Generate Destination Priority Timeline Item) button in the toolbar to generate priority items with the same properties for multiple destinations in your setup.
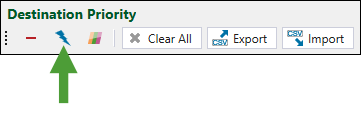
Clicking the ![]() or
or ![]() button will bring up the Generate Destination Priority Timeline Item panel.
button will bring up the Generate Destination Priority Timeline Item panel.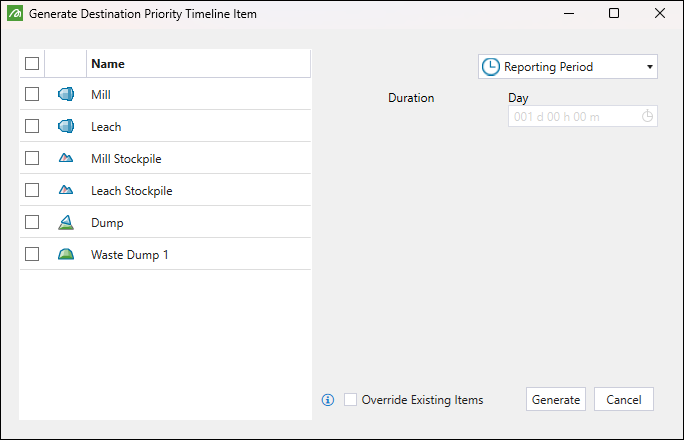
Set the following to generate destination priority items for your setup:
-
Select the destinations you want to add priority timeline items to.
-
Specify the intervals of your timeline by selecting from the following reporting types:
-
 Reporting Period: The interval duration will correspond to your setup settings.
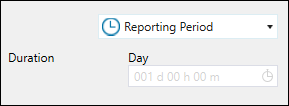 Tip
Tip
To change the reporting period, right-click on your setup in the project explorer, select Settings…, and select the required reporting period from the drop-down in the Edit Setup Settings panel.
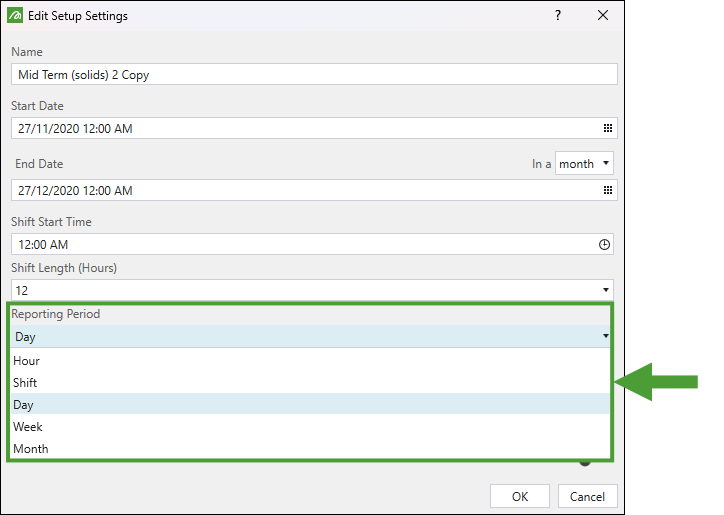
-
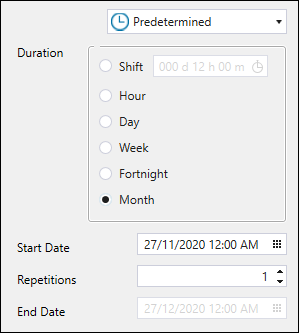
Predetermined: Specify the duration by selecting the required time interval, set the Start Date, and the number of repetitions. The End Date will be calculated based on the duration interval you have selected.
-
 Custom: Enter the required duration manually, specify the Start Date, and the number of repetitions. The End Date will be calculated based on the duration interval you have selected.
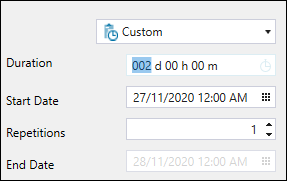
Note: The number of repetitions that you have to set for Predetermined and Custom duration will determine the number of destination priority items that will be created. For example, if you have set a monthly duration and the number of repetitions as five, then five destination priority items with a duration of one month each will be created.
-
-
Optionally, select the Override Existing Items checkbox. This will override the existing priority timeline items of the destinations you have selected in the Generate Destination Priority Timeline Item panel.
After configuring the required settings, click Generate to apply them to your setup.
Note: The timeline items are all created with the default priority value for each selected destination. You can adjust them further, according to your requirements. See Changing the priority of timeline items for more information.
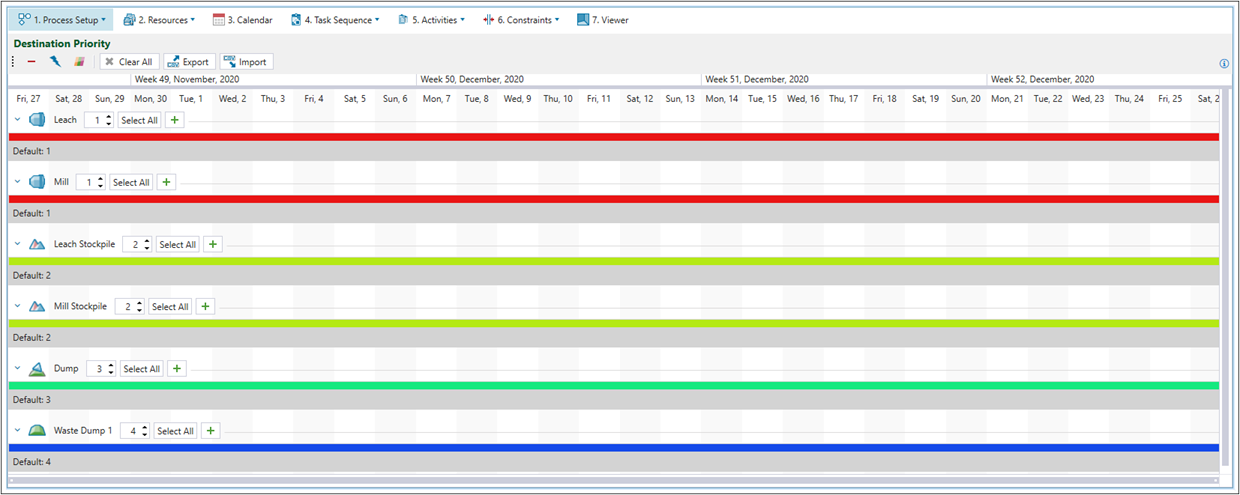
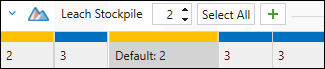
In the example below, the same timeline with the daily reporting period has been generated for all setup destinations. The default priorities that have been assigned to each destination in the ![]() Settings (see Assigning default destination priorities in Epoch for more information) are reflected in each reporting period.
Settings (see Assigning default destination priorities in Epoch for more information) are reflected in each reporting period.
Note: If you change a destination's default priority, the change will apply to all default priority items for that destination.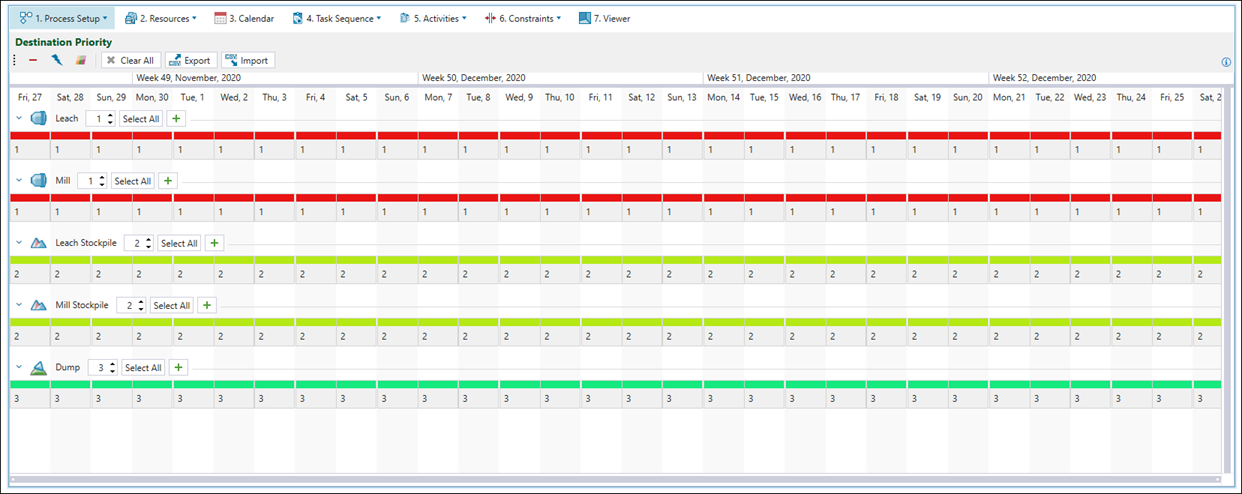
Changing the priority of timeline items
You can change the assigned priorities by:
-
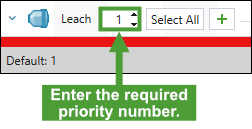
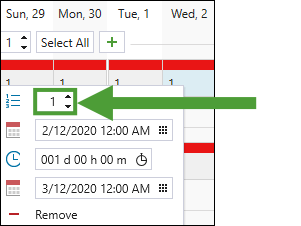
Clicking on a single reporting period and entering the priority number.
-
Selecting multiple reporting periods while pressing ctrl. After selecting the required periods, release the ctrl key and click on one of the selected periods to enter the same priority number for all of them.
 Tip
Tip
Click the Select All button to select all priority items within the given destination’s timeline.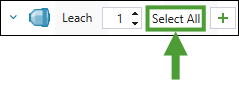 Note
Note
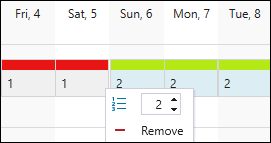
If you assign overlapping destination priority items to a time interval, the item in the higher row will take precedence. As shown in the image below, for the interval where priorities 2 and 4 are active, priority 2 will take precedence.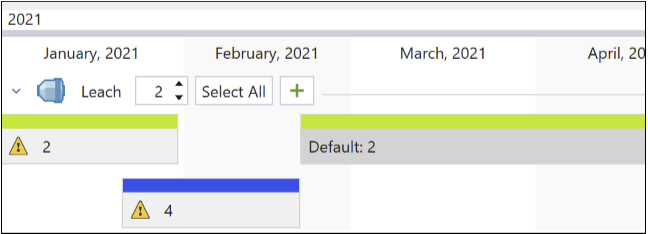
Generating priority colour schemes
Each time you change a destination priority in a given period, the colour representing the period will change to the one corresponding to the newly assigned priority.
Tip: You can set the default colour scheme for Evolution in the Epoch Priorities tab in ![]() Settings (see Assigning default destination priorities in Epoch for more information).
Settings (see Assigning default destination priorities in Epoch for more information).
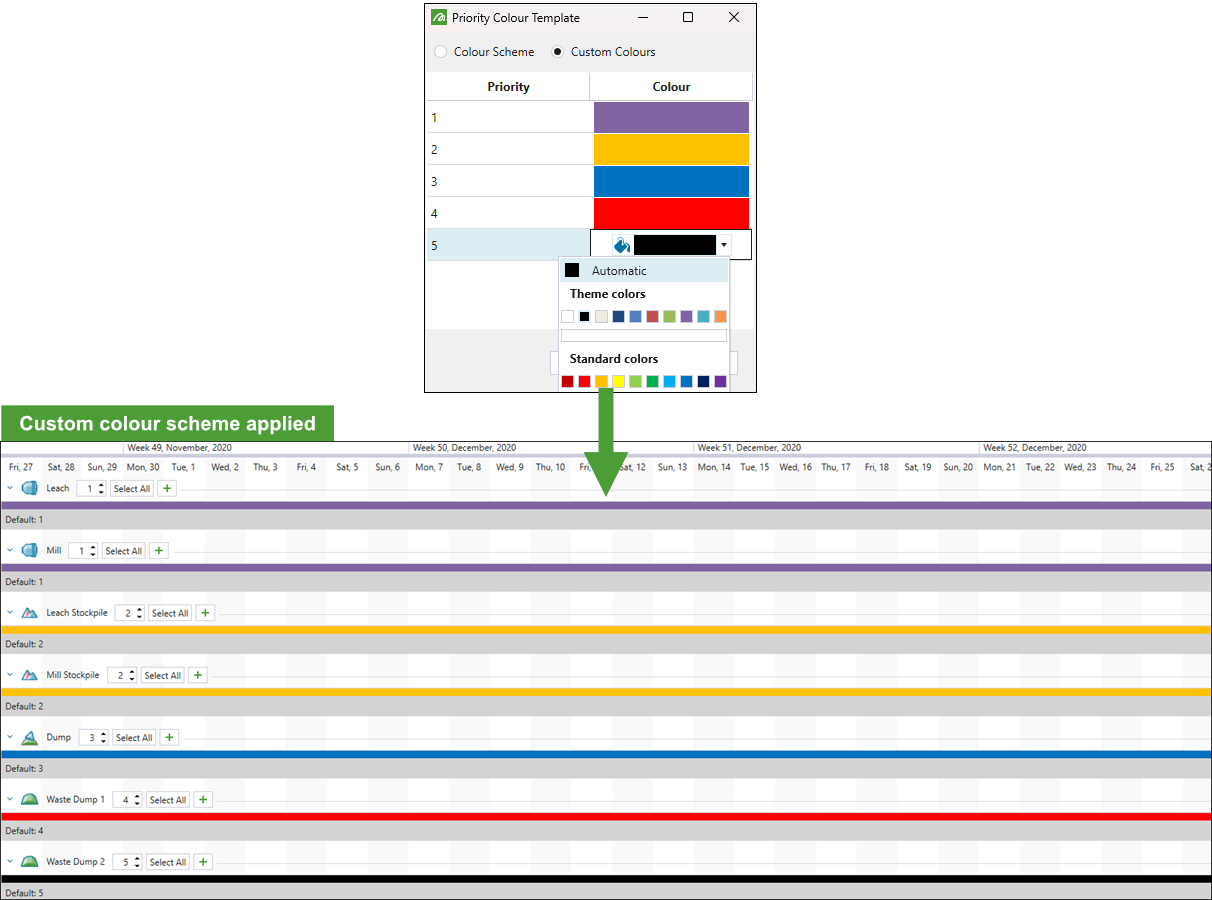
You can also change the default colour scheme you have selected and generate a customised colour scheme for a setup. To do so, click the ![]() (Generate Priority Colour Scheme) button in the Destination Priority toolbar. The Priority Colour Template panel will appear.
(Generate Priority Colour Scheme) button in the Destination Priority toolbar. The Priority Colour Template panel will appear.
-
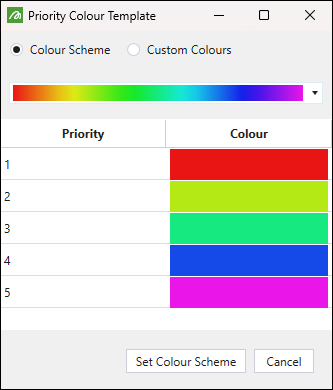
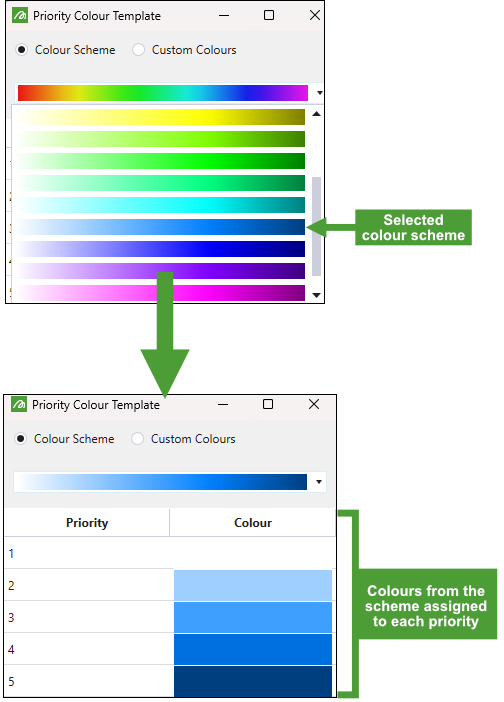
To use a predefined colour scheme, select one from the drop-down menu when the Colour Scheme radio button is selected. Click the Set Colour Scheme button to apply the colour scheme in your setup.
-
To customise the colour scheme, select the Custom Colours radio button. Next, click on each cell in the Colour column to set colours for the corresponding priority numbers. Click the Set Colour Scheme button to apply the colour scheme in your setup.