Importing a Block Model
Source file: origin-block-models-import-new.htm
Importing a pit (block)
Origin Blocks pit can be imported as a Vulcan block model file (.bmf), an Evolution block model file (.evbm), a comma-separated values (CSV) file (.csv), or an Evolution waste dump file (.evwd). To import an Origin Blocks pit, select ![]() Pit (Block) on the Home ribbon > Import Model group.
Pit (Block) on the Home ribbon > Import Model group.

A new file named Vulcan Block Model to Evolution Block Pit Transform will be created in the Transforms folder in your project explorer.
![]()
Note: If you create more files of this type, a consecutive number will be assigned to each of them. You can change the default name by right-clicking on the transform file and selecting ![]() Rename.
Rename.
The created transform file will also open in your viewer.
![]()
The operations that you can perform on this screen are the same as the operations performed when a block model is transformed. For more information, see Transforming a Block Model.
Updating block model attributes
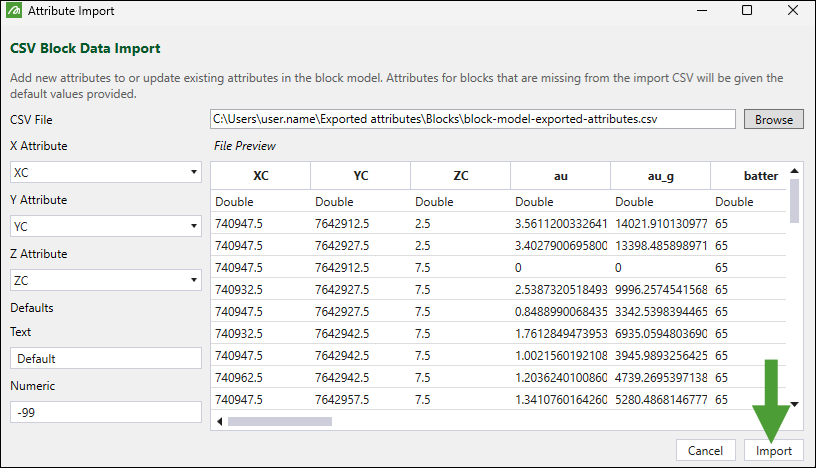
You can update block pit models in your project using a CSV file with the required information, formatted as shown in the image below.

Important: If your CSV file contains type column headers, each column type should be either Double or String.
To update an existing block pit model with the required attributes, follow these steps:
-
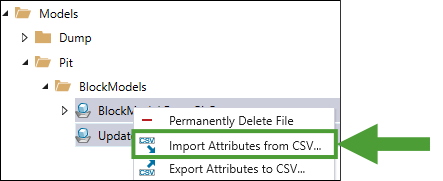
Right-click on the block pit model in the project explorer and select
 Import Attributes from CSV… from the context menu.
Tip: Press Ctrl to select multiple models at once.
-
In the Attribute Import panel, complete the following steps:
-
Click Browse to select the CSV file based on which you want to update the selected models.
-
Using the drop-downs, specify the attributes for X, Y, and Z coordinates.
Note
Evolution will automatically populate the drop-downs if your CSV file contains the following attribute names:For the X Attribute drop-down: X, XC, xcentre, xcenter, est, east, easting.
For the Y Attribute drop-down: Y, YC, ycentre, ycenter, nth, north, northing.
Fort the Z Attribute drop-down: Z, ZC, zcentre, zcenter, rl, elev, elevation, level.
-
-
After specifying all required attributes, click Import.
-
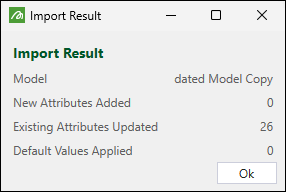
The Import Result pop-up informing you about the import outcome will appear. Click Ok to close it.
Tip: You can also right-click on the required block pit model and select ![]() Export Attributes to CSV… from the context menu, specify the location you want the file to be saved, and click Save. Use the saved file to update other block pit models, as required.
Export Attributes to CSV… from the context menu, specify the location you want the file to be saved, and click Save. Use the saved file to update other block pit models, as required.
Importing a waste dump (Block)
You can import a waste dump (block) as a Vulcan block model file (.bmf), an Evolution block model file (.evbm), a comma-separated values (CSV) file (.csv) or an Evolution waste dump file (.evwd). To do so, click the ![]() Waste Dump (Block) on the Home ribbon > Import Model group.
Waste Dump (Block) on the Home ribbon > Import Model group.

Evolution will create a new file named Vulcan Block Model to Evolution Block Waste Utility Transform in the Transforms folder in the project explorer.
Note: If you create more files of this type, a consecutive number will be assigned to each of them. You can change the default name by right-clicking on the transform file and selecting ![]() Rename.
Rename.![]()
The operations that you can perform on this screen are the same as the operations performed when a block model is transformed. For more information, see Transforming a Block Model.
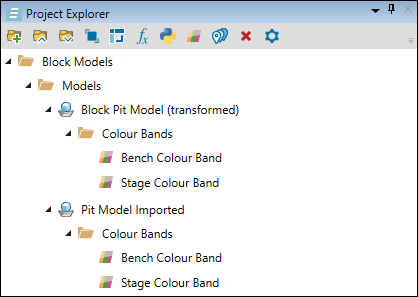
Note: For every model that you import or transform, Evolution will automatically generate a Bench and Stage Colour Band and place them in the project explorer. See Add Colour Bands for more information.