Blend
Source file: origin-block-setups-objectives-blend.htm
Origin Blocks supports producing schedules that maintain specified model variables between upper and lower limits for individual process feeds. If it is not possible to maintain these limits, the produced schedules will be minimising their violation. You can also use other constraints to further reduce these violations. For more information on the constraints in Origin Blocks, see Constraints.
Origin Blocks will try to achieve blend targets through prioritising mining sequences that produce better blend outcomes by redirecting material that was bound for a stockpile directly to a process and, optionally, by redirecting material between processes. In addition, if there are multiple stockpiles to reclaim from, Origin Blocks will choose the best stockpile for meeting your blend target.
Note: Redirect and automatic reclaim to achieve blend targets are only supported in setups that do not have Process Accumulation constraints, and in periods that have an end of period target set to Total Tonnes in the ![]() Calendar.
Calendar.
To include blends in your setup, you must select the Blend checkbox in the New Origin Setup panel window when you create a new setup.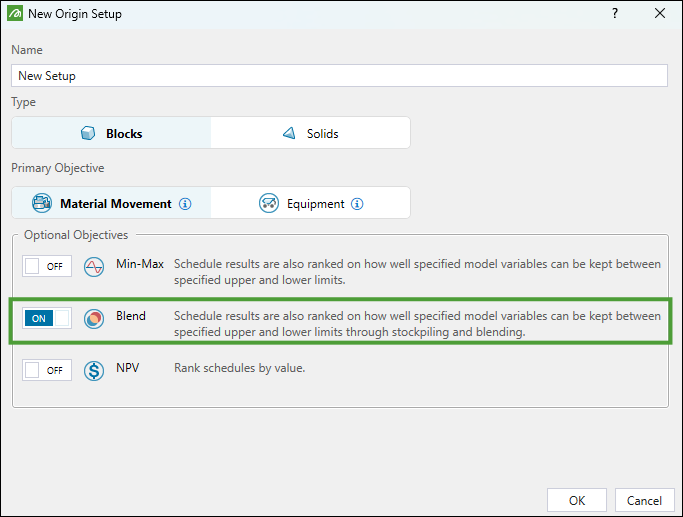
Note: The Blend and Min-Max objectives are mutually exclusive and cannot be applied to the same setup.
For more information on creating setups, see Create a Setup.
Operation sequence
Evolution makes changes in extraction sequence to try to meet blend targets in all setups where such targets have been set. These changes are made regardless of the End of Period (EOP) target that you have set in the ![]() Calendar >
Calendar > ![]() Targets subtab.
Targets subtab.
However, if you have set Total Tonnes as your EOP target, Origin Blocks will use the below sequence of steps to attempt to keep processes at capacity and within the blend target, as follows:
-
Attempt to meet process capacity and blend targets through the choice of mining sequence.
The mining sequence mines whole blocks, but considers the destination of individual parcels within each block (some parcels will go to waste, other parcels to stockpiles, and other parcels to processes). If this solution satisfies the mill capacities, then Origin Blocks takes no further action, even if blend targets are not met. If process capacities are not met, then Origin Blocks will proceed with Step 2. -
Redirect parcels bound for stockpiles to processes linked in the flowchart to better meet process capacities.
Origin Blocks can redirect up to half of all parcels in a period. If this redirection still does not satisfy the capacities, then Origin Blocks will proceed with Step 3. -
Reclaim ore from stockpiles to meet capacities.
If at this point capacities are still not achieved, Origin Blocks takes no further action, even if blend targets are not met. If capacities are met, but not the target blend, the Origin Blocks will proceed with Step 4. -
Swap parcels that were redirected in Step 2 for parcels that were not redirected.
Origin Blocks performs this swapping to see if it can achieve a better blend outcome. The swapped parcels may have lower tonnage than those originally chosen in Step 2. If this is so, and the blend is still not achieved, Origin will proceed with Step 5. -
Reclaim material from stockpiles to meet the target.
Blend configuration
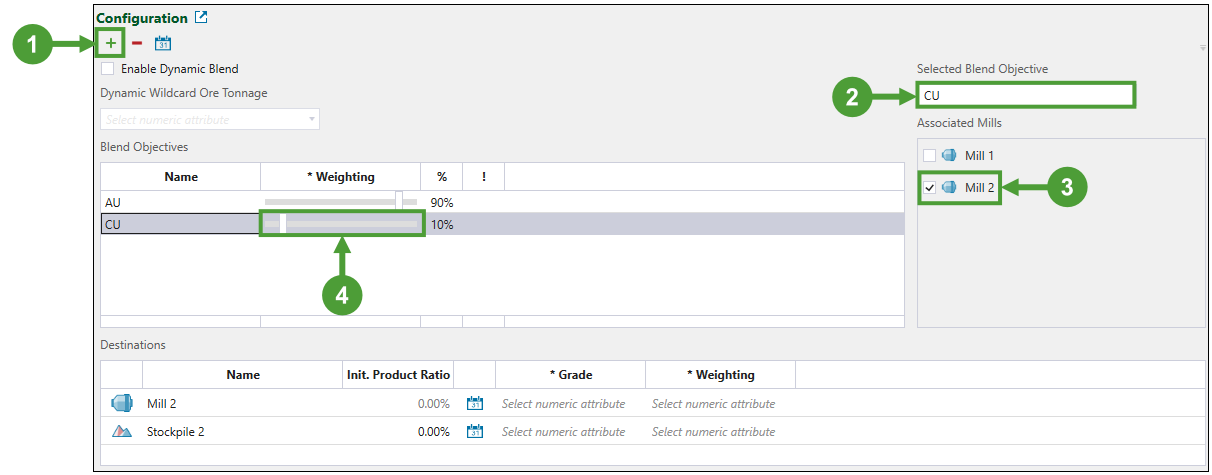
The ![]() Blend tab allows you to add and configure blend objectives.
Blend tab allows you to add and configure blend objectives.
Follow these steps to add a blend objective:
-
Click
 to add a new objective to the Blend Objectives table.
 -
Enter the name of your new objective under the Selected Blend Objective.
-
Select the mill to associate your objective with.
-
Specify the importance of your new blend objective in the schedule by setting the percentage using the slider in the * Weighting column.
Note: The sum of all blend objective weightings must equal 100%.
-
For each destination (associated mill and stockpiles linked to the mill), specify the grade and weighting values. You can do so by either:
-
Selecting the numeric attributes from the corresponding drop-downs. This will apply the same attributes to all periods of your setup.

Or
-
Clicking
 (Define on a period by period basis) button to specify different numeric attributes for each period of your setup. Go to the
  Calendar >
  Blend subtab and select the required grade and weighting attributes for each destination.
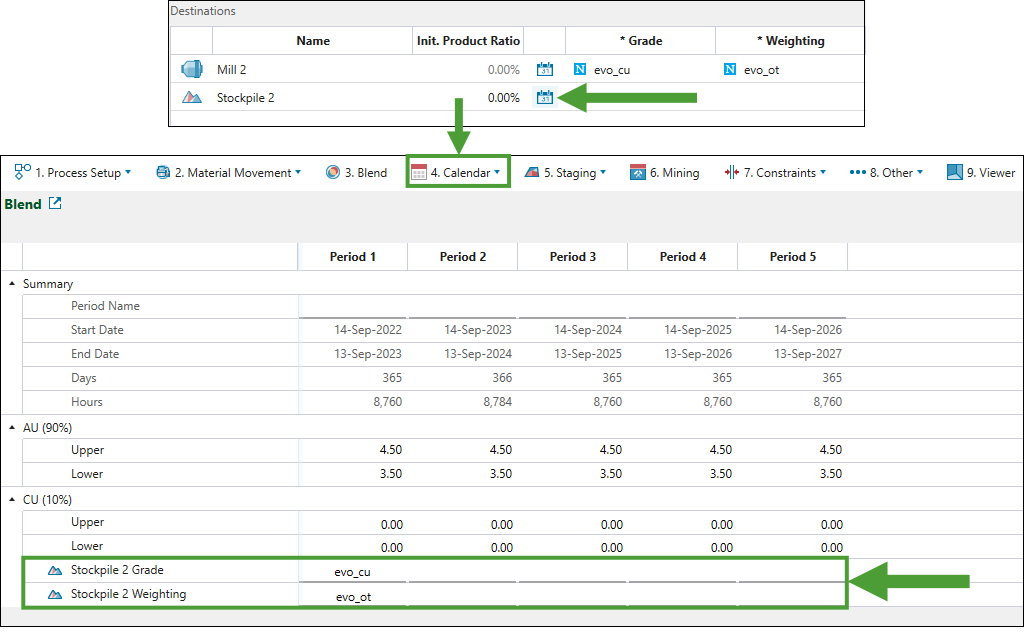
-
-
In the
Calendar tab > Blend subtab, set the range for mill processing by determining the upper and lower limits.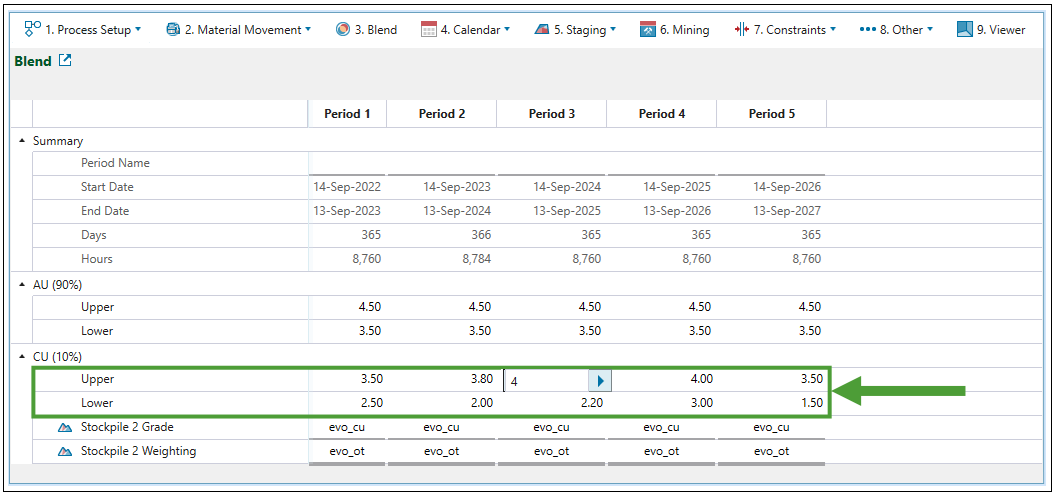
-
Click the
 button once to copy the properties of the current period to the next period.
 -
Double-click the
button to copy the properties of the current period to the subsequent periods until the end of the schedule. -
Alternatively, copy a cell's setting using Ctrl+C , then paste it into selected cells with Ctrl+V.
-
Dynamic blend
The Dynamic Blend option allows processes to have mutually inclusive ore definitions set in the ![]() Calendar. When it is enabled, Origin Blocks can determine which process the mined ore should be sent to. This allows for more flexibility in choosing the target process, which results in achieving better blends.
Calendar. When it is enabled, Origin Blocks can determine which process the mined ore should be sent to. This allows for more flexibility in choosing the target process, which results in achieving better blends.
To set this mode, select the Enable Dynamic Blend checkbox.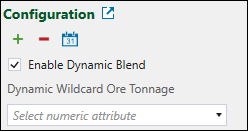
To set the Dynamic Wildcard Ore Tonnage, select the required numeric attribute from the drop-down menu. This will allow the material to pass the definition of multiple mills, with Evolution deciding whether the material should be sent to the mill or stockpile.
Note: If Blending and Dynamic Blending are not enabled, the stockpile ore definition must be mutually exclusive from the ore definition provided for the mill. This ensures that no block can satisfy the definition for more than one destination because the Origin Blocks module uses these definitions to determine where the ore tonnes from each block should be sent.
Important: Blending functionality might be restricted by the characteristics of your setup. For example, if you have applied Ore Tonnes as the end of period target, redirecting material from the mill would cause the mill to work under its capacity.
After you enable the dynamic blend in the ![]() Blend tab, Evolution will generate additional fields for you to configure in the
Blend tab, Evolution will generate additional fields for you to configure in the ![]() Blend subtab that is nested under the
Blend subtab that is nested under the ![]() Calendar tab.
Calendar tab.
The additionally generated fields will be as follows:
-
Dynamic Block Classification: Enter the ore definition in each setup period for the Dynamic Plant and each destination of your setup.
Note: The Dynamic Plant enables you to create overlapping ore definitions that will allow parcels to pass definition of more than one location, which is not normally possible in Origin Blocks. This will result in sending each parcel to a unique destination.
Important: The ore definition for the Dynamic Plant must cover all other definitions.
Example
Note: As blend requirements change over the life of a site, you can model the changes in your targets by setting different values in each period. When evaluating a schedule, Evolution will compare the average achieved grade in relation to the maximum and minimum grade you have set. For example, if the minimum and maximum target grades are 1 and 1.4 respectively, and the achieved average grade is 1.5, the calculated violation (that Evolution will take into account while ranking your schedule) will be 0.1.
Tip: While there is no explicit way to disable blend target in a period, you can apply a range of values that encompasses all possible cases, which will effectively turn off the blend target in the given period, for example, when you set the total tonnes target to be more than 0 (block.tt > 0).
-
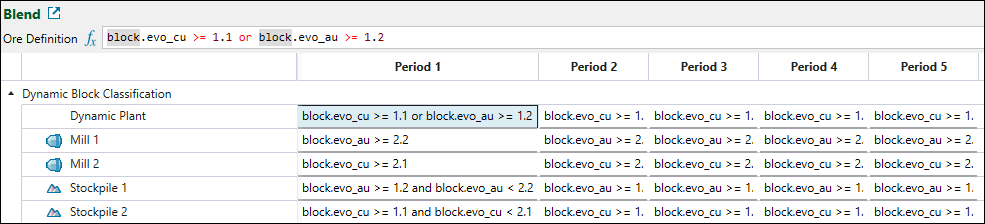
Ore-related Dynamic Grade and Weighting: Select the attributes from the drop-down menu in each period.
Important: The additional dynamic blend fields under the mined ore in the
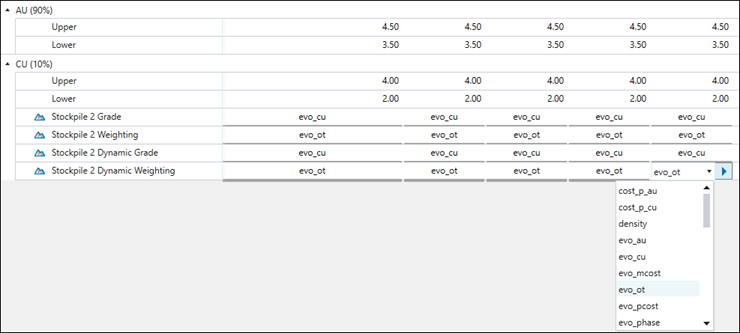
Blend subtab will be generated only for the destinations for which you have selected Set in calendar in the Destinations table of the Blend tab. As shown in the example below, the Set in calendar configuration type has been applied to the Grade and Weighting for Stockpile 2 (which processes copper in the given setup). Consequently, the Dynamic Grade and Dynamic Weighting fields have been added for Stockpile 2 under the CU (copper) category in the Calendar > Blend table.
See Blend configuration for more information on configuring blend setting fields.Example