Step 1: Load Geological Data
![]()
To get started in Vulcan GeologyCore, you will need to bring some data in. When you load data into Vulcan GeologyCore, a local copy is created and stored in your project![]() A Vulcan GeologyCore project is a local store of your data. A project is stored physically on disk in a database folder with a .maptekdb extension. Most data that you load into Vulcan GeologyCore is imported as a copy, although some data can be imported as a live link back to the source file(s).. This local copy acts like a snapshot of the data that you can modify without changing the source data. The local copy also helps to ensure consistency during the modelling process as you test different scenarios. As new data becomes available, your geological model can be updated without having to set up any of the process again. When the model is completed, you can publish the data back to the source database.
A Vulcan GeologyCore project is a local store of your data. A project is stored physically on disk in a database folder with a .maptekdb extension. Most data that you load into Vulcan GeologyCore is imported as a copy, although some data can be imported as a live link back to the source file(s).. This local copy acts like a snapshot of the data that you can modify without changing the source data. The local copy also helps to ensure consistency during the modelling process as you test different scenarios. As new data becomes available, your geological model can be updated without having to set up any of the process again. When the model is completed, you can publish the data back to the source database.
Loading data for geological modelling
Drillholes are the main data source for generating geological models. You can load drillhole information into Vulcan GeologyCore from a variety of sources, including:
-
Vulcan Isis drillhole databases (*.isis)
-
Vulcan ODBC link drillhole databases (*.dsf)
-
Comma-separated values (CSV) files (*.csv)
You can also load other data, including:
-
Legends—for colouring drillholes or block models by attribute.
-
Composites—which can be used to generate an implicit or DomainMCF model. If your drillholes already have domains defined and composites created, you can go straight to Step 4: Generate a Model.
-
Triangulations—which can be used to limit the scope of your geological model, help define your domains, or to aid in manual interpretation.
-
Design Data—for comparing to your geological model or preparing limits for your drillhole data. Design data has the file extension dgd.isis. Design data can also be used as interpretive data when implicit modelling.
-
Block Model Definitions—for defining the parameters when generating block models using DomainMCF modelling.
These key data types used in geological modelling can be efficiently loaded into Vulcan GeologyCore at any time using the ![]() Load Vulcan Data tool, located in the Data group on the Home, Modelling, DomainMCF and Stratigraphic ribbon tabs. The tool automatically detects relevant data in your Vulcan project folder.
Load Vulcan Data tool, located in the Data group on the Home, Modelling, DomainMCF and Stratigraphic ribbon tabs. The tool automatically detects relevant data in your Vulcan project folder.

Follow these steps to load geological data into Vulcan GeologyCore using the Load Vulcan Data tool:
-
Launch the Load Vulcan Data tool and select the files to import.
-
Click
 Load Vulcan Data on the ribbon.
The Load Vulcan Data panel appears.
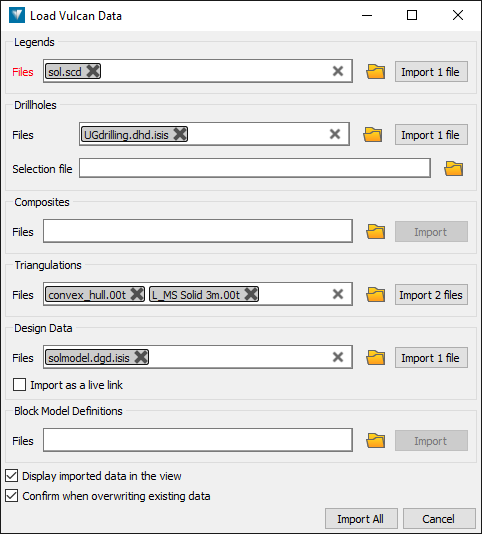
Relevant files found in the data folder are automatically listed in each file type section.
-
Select the files you wish to import.
-
Click
 on a file to remove it from the list of files to import.
 -
Click
 on any list to clear all files from the list.
 -
Click
 to the right of any Files field to browse for files to import. Browsing and selecting new files will replace the current file selection.
The Files field in each section lists the files of each type to import.
-
Under Legends, select your Vulcan legend file (*.scd).
-
Under Drillholes, select any number of drillhole databases (*.isis, *.dsf, *.csv) to import.
-
CSV drillhole databases consist of multiple files, each representing the collar, survey, geology or other information about the drillhole set. Select all the CSV files you wish to import—at a minimum this must include the file defining the drillhole collars.
-
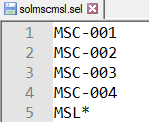
In Selection file, optionally specify a drillhole selection file (*.sel) to import only a subset of drillholes. A selection file is a text file containing a list of hole names. Names can use an asterisk (*) as a wildcard. Only drillholes with names found or matched in the selection file will be imported. Below is an example of a selection file.
-
-
Under Composites, select any number of Vulcan composite database files (*.isis, *.dsf) to import.
-
Under Triangulations, select any number of triangulation files (*.00t, *.**t) to import.
-
Under Design Data, select any number of Vulcan design data files (*.dgd.isis) or CAD files (*.arch_d) to import.
-
Select the Import as a live link checkbox to import the files as a live link. This means that any changes made to the files in Vulcan will automatically propagate to Vulcan GeologyCore.
-
-
Under Block Model Definitions, select any number of Vulcan block model definition files (*.bdf).
-
-
Tip: You can import other data types not listed in the Load Vulcan Data tool. On the ribbon, navigate to Home > Data >
 Import.
 -
-
Import selected files.
To import selected files, do one of the following:
-
Click Import n files (e.g. “Import 2 files”) in any given file type section to import only the files listed in that section.
-
Click Import All to import all files listed on the panel.
-
-
Confirm drillhole database import.
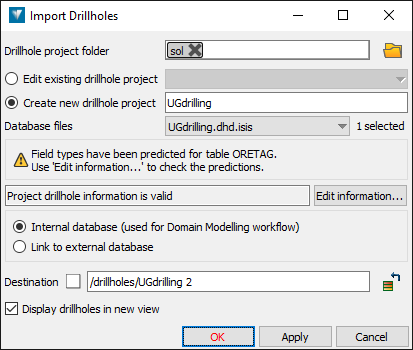
If you chose to import a drillhole database, a panel appears where you can configure and confirm the import.
-
Configure the database import settings.
It is recommended to use the default import settings. You can, however, modify the import settings.
Tip: Be sure to select the Internal database radio button if you want to use the Domain Manager to dynamically code domains.

-
Set the location of the drillhole database files next to Drillhole project folder.
-
Choose to edit an existing or create a new drillhole project file.
Drillhole project information such as table and field mappings is stored in a drillhole project file with the extension .maptekdhp in the drillhole project folder.-
Select Edit existing drillhole project to use an existing drillhole project file in the drillhole project folder.
-
Select Create new drillhole project to create a new drillhole project file in the drillhole project folder.
-
-
Edit the set of drillhole database files to import from Database files.
-
Click Edit information... to edit the drillhole project information, such as table and field types and coordinate system information.
If there is an existing drillhole project file (*.maptekdhp) in the drillhole project folder, Vulcan GeologyCore will use it to establish the table and field mappings. If not, Vulcan GeologyCore will attempt to automatically assign mappings. In either case, you can inspect and edit the project information with this tool.
Specifying the coordinate system is optional. You will not need to do this if all the data is in the same coordinate system. Specify a coordinate system if you want to use data from different systems, or if you want to transform data from one system to another.
-
Choose the database type.
-
Select Internal database to create an internal copy of the database within your Vulcan GeologyCore project. An intervals table will be created to store the domains to be modelled. Changes you make to the database within Vulcan GeologyCore will not affect the source files until you explicitly publish.
-
Select Link to external database to use the drillhole database project files directly. Changes made to the drillhole database within Vulcan GeologyCore will be reflected immediately in the database source files.
Important! This option is not recommended as it is not compatible with the domain modelling process.
-
-
Set the path in the project explorer to import the database to next to Destination.
-
Select the Display drillholes in new view checkbox to display the drillholes in a new view when import is complete.
-
-
Click OK to import the data.
The data is imported, and by default is stored in various standard containers within your project.
If you selected the Display imported data in the view checkbox on the import panel, the imported data will be displayed in a view window.
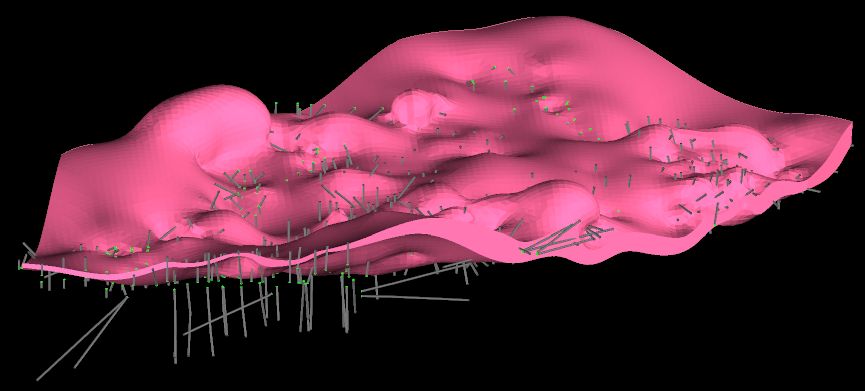
When import is complete, Vulcan GeologyCore automatically performs some consistency checks on the drillhole database, which you can inspect in the report window.
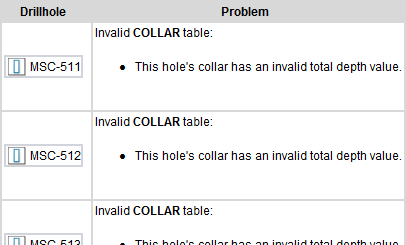
The report is also saved to a CSV file in your data folder.
-
To view the CSV file in the Workbench CSV Editor, drag the file
 from the report window onto the Workbench Start Page tab.
 -
To show the CSV file in a Windows file browser, simply click on the CSV file
 in the report window .

In Step 2 of the Vulcan GeologyCore Workflow, you’ll learn how to fix any problems detected.
-
-