Colour Dip and Strike
Colour by dip and strike colours facet networks based on the dip or strike values of the individual facets. This helps to highlight discontinuities and planar areas and makes it easy to see fractures.
The Colour by dip and strike tool is a preliminary way of marking exposed discontinuities. The resulting information may be used for further analysis using the geotechnical tools.
To colour by dip or strike:
-
Go to Geotechnical > Colour dip and strike.
-
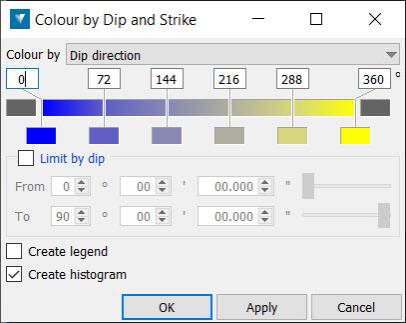
Set the Colour by field to dip direction, dip or strike.
-
The colour scale of the colour scheme editor may be adjusted manually by sliding the vertical edges of the coloured cells representing the colour bands. Colours may be selected from a colour palette for individual cells, or preset colour schemes may be applied to colour the entire range. Calculate range determines the distance settings for the colour scheme based on minimum and maximum separation between the base object(s) and the selected object. Right clicking on the top line of coloured cells displays further options for editing colour bands and the automated arrangement of colours. These include:
-
New — This option splits a colour band in two, adding a new colour band to the range of colours in the colour scheme editor.
-
Intervals — This option provides further numerical control over the spacing of colours.
-
Spread evenly — This option distributes the total colours evenly over the distance range.
-
Colour scheme — This option lets you select from preset arrangements of colours.
-
Copy/Paste/Undo/Redo — These options let you perform the selected operation to the colour scheme editor.
-
-
The From and To dip and strike fields may be used to limit the colouring to a particular set. This highlights which fractures are part of the same set.
-
Checking the Create legend checkbox creates a secondary container named Colour by dip and strike legend.
-
Checking the Create histogram checkbox to create a histogram.
