Global Settings
Note: You must be assigned a role that has either the Edit Settings or Manage Users/Roles permission enabled to manage settings.
To manage global settings, click the ![]() (Settings) button in the top-right corner of GeoSpatial Manager.
(Settings) button in the top-right corner of GeoSpatial Manager.

 Site Settings
Note: You must be assigned a role that has the Edit Settings permission enabled to manage site settings.
Important: Some site settings cannot be changed after surfaces have been uploaded. It is recommended to define these settings during initial configuration.
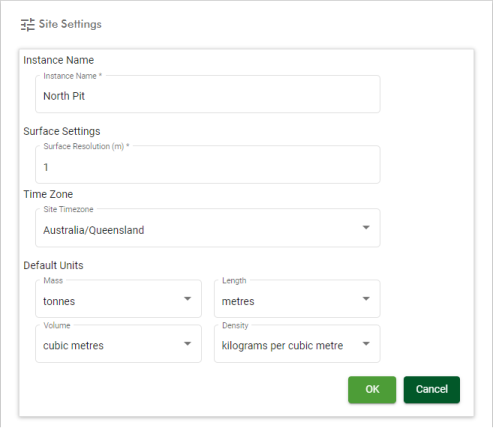
Configure the site settings as follows:
| Instance Name | Enter a unique identifier for the instance. |
| Surface Settings | Surface Resolution |
Enter the resolution in metres at which the surface is modelled (default = 1 m). A higher resolution means the data will display at a high level of detail, but merging and visualising can take longer. Important: Surface Resolution cannot be changed after surfaces have been uploaded. |
| Time Zone | Site Timezone | The timezone to display dates and times in. |
| Default Units | The mass and volume units to display measurements in. |
-
Click OK to save any changes to the site settings.
-
Click Cancel to cancel any changes and revert back to the previous settings.
 Coordinate Systems
Note: You must be assigned a role that has the Edit Settings permission enabled to manage coordinate systems.
When importing a surface, GeoSpatial Manager needs to know the coordinate system the surface is in to ensure that it is correctly located. The Coordinate Systems tab allows you to manage your predefined coordinate systems.
You can also manage coordinate systems when importing surfaces. In the ![]() Import Surface tool, when selecting surfaces to import, a Coordinate System tab appears to the right. Click the
Import Surface tool, when selecting surfaces to import, a Coordinate System tab appears to the right. Click the ![]() button to the right of the Coordinate System field to manage coordinate systems.
button to the right of the Coordinate System field to manage coordinate systems.
Managing coordinate systems
-
To edit the configuration of coordinate system, click on it in the list, then configure the settings as explained in Coordinate system settings below.
-
To define a new coordinate system based on a PROJ, WKT2, or EPSG format, click Add, then configure the settings as explained in Coordinate system settings below.
-
To import a coordinate system that has been defined and exported from other software such as Maptek PointStudio, see Importing a coordinate system below.
-
To delete a coordinate system, click its
 button in the Delete column.
You cannot delete a coordinate system flagged as being the default. To delete such a coordinate system you will need to first clear its Default flag.
Coordinate system settings
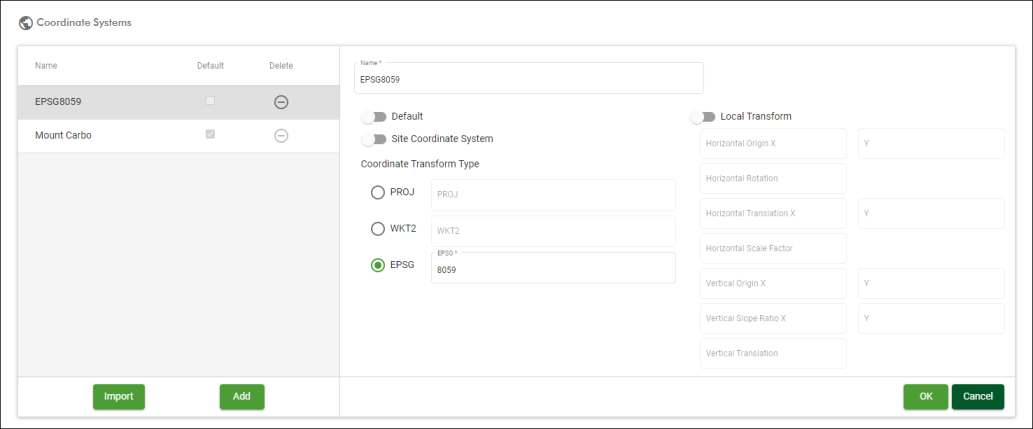
Configure the coordinate system settings as follows:
| Name | Enter a name for the coordinate system. This name will appear in the coordinate system list for future use. |
| Default | Enable this option to set the coordinate system as the default. All new imported surfaces will be assumed to be in the default coordinate system unless otherwise specified. |
| Site Coordinate System | Enable this to flag the coordinate system as being the site coordinate system. All uploaded surfaces are converted to the site coordinate system and stored in that system. If you do not explicitly specify a site coordinate system, the coordinate system of the first uploaded surface becomes the site coordinate system. |
| Coordinate Transform Type |
Define the coordinate reference system format to use, as follows:
|
| Local Transform | Enable this option to define a local transform. This can be used to adjust a standard coordinate system to your site. |
Importing a coordinate system
You can import a coordinate system that has been defined and exported from other software such as Maptek PointStudio.
Tip: You can export a coordinate system from PointStudio from the Coordinate systems tab in the PointStudio preferences.
To import an existing coordinate system:
-
In the Coordinate Systems panel, click Import.
-
Drag the coordinate system file from a Windows File Explorer onto the Coordinate System Upload panel that appears.
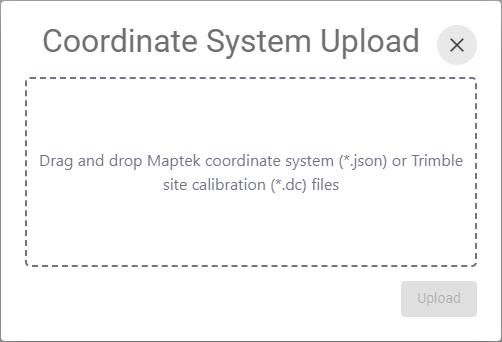
Alternatively, click within the dashed area on the panel to open a file browser. Select the coordinate system file and click Open.Coordinate system files must be one of the following:
-
A coordinate system exported from Maptek software as a JSON file (.json)
-
A Trimble site calibration file (.dc)
You can import multiple coordinate system files simultaneously.
-
-
Click Upload.
GeoSpatial Manager will upload the file. After uploading, you may need to validate the details and enter further information such as the coordinate system name. -
Press OK to save the coordinate system.
See also: Importing Surfaces > Coordinate System
 File Name Parsers
Note: You must be assigned a role that has the Edit Settings permission enabled to manage file name parsers.
File name parsers can be used when importing surfaces with file names that follow a systematic naming scheme that incorporates the date or date and time of the surface. The import tool uses the parser to extract the date and time from the file name and applies it to the surface when merging so that it is inserted into the correct point in time.
-
To create a new file name parser, click Add. Then, configure the parser as explained below.
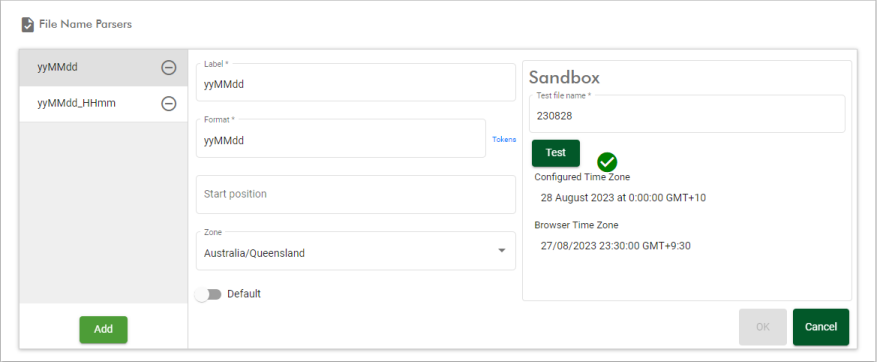
Label Enter a unique name for the parsing format.
Format Enter the date/time format corresponding to the file naming scheme. You need to specify the format in terms of a sequence of tokens that represent the expected date or time component, or other tokens such as separators. The most common tokens are shown in the table below.
Token Description Example yyyy Year 2023 MM Month as a two-digit padded number 09 dd Day of the month as a two-digit padded number 30 HH Hour in 24-hour time as a two-digit padded number 14 mm Minutes as a two-digit padded number 15 ss Seconds as a two-digit padded number 00 As an example, the date/time 2:15 pm, September 30, 2023 might be represented in a filename using the ISO 8601 format as 2023-09-30T141500. A format that can correctly parse such a string would be yyyy-MM-ddTHHmmss.
Click the tokens link to the right of the Format field for a complete listing of all possible tokens.
Start position Optionally specify the position within the filename to start searching for the date/time from. A positive number will trim N characters from the beginning, while a negative number will trim N characters from the end.
Zone Select the time zone applicable to interpreted dates and times.
Default Enable this option to set the parsing format to the default. This means you won’t need to manually select the file format parser each time you import a surface.
Sandbox As you define the format, you can test the result of applying the format to a filename in the Sandbox area on the right-hand side of the panel. Enter a filename in the Test file name field, and click
 .
.Click OK to save the format.
-
To delete a file name parser, click its
button.
See also: Importing Surfaces > Time
 Geoid Files
Note: You must be assigned a role that has the Edit Settings permission enabled to manage geoid files.
A coordinate system defined in WKT2 format can reference a geoid file. Upload any such geoid files in the ![]() Geoid Files tab.
Geoid Files tab.

 Users
Users
Note: You must be assigned a role that has the Manage Users/Roles permission enabled to manage users. See Roles on this page for more information.
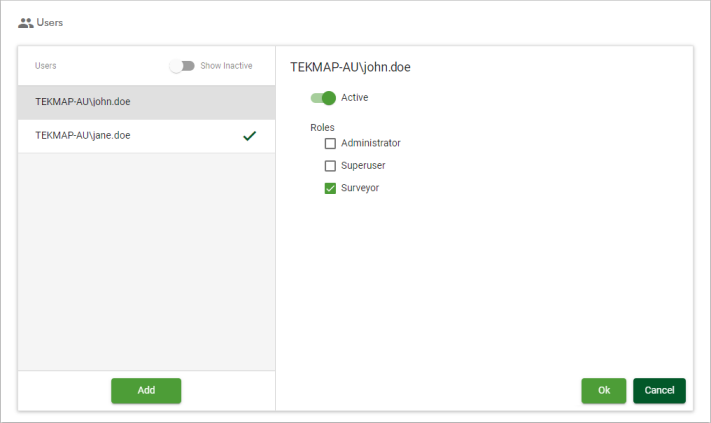
The ![]() Users tab allows you to manage users, including setting user permissions by assigning roles.
Users tab allows you to manage users, including setting user permissions by assigning roles.
-
To add a user, click Add.
Note: Adding users is not supported if using Azure Active Directory authentication.
-
Toggle Show Inactive on to show all users, whether active or inactive, in the list. Active users will display a
 icon.
icon.
Configure the user settings as follows:
| Active | Flag the user as active. If this option is disabled, the user will not be able to access this GeoSpatial Manager instance. |
| Roles | Assigning a role to a user gives the user the permissions associated with that role. To assign a role to a user, make sure the checkbox for that role is selected for the user. A user can be assigned multiple roles. |
-
Click Ok to save any changes to a user’s configuration.
-
Click Cancel to revert any changes back to the previous settings.
 Roles
Roles
Note: You must be assigned a role that has the Manage Users/Roles permission enabled to manage roles.
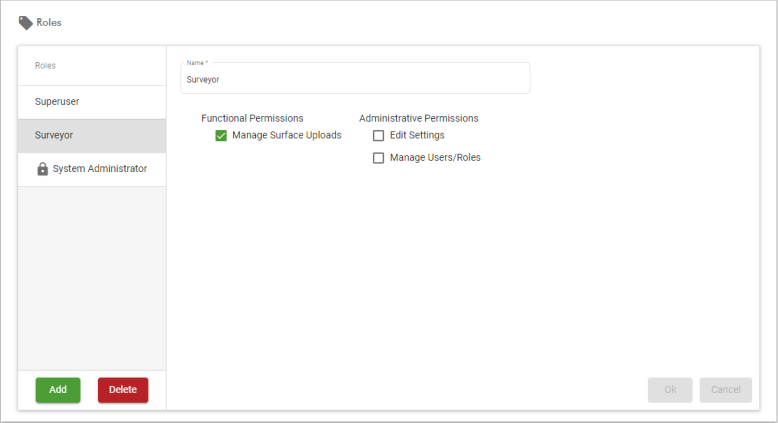
The ![]() Roles tab allows you to manage roles and permissions associated with them.
Roles tab allows you to manage roles and permissions associated with them.
-
To add a new role, click Add.
-
To delete a role, select it in the list and click Delete.
-
To configure a role, select it in the list and configure the fields as explained below.
Note: The System Administrator role is read-only as indicated by the
 icon and cannot be modified.
Configure the role settings as follows:
| Name | Enter a unique name for the role. |
| Administrative Permissions |
The Edit Settings permission provides a role with the ability to edit the following settings:
The Manage Users/Roles permission provides a role with the ability to edit the following settings:
|
| Functional Permissions |
The Manage Surface Uploads permission provides a role with the ability to upload surfaces. |
-
Click Ok to save any changes to a role configuration.
-
Click Cancel to revert any changes back to the previous settings.
