Managing Surface Items
Surface items are objects that have been imported and incorporated into the as-built model. Surface items include the following:
-
Source surfaces: Individual as-built surfaces that are uploaded and merged into the as-built model
-
Images: Individual images imported from GeoTIFF files and displayed on the as-built model
This topic discuss managing surface items after they have been uploaded. See Importing Data for detailed instructions on how to import surfaces and images.
Surfaces Items list
Imported surfaces and images are listed in reverse chronological order in the Surface Items list. That is, the most recent item appears at the top of the list. From here you can manage all imported surface items.
-
Click the
 (Surfaces) tab located to the right of the viewer on the
  Home page to show the Surface Items list.
Note: Images only appear in the Surface Items list when Imagery is selected in the ![]() Colouring tool.
Colouring tool.
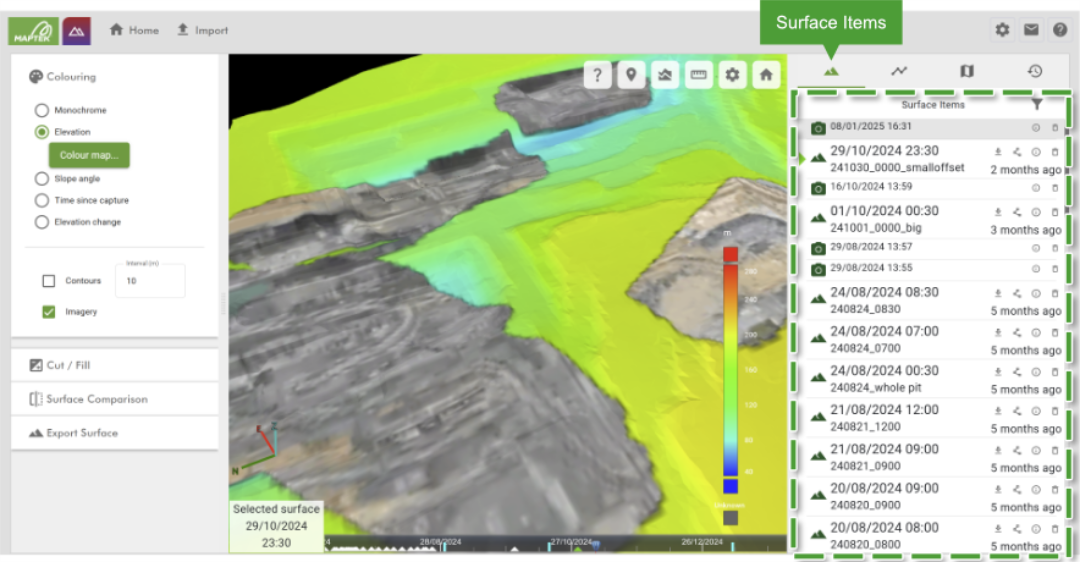
Each item in the list displays the following information:
-
The date and time of the item set on import
-
An icon indicating the status of the item, as follows:

The item has not yet been uploaded. 
The item has been uploaded and has been queued for processing (or deletion). 
Surface (successfully merged) 
Image (successfully merged) 
The item failed to merge. 
The item has been deleted.
In addition, surfaces display the following information:
-
The name of the source file
-
The age of the surface
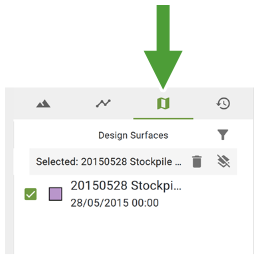
Design Surfaces list
The Design Surfaces list is similar to the Surface items list in that it lists all design surfaces in reverse chronological order. However, there are fewer options available and status icons are not applied.
Filtering the lists
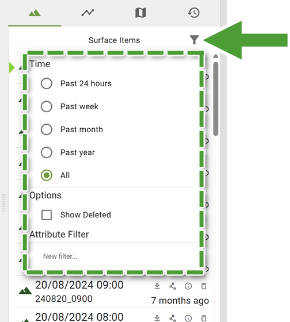
You can filter the Surface Items and Design Surfaces lists to show only items that meet specific criteria.
Note: Filtering the Surface Items and Design Surfaces lists only affects what is displayed in the lists; it does not affect what is displayed in the view.
Filtering by time
To filter by time, click the ![]() button to open the filter panel, then select the required time frame from the panel.
button to open the filter panel, then select the required time frame from the panel.
Showing deleted items
While deleted items are removed from the surface model, and cannot be restored, you can still show them in the list. When you mouse over a deleted item, its outline will appear in the view, as with any active item.
-
To show deleted items, click the
 button to open the filter panel, then select Show Deleted under Options.
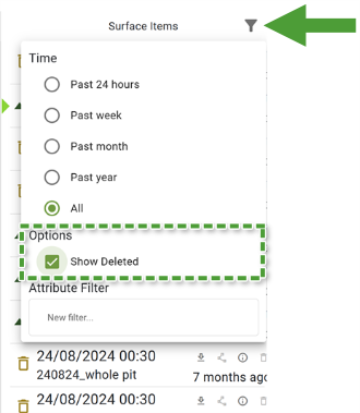
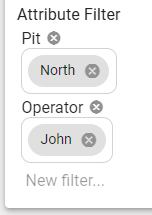
Filtering by attribute values
You can also filter a list to only show surfaces that have selected attribute values associated with them.
To filter a list by attribute values:
-
Click the
button to show the filter menu. -
Click the New filter... field under Attributes Filter. A list appears showing all attribute fields defined in the current schema.

Note: The attributes list will be empty if no list items have associated attributes.
-
Type text into the New filter field to filter the list of attribute fields to show only matching attribute field names or field values.
-
Select the attribute field you wish to filter by. Filter by multiple fields by clicking New filter... and selecting the desired fields.
-
To remove a field or group of fields, click the
 button next to it.
-
Surface List item operations
Each item in the Surface Items list has several buttons available to perform an associated action.
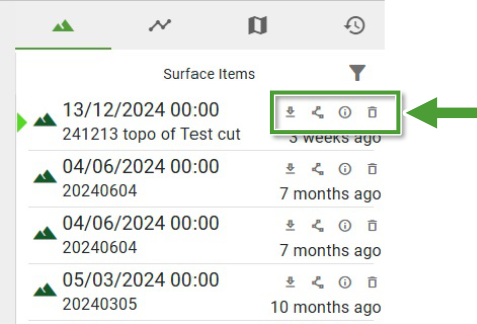
The operations are as follows:
|
|
Download surface Download the source surface file. The downloaded file will be in the same format as the originally uploaded file. Tip: You can also download surfaces directly in PointStudio from a Geospatial Manager project. See Download from Geospatial Manager in PointStudio help. |
|
|
Generate polygon Generate a polygon representing the surface boundary. See Generating a polygon from a surface boundary for detailed instructions. |
|
|
View details View and manage details about the surface item. For surfaces, this includes the following:
See Surface details on this page for more information. |
|
|
Delete item Remove the surface or image from the as-built model. While an item is being deleted, you can cancel the deletion by pressing the Note: Your role must have the Manage Surface Uploads permission enabled to delete items. See Site Settings > Roles for more information. Note: Deleted surfaces are removed from the as-built model, but the details of each deleted surface are retained in the Surface Items list. You can show deleted surfaces in the list using the filter tool. |
|
|
Clear Selected Click to deselect all selected design surfaces. |
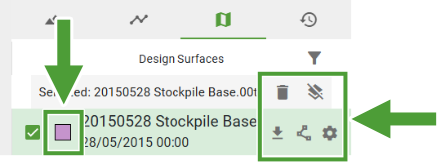
Design Surfaces operations
Each item in the Design Surfaces list has several buttons available to perform an associated action.
|
|
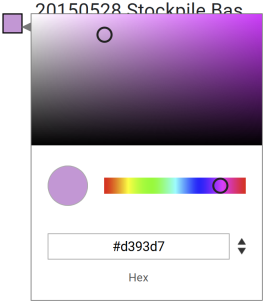
Colour Change the surface colour. Click the swatch, then select a suitable colour from the colour picker that appears.
See Colouring > Monochrome for instructions on using the colour picker. |
|
|
Download surface (appears when you mouse over the surface) Download the source surface file. The downloaded file will be in the same format as the originally uploaded file. This button appears when you mouse over the surface. |
|
|
Settings (appears when you mouse over the surface) View and manage details about the surface item. For surfaces, this includes the following:
See Surface details on this page for more information. |
|
|
Delete surface(s) (appears when you select a surface) Remove the selected surfaces from the project. Note: Your role must have the Manage Surface Uploads permission enabled to delete items. See Site Settings > Roles for more information. Note: Deleted surfaces are removed from the project, but the details of each deleted surface are retained. You can show deleted surfaces in the list using the filter tool. See Filtering the lists. |
Surface details
Every surface imported into GeoSpatial Manager has certain information attached to it. Some information, such as file size, is fixed on import. Other information, such as attributes, can be set at import or configured subsequent to import.
-
To query or edit an individual surface’s information, click the
 (View details) button on the item in the Surface Items list. In the panel that appears, generic file details and surface status information is shown in the Details tab. The other information types are described below.
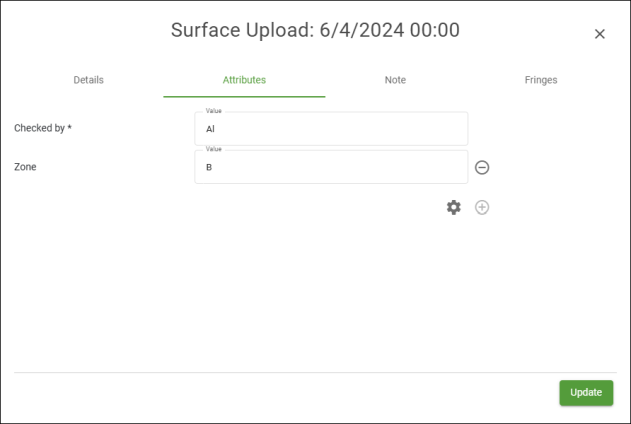
Attributes
Attributes are small pieces of information encoded as key–value pairs associated with a surface. You can associate an arbitrary number of textual attributes with an imported surface. Depending on configuration, an attributes field can be either required or optional.
Adding or modifying attributes
Existing attribute fields are listed on the Attributes tab. Required fields are always shown and are marked with an asterisk (*).
-
To edit the value of an attributes field, change the field’s value and click Update.
-
To add predefined, optional attribute fields (if defined), click the
 button and select the required field from the drop-down list.
 -
To remove an optional attribute field, click the
 button to the right of the field. Required attribute fields cannot be removed.
 -
To create new or configure existing attribute fields, click the
 button to open the attribute schema editor.
Note: You must be assigned a role that has the Edit Settings permission enabled to configure attribute fields.
 Expand for detailed instructions on configuring attribute fields.
The Attributes Schema Editor allows you to configure attribute fields.
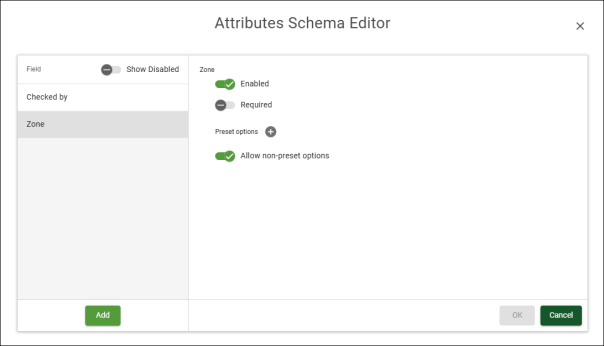
Click Add to create a new attribute field, or select an existing field’s key from the list to change its settings. Configure the fields as follows:
Field Name Enter a unique identifier for the attribute field.
An attribute field cannot be renamed once it has been created. The Field Name field will not display for existing attribute fields.Enabled Marking the field as Enabled makes it available for addition to surfaces. Required Marking the field as Required makes the field mandatory. The user will need to set this attribute for every imported surface. Preset options Preset options are predefined values that appear in the field’s drop-down list. Click the  button to add a new preset option and enter the value in the Preset field. Click the
  button to remove a preset option.
Allow non‑preset options Enable this option to allow the user to enter arbitrary text for the attribute . Attribute field keys cannot be renamed or deleted once they have been created. If a key becomes obsolete, you can turn off the Enabled option to prevent it from appearing. If you need to rename a key, it is recommended to disable the existing key, and then create another key with the new name.
Note
Each surface can have an arbitrary textual note associated with it.
-
Click the Note tab to display the textual note.
-
To edit the note, click in the text field, modify the text, and the click Update to save the changes.
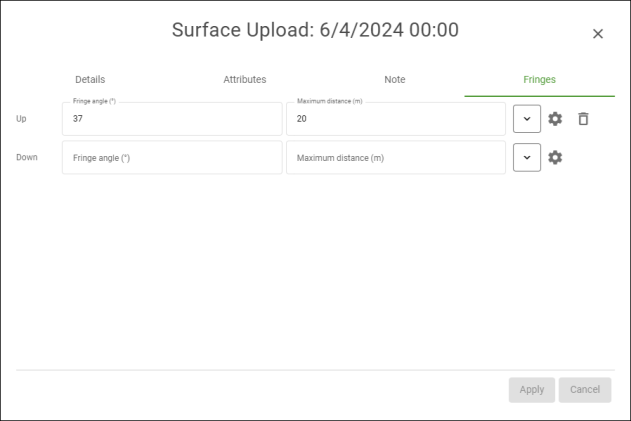
Fringes
A fringe is a sloping extension added to a newly imported surface to provide a smooth transition to the existing surface. The Fringes tab allows you to define the fringe parameters for a surface. Fringes are explained in more detail in Surface Model > Fringes.
Note: Modifying fringes on historical surfaces invalidates the as-built surface from the date of those surfaces. This may lead to a temporary decline in performance while the as-built surface is being updated.
-
To set or edit a surface’s up or down fringe parameters, enter the angle and distance values in the required fields and click Apply. To use a fringe preset, click the
 button and select the desired preset value before clicking Apply.
 -
To remove an up or down fringe, click the
 button and click Apply.
 -
To configure fringe presets, click the
button to open the Fringe Presets panel.Note: You must be assigned a role that has the Edit Settings permission enabled to configure fringe presets.
Expand for detailed instructions on configuring fringe presets.
Fringe Presets allows you to define named fringe presets that can be selected by users when specifying surface up and down fringes.

Click Add to create a new fringe preset, or select an existing field’s key from the list to change its settings. Configure the fields as follows:
Name Enter a unique name for the fringe preset.
Default Up Fringe Enabling this will cause this preset to be applied as the up fringe to new surfaces on import without having to be specified by the user. Default Down Fringe Enabling this will cause this preset to be applied as the down fringe to new surfaces on import without having to be specified by the user. Angle Enter the preset fringe angle value. The fringe angle is the slope of the fringe given as the angle from horizontal. Maximum distance Enter the preset maximum distance value. This is the maximum horizontal distance from the boundary of the new surface to extend outwards.
