How to Run Python Scripts
There are several ways to run a Python script that uses the Maptek Python SDK, each appropriate for different situations. The following table summarises these methods and the context in which the method is most likely to be applicable:
| Visual Studio Code | Initial development or debugging of a script |
| Maptek Extend Ribbon | Running scripts that are used occasionally |
| Ribbons and context menus | Running scripts that are used frequently |
| Workflow component | Running a script as part of a workflow |
| Command line | Running a completely automated script without user interaction |
Developing scripts in Visual Studio Code
Running a script from Visual Studio Code (VS Code) is the recommended method when first developing a script. It allows for running the script while looking at the code, which is useful for identifying bugs in the script. In particular, it makes it easy to jump to the line of code where an exception was raised. It is also easy to transition from running a script in Visual Studio Code to debugging the script.
-
To run a script in VS Code, go to Run > Run Without Debugging, or use the Ctrl+F5 keyboard shortcut.
A debugger is a tool to help you determine why a script is not doing what it is supposed to do. It allows you to step though the script one line at a time and inspect the values of each variable at that point. This can help identify exactly when and where something has gone wrong, which is the first step towards fixing the problem.
-
To debug a script in VS Code, go to Run > Start Debugging, or use the F5 keyboard shortcut.
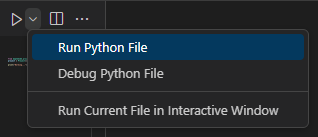
You can run or debug a script quickly in VS Code by pressing the  or
or  button in the script window. From the drop-down menu, choose either Run Python File or Debug Python File. The button’s state will reflect the most recently chosen option.
Note: You must have a project open in a Workbench application when running a script from VS Code that uses a Project() instance.
See also: Installing and Configuring Visual Studio Code in Getting Started
Scripting via the Maptek Extend ribbon
You can create, run, and edit Python scripts from the Maptek Extend ribbon in Maptek Workbench.

The following commands are available:
| Create Python Script | Opens your default Python script editor for you to create a new script. |
| Edit Selected Python Script | Opens the selected script in your default Python script editor. |
| Run Selected Python Script | Runs the selected script in the Maptek Workbench Python environment. Output is displayed in the Workbench log window. |
To the right of the buttons in the Python Scripts group is a list of Python scripts that you can select to edit or run. The list displays Python scripts in a specific folder on your computer. By default, the folder is the data folder selected on the Workbench Start Page, but you can define your own custom paths to folders containing the scripts you want to appear in the list.
To add a custom path:
-
Click the
 button to the right of the list of scripts.
-
In the drop-down that appears, select Add Custom Path....

-
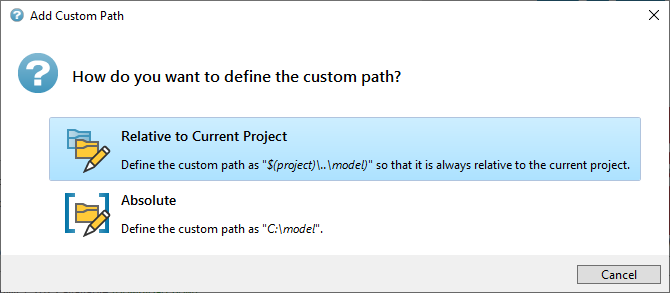
In the file dialog that appears, select the folder you wish to add and press Select Folder. You will be prompted to define the path as either a relative or absolute path.
-
If you want to define a general path pattern applicable to multiple projects, select Relative to Current Project. Otherwise, select Absolute to simply define a specific folder.
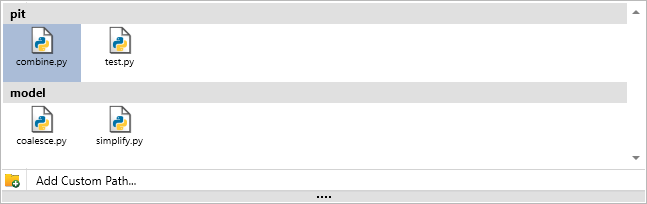
The folder will now appear in the drop-down list whenever you press the ![]() button.
button.
-
Double-click a script to run it. This will also change the list in the ribbon to display the containing folder.
-
To change the list in the ribbon to display the folder containing a script, click on the script and then click outside the drop-down menu.
Tip: To simplify maintenance and reduce the risk of inconsistencies, avoid creating multiple copies of the same script in different locations. Instead, store all your scripts in a single external location. This saves time and streamlines the management of updates and modifications.
Tip: When you run a script in the Workbench, a console opens in the logs area of the Workbench user interface. This console displays output from and allows you to enter input for your script. If you want to suppress the console from appearing, you can rename the script’s extension from .py to .pyw. If you do so, be aware that the print() and input() functions won’t do anything as there will be no console for them to output to or receive input from.
Tip: You can also run a Python script on your computer simply by dragging it from Windows File Explorer and dropping it onto the Workbench start page.
Note: There is no way to provide inputs to scripts that use a WorkflowArgumentParser when run from the Maptek Extend ribbon. All inputs will have their default values.
Running scripts from ribbons and context menus
If you are running a Python script often enough it might be worthwhile to add it to a ribbon or context menu to make it more convenient to access.
To add a script to a ribbon or context menu, follow these steps:
-
Make sure your script is located in one of the following places:
-
In the data folder, as configured on the Workbench Start Page.
-
In a custom folder in the Maptek Extend ribbon. See Scripting via the Maptek Extend ribbon on this page for how to add a custom folder.
-
-
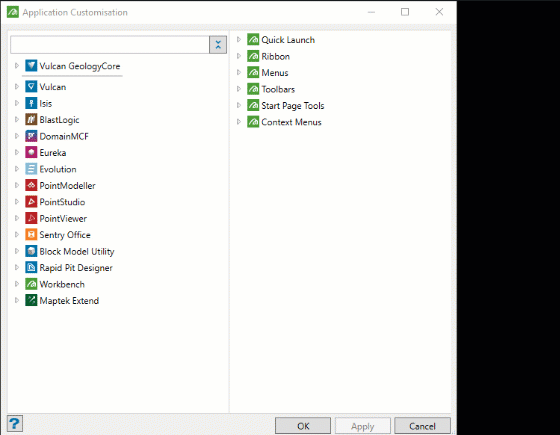
On the Workbench ribbon, from the Customise drop-down, select Application....

The Application Customisation panel appears. The left side of the panel is a list of commands grouped into various categories. The right side of the panel is list of contexts where you can insert the command.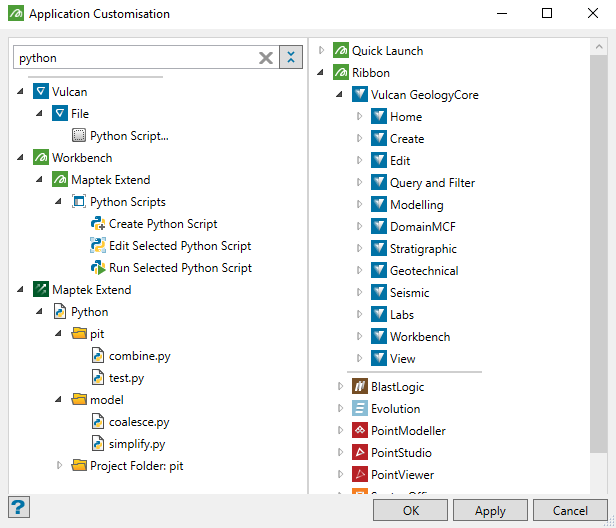
-
Find your script in the list on the left and drag it to the context on the right where you want it to appear.
-
You can find your Python scripts in the list on the left under Maptek Extend > Python.
Tip: You can search for all scripts or a specific script quickly by typing in the field at the top of this list. For example, type .py to list all Python scripts, or type the name of the script if you know it.
-
The list on the right includes many contexts where you can add a script, including application ribbons menus and context menus. The animation below shows how to add a script to a new custom ribbon named Scripts in Vulcan GeologyCore.
-
Tip: When you run a script in the Workbench, a console opens in the logs area of the Workbench user interface. This console displays output from and allows you to enter input for your script. If you want to suppress the console from appearing, you can rename the script’s extension from .py to .pyw. If you do so, be aware that the print() and input() functions won’t do anything as there will be no console for them to output to or receive input from.
Accessing context objects and locations
When a script is run from a context menu, the script often needs to know which object was clicked on to bring up the context menu, and sometimes its position. These two pieces of information are called the context object and the context location. The mapteksdk.context_menu package contains functions to obtain this information.
Context object
The context object is the object that was under the mouse cursor when the user clicked the right mouse button to activate the context menu. There are two functions you can use to get the context object, listed below:
|
Returns the path to the context object. |
|
|
Returns the object ID of the context object. This can be used to query metadata about the object (e.g. its type) and to open the object. |
The following example script uses context_object_path() to colour the context object purple.
from mapteksdk.project import Project
from mapteksdk.context_menu import context_object_path

PURPLE = [221, 160, 221, 255]

if __name__ == "__main__":
  # Call context_object_path() before Project() so that if the script is not
  # called from a context menu, it will encounter an error before it
  # wastes any time attempting to connect to an application.
  path = context_object_path()
  with Project() as project:
    with project.edit(path) as context_object:
      try:
        context_object.point_colours[:] = PURPLE
      except AttributeError:
        pass
      try:
        context_object.facet_colours[:] = PURPLE
      except AttributeError:
        pass
      try:
        context_object.block_colours[:] = PURPLE
      except AttributeError:
        pass
The following animation demonstrates the script applied to two objects in a view window:

Context location
You can use the context_location() function to obtain the location of the point in 3D space that the mouse cursor was over when the user clicked the right mouse button to open the context menu.
The following example script creates a label where the mouse cursor was when the context menu was opened:
from __future__ import annotations

from mapteksdk.project import Project
from mapteksdk.data import Text2D
from mapteksdk.context_menu import context_object_id, context_location
from mapteksdk.operations import active_view

def next_label_name(project: Project, template: str) -> tuple[int, str]:
  """Get the next unused number and path for the next label to create.

  Parameters
  ----------
  project
    Project to use to check for objects in.
  template
    A string containing a single "%i". The %i will be replaced with an integer
    until it is a path that does not exist in a project.

  Returns
  -------
  tuple
    A tuple where the first element is the number inserted into the
    template string that resulted in an object that did not exist.
    The second element is the path for the next label.

  Warnings
  --------
  This function is not thread safe.
  """
  i = 1
  while True:
    result_path = template % i
    if not project.find_object(result_path):
      return i, result_path
    i += 1

if __name__ == "__main__":
  with Project() as project:
    oid = context_object_id()
    template = f"{oid.path}_labels/%i"
    i, path = next_label_name(project, template)
    with project.new(path, Text2D) as label:
      label.text = str(i)
      label.location = context_location()
    view = active_view()
    view.add_objects([label.id])
The following animation shows this script in action:

Example: Using both context object and location
The context menu functions are not mutually exclusive and can be used together, as demonstrated in the following example. This example colours the context object by distance from the mouse cursor when the context menu was opened (red for close points, transitioning to orange, and then blue for points far away from the cursor):
from mapteksdk.project import Project
from mapteksdk.data import PointSet, NumericColourMap, ObjectID
from mapteksdk.context_menu import context_location, context_object_id
import numpy as np

DISTANCE_FROM_CLICK = "distance_from_click"

def calculate_distance_from_point(
    points: np.ndarray, target_point: np.ndarray) -> np.ndarray:
  """Calculate the distance of many points from the target point.

  Parameters
  ----------
  points
    The points to calculate their distance from the target point.
    This should be a numpy array of shape (N, 3) where N is the point count.
  target_point
    The target point.
    This should be a numpy array of shape (3,)

  Returns
  -------
  ndarray
    The distance of each point in points from the target point.
    This is a numpy array of shape (N,) where N is the number of points
    in points.
  """
  return np.linalg.norm(points - target_point, axis=1)

def generate_colour_map(
    project: Project, minimum: float, middle: float, maximum: float
    ) -> ObjectID[NumericColourMap]:
  """Generate a colour map.

  The colour map is red at the minimum, orange at the middle and
  blue at the maximum.

  Parameters
  ----------
  project
    The Project to use to create the colour map.
  minimum
    The minimum value in the colour map. This will be red in the colour map.
  middle
    The midpoint of the colour map. This should be greater than minimum
    and less than middle. It does not need to be the exact midpoint.
    This will be orange in the colour map.
  maximum
    The maximum value in the colour map. This will be blue in the colour
    map.

  Returns
  -------
  ObjectID[ColourMap]
    The object ID of the colour map.
  """
  with project.new(None, NumericColourMap) as colour_map:
        colour_map.ranges = [minimum, middle, maximum]
        colour_map.colours = [
          [255, 0, 0, 255],
          [255, 165, 0, 255],
          [0, 0, 255, 255]
        ]
  return colour_map.id

if __name__ == "__main__":
  with Project() as project:
    with project.edit(context_object_id()) as data_object:
      data_object: PointSet

      # Calculate the distance of every point in the object from the
      # picked point.
      try:
        distance_from_click = calculate_distance_from_point(
          data_object.points, context_location())
        data_object.point_attributes[DISTANCE_FROM_CLICK] = distance_from_click
      except AttributeError as error:
        raise RuntimeError("This operation only supports objects with points."
          ) from error

      minimum = np.min(distance_from_click)
      maximum = np.max(distance_from_click)
      middle = (minimum + maximum) / 2
      # Colour the object by distance from the picked point.
      colour_map_id = generate_colour_map(project, minimum, middle, maximum)
      data_object.point_attributes.set_colour_map(
        DISTANCE_FROM_CLICK, colour_map_id)
The following animation shows this script in action:

Running scripts in workflows
The Extend Python Script workflow component allows you to run a Python Script within a workflow. Some tasks are easier to compose in a workflow, while others are easier with a script. By combining the two approaches, you can harness the power of both.
For example, you could use Python to create a panel similar to a menu command in an application. But for simple panels it is often quicker and requires less effort to use the Custom Panel component in a workflow instead of a pure Python solution.
Additionally, though menu commands are available via the operations subpackages of the Python SDK, they only contain a limited selection of the menu commands compared to those available in workflows. To use such menu commands with Python scripts requires running the Python script in a workflow.
Simulating running in a workflow in Visual Studio Code
Scripts run in workflows are more difficult to debug. They are usually run by starting the workflow rather than Visual Studio Code. Because they accept inputs from the workflow, simply running them in Visual Studio Code may not be able to replicate any errors encountered when running in a workflow. This section covers running (and debugging) a script in Visual Studio Code. Visual Studio Code provides the inputs to the script so that the script will run as if it were run from a workflow. This allows for debugging the Python script without needing to run the entire workflow or modifying the script.
Follow these steps to simulate running a workflow in Visual Studio Code:
-
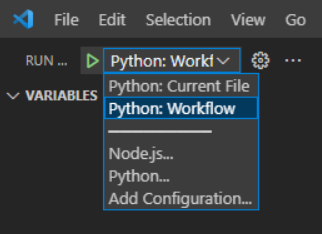
Create a launch configuration for running a Python script in a workflow. Launch configurations are defined in a file in the workspace called launch.json. This file can be found in a subfolder of the workspace directory named .vscode. If the file does not exist, you can create one by following the instructions in the Visual Studio Code documentation.
Below is a template for a launch configuration for emulating running a script in a workflow. You can copy and paste it into the configurations list in launch.json.
{ "name": "Python: Workflow", "type": "python", "request": "launch", "program": "${file}", "console": "integratedTerminal", "justMyCode": true, "args": [ // List the input attributes here. They should be of the form: // "--name=value" // where name is the attribute name and value is the value of the // input. // For connectors of type bool, they should be of the form: // "--name" // Note that the presence of "--name" indicates the attribute // should have a value of True and the absence indicates a value // of False. ] } -
Fill in the args list with the input attributes in their values.
-
An argument of --name=value indicates that the input attribute name will have the value value.
-
An argument of --name indicates that the boolean input attribute name should have a value of True. Omitting --name from the list will set the boolean input attribute name to False.
-
If the attribute name only contains one character, then it will only have one dash before it. For example, -n=value or -n for a boolean argument.
-
-
Select the Run configuration in the Run menu. Now when you run the script the inputs will be available to the WorkflowArgumentParser .
-
The args list is part of the run configuration, so the run configuration will need to be changed to change the args list.
-
Once you are finished running the workflow script, you should switch to a different run configuration.
-
If the WorkflowArgumentParser is not configured with allow_unknown_attributes=True and there are any input attributes that do not correspond to an input connector it will raise an error. This is useful for catching typos in the argument names.
-
You can change the name of the run configuration if another name is more appropriate. This also allows you to have multiple run configurations for workflows if required. Descriptive names are best.
-
The run configuration template above uses the current file. You should be cautious to only use the run configuration for the file the arguments are set up for.
-
The run configuration can also be used to debug the script.
-
For more information on formatting the inputs in the args list see Running scripts from the command line on this page. This is simply a more user-friendly interface to the same mechanism.
-
The name should be the attribute name, not the connector name.
Debugging a script running in a workflow
The previous section covered simulating running a script in a workflow. Typically that is sufficient for debugging errors in a script designed for workflows. However, in rare cases certain bugs may only occur when the script is running in a workflow and not when simulating running in a workflow. Debugging a script while it is running in a workflow is more involved because it requires editing the script and running the entire workflow to be able to debug the script. The following steps cover how this can be achieved.
-
Install the debugpy package if not already installed. You can do this in the Workbench Python preferences by typing debugpy in the Manage Python Packages field and pressing Install Packages.
-
Open the script in Visual Studio Code.
-
Add the following snippet to the start of your script:
import debugpy # 5678 is the default attach port in the VS Code debug configurations. Unless a host and port are specified, host defaults to 127.0.0.1 debugpy.listen(5678) print("Waiting for debugger attach") debugpy.wait_for_client() debugpy.breakpoint() print('break on this line') -
Add the following run configuration to launch.json:
{ "name": "Python: Remote Attach", "type": "python", "request": "attach", "connect": { "host": "localhost", "port": 5678 }, "pathMappings": [ { "localRoot": "${workspaceFolder}", "remoteRoot": "." } ], "justMyCode": true }, -
Run the workflow. The script will pause when it reaches the debugpy.wait_for_client() line.
-
Select the Remote Attach run configuration.
You should now be debugging the script running in the workflow.
See also: Debugging by attaching over a network connection in the Visual Studio Code documentation.
Running a script designed for workflows from a ribbon tab
The WorkflowArgumentParser class is also compatible with running scripts from the ribbon. The inputs can be provided via the Arguments field in the configuration. For example, consider the following script:
from __future__ import annotations

import numpy as np


from mapteksdk.project import Project
from mapteksdk.data import Surface, ObjectID
from mapteksdk.workflows import (WorkflowArgumentParser, WorkflowSelection,
    Point3DConnectorType, DoubleConnectorType,
    StringConnectorType, BooleanConnectorType)
from mapteksdk.operations import open_new_view

RNG = np.random.default_rng()
"""Random number generator."""

def create_parser() -> WorkflowArgumentParser:
    """Creates the WorkflowArgumentParser used by this script.

    Returns
    -------
    WorkflowArgumentParser
    The parser to use to configure the cube created by this script.
    """
    parser = WorkflowArgumentParser(
        description="Create cubes."
    )
    parser.declare_input_connector("path",
        StringConnectorType,
        "surfaces/cube",
        description="Base path to the cube to create.")
    parser.declare_input_connector(
        "centroid",
        Point3DConnectorType,
        [0, 0, 0],
        description="Centroid of the cube.")
    parser.declare_input_connector(
        "size",
        DoubleConnectorType,
        5,
    description="Edge length of the cube.")
    parser.declare_input_connector(
        "view",
        BooleanConnectorType,
        connector_name="Open new view",
        description="If True, a new view will be opened.")


    parser.declare_output_connector("selection", WorkflowSelection)
    return parser

def unique_path(project: Project, base_path: str) -> str:
    """Get the next unused path in the project based on base_path.


    Parameters
    ----------
    project
    Project to use to check if paths have already been used.
    base_path
    The base path. This must contain a single {0} token indicating where
    to substitute in a number to make the path unique.


    Returns
    -------
    str
    base_path with the {0} token replaced by the smallest integer such
    that there were no objects in the project which have that name.


    Warnings
    --------
    This function is not thread-safe. If multiple scripts run simultaneously
    this function can return a path to an object that already exists.
    """
    i = 1
    path = base_path.format(i)
    while project.find_object(path):
        i += 1
        path = base_path.format(i)
    return path


def random_facet_colours(facet_count: int) -> np.ndarray:
    """Generates random facet colours for a surface.


    This generates one colour per facet. All generated colours are completely
    opaque.
    """
    facet_colours = np.empty((facet_count, 4), dtype=np.uint8)
    # This only randomly generates the red, green and blue components of the
    # colour. Randomly generating the alpha component would make most facets
    # partially transparent, which is not ideal for this script.
    facet_colours[:, :3] = RNG.integers(
        0, 255, size=(facet_count, 3), dtype=np.uint8)
    # Set every alpha component to 255 to indicate the colour is fully opaque.
    facet_colours[:, 3] = 255
    return facet_colours


def create_cube(
        project: Project, base_path: str, centroid: iter[float], size: float
    ) -> ObjectID[Surface]:
    """Create a cube in the specified project.


    Parameters
    ----------
    Project
    The project to use to create the cube.
    base_path
    The base path to place the cube at. If there is already an object
    at the path a number will be postfixed to it to make it unique.
    centroid
    The centroid of the cube. This can be any iterable containing three
    floats.
    size
    The edge length of the cube.
    """
    # This is a unit cube centred at the origin.
    points = np.array(
        [
            [-0.5, -0.5, -0.5], [-0.5, -0.5, 0.5], [-0.5, 0.5, -0.5],
            [-0.5, 0.5, 0.5], [0.5, -0.5, -0.5], [0.5, -0.5, 0.5],
            [0.5, 0.5, -0.5], [0.5, 0.5, 0.5],
        ], dtype=np.float64)
    facets = np.array([
            [0, 2, 1], [1, 2, 3],
            [4, 5, 6], [5, 7, 6],
            [0, 1, 5], [5, 4, 0],
            [1, 3, 5], [5, 3, 7],
            [2, 7, 3], [7, 2, 6],
            [0, 6, 2], [4, 6, 0]
        ], dtype=np.uint32)


    # Scale the unit cube to be the specified size then translate it to have
    # the specified centroid.
    points *= size
    points += centroid


    path = unique_path(project, base_path + " {0}")


    with project.new(path, Surface) as cube:
        cube.points = points
        cube.facets = facets


    # Each face of the cube is made of two facets, so the number of faces of
    # the cube is half the facet count.
    colours = random_facet_colours(cube.facet_count // 2)


    # This assigns the first colour to the first two facets, the second
    # colour to the second two facets and so on. Due to the way the facets
    # are set up, this results in both facets in each face having the same colour.
    cube.facet_colours[0::2] = colours
    cube.facet_colours[1::2] = colours
    return cube.id


if __name__ == "__main__":
    parser = create_parser()
    parser.parse_arguments()


    with Project() as project:
        cube_id = create_cube(
            project,
            parser["path"],
            parser["centroid"],
            parser["size"]
        )


    if parser["view"]:
        open_new_view(cube_id)


    parser.set_output("selection", cube_id)
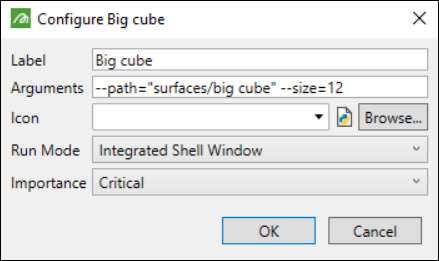
This simple script creates a cube at the specified path with the specified dimensions. If it is configured in a custom menu with the Arguments string set to --path="surfaces/big cube" --size=12 (see image below), then the Big cube ribbon item would create the cube at surfaces/big_cube i and the cube would have a size of 12. The centroid is not specified in the arguments, so it uses the default value of [0, 0, 0] in the script.
This uses the same conventions as the arguments for running a script from the command line. See Running scripts designed for Workflows from the command line for more details on how to format the arguments string.
The following table compares argument strings to the values of each of the inputs for this example script:
| Arguments string | Path | Centroid | Size | View |
|---|---|---|---|---|
| (empty) | surfaces/cube | [0, 0, 0] | 5 | False |
| --path="regular hexahedron" | regular hexahedron | [0, 0, 0] | 5 | False |
| --centroid=-1,1.5,3.24 | surfaces/cube | [-1,1.5,3.24] | 5 | False |
| --size=3.1 | surfaces/cube | [0, 0, 0] | 3.1 | False |
| --view | surfaces/cube | [0, 0, 0] | 5 | True |
| --path="regular hexahedron"
--centroid=-1,1.5,3.24 --size=3.1 --view |
regular hexahedron | [-1,1.5,3.24] | 3.1 | True |
-
If the attribute name is only one character long, it must be prefixed with one dash instead of two (e.g. the input n would be -n=value, or -n if it was boolean).
-
Values that contain spaces must be surrounded in quotation marks.
-
If an input does not match one of the input connectors and the WorkflowArgumentParser was not configured to allow unknown inputs, the script will raise an error when it is run.
Running scripts from the command line
The command line is the lowest-level way to run a Python script. It provides the greatest amount of control, but also the greatest scope for mistakes. This method is not as user friendly as the other methods described above. It is not expected that you will commonly use the command line to run scripts, but we include some explanation here because it can be useful for gaining a deeper understanding of the other methods, and because sometimes the additional control gained by using this method can be useful.
Examples of command line interfaces (also known as shells) include programs such as Windows PowerShell and Vulcan’s Native tsch. In this section we use the symbol $ to indicate the shell prompt. Depending on the shell used this may differ, but > or $ are common.
Launching Python in interactive mode
The most common way to run Python from the command line is through the py launcher program. This is a special program installed with Python on Windows that handles determining which installed version of Python to run. This is more important if there are multiple versions of Python installed. The simplest way to run Python from the command line is using the following command:
$ py
This will start the newest installed version of Python in interactive mode. Rather than running a script file, Python code can be typed into the command line and it will be executed when you press Enter. See Interactive Mode in the Python documentation for more information on running Python in interactive mode.
Note: For more information on the Python launcher see Python Launcher for Windows in the Python documentation.
Note: The Python Launcher will not detect Python for Workbench.
Choosing which Python to run
If you have multiple versions of Python installed, it may be necessary to specify which version of Python to run. Common reasons include:
-
A script uses a new feature of a new version of Python, so it cannot be run in older versions of Python.
-
A script uses a package (or a new version of a package) that does not support older (or in some cases newer) versions of Python.
To specify that a script should be run using the highest version of Python 3, add a space and then a -3 argument immediately after the Python launcher. For example:
$ py -3
It is possible to be more specific with the version by appending more numbers to the argument. For example, adding -3.10 instead of -3 will launch the highest installed version of Python 3.10:
$ py -3.10
Alternatively, you can launch a specific Python by providing the full path to the python.exe for that Python installation. For example, the following command will launch the Python distribution bundled with Vulcan 2022.3:
$ "C:\Program Files\Maptek\Vulcan 2022.3\bin\exe\python.exe"
Important: The path must be enclosed in quotation marks because it contains spaces.
Alternatively, you could launch Python for Workbench version 3.7 with the following command:
$ "C:\Program Files\Maptek\Extend\Python 3.7\python.exe"
Other arguments can be passed to the Python interpreter to alter its behaviour. They can be listed by using the special --help argument:
$ py --help
See also: Command line and environment in the Python documentation.
Running a script from the command line
To run a script from the command line you need to include the path to the script in the command. Remember to enclose the path in quotation marks if it contains spaces. For example:
$ py "C:\Users\jane.doe\Documents\Python Scripts\demo.py"
Note that this command is compatible with all of the options mentioned in the section above. So the following command runs the same script with the newest version of Python 3.10:
$ py -3.10 "C:\Users\jane.doe\Documents\Python Scripts\demo.py"
Typing out the full path to your Python scripts every time you want to run a script is tedious and error prone. To alleviate this, command line shells have a concept of a working directory. This allows you to specify the path to a file relative to that directory. If a file is inside of the current working directory then you only need to specify the name of the script to run it. Typically the cd command (for “change directory”) is used to change the working directory. For example, to set the working directory to the Python Scripts folder in the example above, you would use the following command:
$ cd "C:\Users\jane.doe\Documents\Python Scripts"
Then, to run the script demo.py file from above you could simply use the command:
$ py demo.py
For simplicity, the remainder of this section assumes that any scripts that will be run are contained in the current working directory.
Passing arguments to a script from the command line
In addition to passing arguments to Python itself, it is also possible to pass arguments to the script. These can be read using the WorkflowArgumentParser class, or for scripts not intended to be runnable in a workflow, Python’s built-in argparse class. The following table covers the different types of arguments that can be passed to a script:
| Type | Example | Function | Notes |
|---|---|---|---|
| Positional |
$ py script.py path/to/data.csv |
Pass unstructured data to the script. |
Not supported by WorkflowArgumentParser. If multiple are specified, they must be provided in order. |
| Flags |
$ py script.py --overwrite |
Used to pass a true/false value to a script. |
The presence of the argument indicates True; the absence of the argument indicates False. |
| Short flags |
$ py script.py -o |
Used to pass a true/false value to a script. | The same as flags; however if the flag is only one character long only a single dash is used. |
| Key-value pair |
$ py script.py --key=value |
Used to pass named inputs to a script. | The most common way to pass inputs to scripts designed to be run from workflows. |
| Short key-value pair |
$ py script.py -k=value |
Used to pass named inputs to a script. | The same as Key-value pair, except as the key is only a single character long only a single dash is used. |
Flags and key-value pair arguments can be specified in any order, but positional arguments must be in the order that the script expects.
Consider the following command:
$ py -37 script.py input.csv -o output.csv --overwrite
This command does the following:
-
Runs script.py with the newest installed Python 3.7.
-
Passes a positional input input.csv to the script.
-
Passes an input o the value output.csv
-
Passes an input overwrite with value True
-
All inputs for the Python interpreter must be placed before the script.
-
All arguments to the script must be placed after the script.
Running scripts designed for Workflows from the command line
The WorkflowArgumentParser class is not completely specialised towards running a script within a workflow. As mentioned in the previous section, it is also possible to run scripts that use it via a command line. This section covers how to provide inputs to a script designed for running in Workflows from the command line.
Download all examples scripts used in this section as a ZIP archive
Example 1: Basic call to declare input connector
Consider the script example-1.py, which contains a very minimal call to declare_input_connector():
if __name__ == "__main__":
    parser = WorkflowArgumentParser()
    parser.declare_input_connector("input", str)
    parser.parse_arguments()
    print("Input:", parser["input"])
In Workflows, this script would have a single input connector called input, which accepts string values. To pass the value Hello! to the input from the command line would require the following command:
$ py example_1.py --input=Hello!
The output of the script when run with the above command would be:
Input: Hello!
If the script was instead run with the following command:
$ py example-1.py --input="Hello world!"
the output of this script would be:
Input: Hello world!
-
The name of the input is the first argument to declare_input_connector() prefixed with two dashes.
-
An equals sign separates the name and the value.
-
There cannot be a space before or after the equals sign.
In the first example, the value does not need to be enclosed in double quotes because it does not include a space. However, in the second example the value contains a space so it must be surrounded in double quotes.
The first example will still work if the value is surrounded in double quotes.
The quotes surrounding the values are used for indicating the start and end of a value that contains a space. They do not reach the script.
To include a quotation mark in the value, it is necessary to “escape” it by prefixing it with a backslash character (i.e. \" for a double quote and \' for a single quote).
If the input name only contains a single space, it should be prefixed with one dash instead of two. For example, if the first argument to declare_input_connector() was i instead of input then the input would be -i="Hello world".
Example 2: A more complex call to declare_input_connector()
Consider the script example-2.py, which uses a more complex call to declare_input_connector():
from mapteksdk.workflows import WorkflowArgumentParser
if __name__ == "__main__":
    parser = WorkflowArgumentParser()
    parser.declare_input_connector(
        "size",
        float,
        connector_name="Edge length",
        default=5.0,
        description="Edge length of the cube.")
        parser.parse_arguments()
    print("Size:", parser["size"])
In a workflow, this script would have a single input connector with a user-facing name of Edge length, which assigns its value to an input attribute called size. To provide a value of 7.5 to the Edge Length input, you would use the following command:
$ py example_2.py --size=7.5
The output of the script would be:
Size: 7.5
-
The name is the first argument to declare_input_connector(), not the connector_name argument.
-
The first argument to declare_input_connector() cannot contain spaces, so this avoids needing to surround the name in double quotes.
-
The name and value are still separated by an equals sign.
-
The value of 7.5 does not contain a space, so it does not need to be enclosed in quotation marks.
Because this script specifies a default value of 5.0 for the size connector, that input can be omitted when running the script. Thus the following two commands are equivalent:
$ py example-2.py
$ py example-2.py --size=5.0
In either case, the output of the script would be:
Size: 5.0
Example 3: Multiple inputs
It is common for scripts to contain multiple calls to declare_input_connector() and thus multiple input connectors. Consider example-3.py, which has two inputs: text and count:
import itertools
from mapteksdk.workflows import WorkflowArgumentParser

if __name__ == "__main__":
    parser = WorkflowArgumentParser(
        description="Echoes the input.",
        allow_unknown_attributes=True
    )
    parser.declare_input_connector(
        "text",
        str,
        connector_name="Text",
        description="The text to echo."
    )
    parser.declare_input_connector(
        "count",
        int,
        connector_name="Count",
        description="The number of times to echo the text."
    )
    parser.parse_arguments()

    text = parser["text"]
    count = parser["count"]

	print(*itertools.repeat(text, count))
To pass values for multiple inputs via the command line the inputs simply need to be separated with spaces. For example, consider the following command:
$ py example-3.py --text=example --count=3
This would set the text input to example and the count input to 3. Thus the output of the above command would be example repeated three times:
example example example
-
Any number of inputs can be specified for a script by separating them by spaces.
-
However having a large number of inputs can quickly make running the script from the command line unmanageable.
-
The order of the inputs does not matter. The command $ py example-3.py --count=3 --text=example would give the same results.
-
Using spaces to separate inputs is the reason why values containing spaces must be quoted. If the value is not quoted, the part after the space is interpreted as another input.
Example 4: Simple boolean inputs
The WorkflowArgumentParser class handles boolean inputs differently. Instead of providing a key-value pair, they are represented as a key (or the absence of a key). For example, consider example-4.py, which has a single boolean input overwrite:
from mapteksdk.workflows import WorkflowArgumentParser
if __name__ == "__main__":
    parser = WorkflowArgumentParser()
    parser.declare_input_connector("overwrite", bool)
    parser.parse_arguments()
    print("Overwrite:", parser["overwrite"])
To set the value of the overwrite input to True requires the following command:
$ py example-4.py --overwrite
The output of the above command would be True:
Overwrite: True
Because the overwrite input is boolean, its value can either be True or False. Rather than provide the value, the presence of the input name is interpreted as True and its absence is interpreted to be False. Thus to set the value of the overwrite input to False, the overwrite argument should not be provided to the script. Thus the following command would be used:
$ py example-4.py
The output of this command would be:
Overwrite: False
-
The presence of a boolean input sets the value to True and its absence sets the input to False.
-
Providing a value to the input causes the script to fail with an error.
-
If the first argument to declare_input_connector() is one character long, the input should be prefixed with a single dash instead of two. For example, if the connector name is o instead of overwrite then the input would be -o instead of --overwrite.
Example 5: Boolean and non-boolean inputs
Boolean and non-boolean inputs can be used together. Consider example-5, which has three inputs one of which is boolean.
import itertools
from mapteksdk.workflows import WorkflowArgumentParser

if __name__ == "__main__":
    parser = WorkflowArgumentParser(
        description="Echoes the input.",
        allow_unknown_attributes=True
    )
    parser.declare_input_connector(
        "text",
        str,
        connector_name="Text",
        description="The text to echo."
    )
    parser.declare_input_connector(
        "count",
        int,
        connector_name="Count",
        description="The number of times to echo the text."
    )
    parser.declare_input_connector(
        "reverse",
        bool,
        connector_name="Reverse",
        description="If the text should be reversed."
    )
    parser.parse_arguments()

    text = parser["text"]
    if parser["reverse"]:
        text = text[::-1]
        count = parser["count"]

    print(" ".join(itertools.repeat(text, count)))
Given the following command:
$ py example-5.py --text=hello --count=3 --reverse
The output would be hello reversed and repeated three times:
olleh olleh olleh
The order of the inputs doesn’t matter, so the following command is equivalent:
$ py example-5.py --count --reverse --text=hello
To instead set the text input to bye, the count input to 5 and the reverse input to False, the following command could be used:
$ py example-5.py --text=bye --count=5
The output of this command would be:
bye bye bye bye bye
Example 6: Running a script with unknown attributes
Scripts that have configured their WorkflowArgumentParser instance to accept unknown inputs can be run from the command line. Consider example-6.py:
from mapteksdk.workflows import WorkflowArgumentParser
if __name__ == "__main__":
    parser = WorkflowArgumentParser(allow_unknown_attributes=True)
    parser.parse_arguments()
    values = []
for name in parser.unknown_attribute_names:
    values.append(parser.unknown_attribute(name, str))
    print(",".join(values))
Because allow_unknown_attributes is True, the script will accept any key-value pair or boolean input. The script could be run with the following command:
$ py example-6.py --hello=world --overwrite -a=6 -b
The script would have the following unknown inputs:
| Name | Value |
|---|---|
| hello | world |
| overwrite | True |
| a | 6 |
| b | True |
The output of the script when it is run with the command above would be the values from the second column of the table separated with commas, that is:
world,True,6,True
Alternatively if the following command were used:
$ py example_6.py -a=ant -b=bat -c=cat -d=donkey
then the script would have the following inputs:
| Name | Value |
|---|---|
| a | ant |
| b | bat |
| c | cat |
| d | donkey |
and the output of the script would be:
ant,bat,cat,donkey
Essentially, when unknown inputs are enabled then any input will be accepted.
Example 7: Redirecting the output to a file
When running a script that uses a WorkflowArgumentParser in a command line, by default any outputs set via WorkflowArgumentParser.set_output() are printed to the command line when the script finishes. For example consider example-7.py:
from mapteksdk.workflows import WorkflowArgumentParser
if __name__ == "__main__":
    parser = WorkflowArgumentParser()
    parser.declare_output_connector("message", str)
    parser.parse_arguments()
    parser.set_output("message", "Hello world!")
Given the following command:
$ py example-7.py
the output would be:
{
  "message": "Hello world!"
}
This is a JSON object containing the names of each output with the associated value. If you wish to use the outputs for something, it is usually more useful to write the outputs to a file rather than standard output. To achieve this, the special input --workflow-output-path can be specified. For example, if the script example-7.py was run with the following command:
$ py example-7.py --workflow-output-path=output.json
the output would not be printed to the command line.
The output would instead be saved to the file output.json in the current working directory.
Specifying a full file path to --workflow-output-path allows for writing the output file into a different directory.
The --workflow-output-path input is a special input. It does not need to be declared with declare_input_connector(). (In fact, attempting to declare it with WorkflowArgumentParser.declare_input_connector() will raise an error.)
