Drillholes
-
Drillholes and drillhole databases are only available when connected to Vulcan GeologyCore. Attempting to access these classes when connected to another application will encounter an error.
-
This documentation covers the drillholes available in Vulcan GeologyCore. It is not compatible with blast holes in BlastLogic.
Drillhole storage
Drillholes store their data in fields and these fields are organised into tables. The following table shows the built-in drillhole table types, and the built-in types of fields that each of these tables support.
| Table | Field Types | Required? | Description |
|---|---|---|---|
| Collar table | Northing | Yes | The “North” component of the collar The location where drilling started. location |
| Easting | Yes | The “East” component of the collar The location where drilling started. location | |
| Elevation | No | The “Elevation” component of the collar The location where drilling started. location | |
| Azimuth | No | The bearing of the drill at the collar The location where drilling started. location | |
| Dip | No | The angle of the drill at the collar The location where drilling started. location | |
| Survey table | Depth | Yes | The depth the azimuth and dip measurements were taken at |
| Azimuth | Yes | The azimuth of the hole at each depth | |
| Dip | Yes | The dip of the hole at each depth | |
| Geology table | To depth | Yes | The end depth of each interval in the table |
| From depth | Yes | The start depth of each interval in the table | |
| Thickness | No | The thickness of each interval in the table | |
| Rock type | No | The type of rock in each interval | |
| Horizon | No | Stratigraphy layer for the interval | |
| Assay table | To depth | Yes | The end depth of each interval in the table |
| From depth | Yes | The start depth of each interval in the table | |
| Thickness | No | The thickness of each interval in the table | |
| Downhole table | To depth | Yes | The end depth of each interval in the table |
| From depth | Yes | The start depth of each interval in the table | |
| Thickness | No | The thickness of each interval in the table | |
| Quality table | To depth | Yes | The end depth of each interval in the table |
| From depth | Yes | The start depth of each interval in the table | |
| Thickness | No | The thickness of each interval in the table |
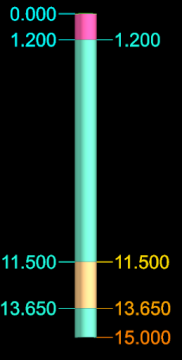
As an example, consider the drillhole represented in the image below:
-
The intervals are coloured by the rock type from the geology table.
-
The left hand labels are the values from the “From depth” field.
-
The right hand labels are the values from the “To depth” field.
This drillhole is represented using these two tables:
| Geology Table | ||
|---|---|---|
| From depth | To depth | Rock type |
| 0.0 m | 1.2 m | Soil |
| 1.2 m | 11.5 m | Rock |
| 11.5 m | 13.65 m | Ore |
| 13.65 m | 15.0 m | Rock |
| Collar Table | ||
|---|---|---|
| Northing | Easting | Elevation |
| 12.5 m | 6.76 m | 1.12 m |
The other tables (Survey, Assay, Downhole and Quality) do not exist in this drillhole.
-
The first row of the geology table indicates that from a depth of 0.0 m to 1.2 m the rock type is “Soil”.
-
The second row of the geology table indicates that from a depth of 1.2 m to 11.5 m the rock type is “Rock”.
-
The third row of the geology table indicates that from a depth of 11.5 m to 13.65 m the rock type is “Ore”.
-
The fourth row of the geology table indicates that from a depth of 13.65 m to 15.0 m the rock type is “Rock”.
This is how all drillholes are represented. More tables allows for more complicated representations. For example, adding a survey table allows the drillhole’s representation to bend, which can allow it to more accurately represent the path of the drill.
The tables a drillhole has and which fields are in those tables are defined by the drillhole database that contains the drillhole.
-
The drillhole database defines which tables and fields each drillhole has.
-
The drillhole defines what values are stored in each of these tables and fields.
-
All drillholes within the same database will have the same tables and fields, however each drillhole will store different values in those tables/fields.
-
Drillholes within the same database will have a different number of rows in each table.
-
-
If a drillhole is not part of a database, an error will be raised by the SDK when attempting to open it.
Drillhole operations
Accessing the collar point
A Drillhole object provides two properties for accessing the collar location:
|
|
|
import collections
from mapteksdk.project import Project
from mapteksdk.geologycore import Drillhole, DrillholeDatabase
from mapteksdk.data import ObjectID
from mapteksdk.operations import object_pick, write_report

def count_rock_types(project: Project, database_id: ObjectID[DrillholeDatabase]) -> collections.Counter:
  """Count the rock types in the drillhole database.

  Parameters
  ----------
  project
    The Project containing the drillhole database to summarise.
  database_id
    Object ID of the drillhole database to summarise.

  Returns
  -------
  collections.Counter
    A counter object containing the counts of every rock type in the drillhole database.
  """
  counts = collections.Counter()
  for drillhole_id in project.get_children(database_id).ids():
    if not drillhole_id.is_a(Drillhole):
      # Skip non-drillholes.
      continue
    with project.read(drillhole_id) as drillhole:
      drillhole: Drillhole
      geology_table = drillhole.geology_table
	  lithology_values = geology_table.rock_type.values
      counts.update(lithology_values)

  return counts

  if __name__ == "__main__":
    with Project() as project:
      picked_drillhole = object_pick(label="Pick database to summarise")
      target_database = picked_drillhole.parent
      counts = count_rock_types(project, target_database)

      # Generate a report which prints out the rock types one per line with their counts.
      report_lines = [
        f"{rock_type} : {count}" for rock_type, count in counts.most_common()
      ]

      report_lines.insert(0, "Rock type : Interval count")

      # Write the report to the application and print it to standard output.
      print(*report_lines, sep="\n")
      write_report(
        f"Summary of: {target_database.path}",
        "\n".join(report_lines)
      )
Reading the values of a drillhole
This example demonstrates reading the values of the various built in tables and fields, and values from custom fields and tables. In your own scripts you do not need to assign each field to a variable before use, the following is merely an example showing accessing each property.
| Field | Table Property | Field Property |
|---|---|---|
| Collar easting | collar_table = drillhole.collar_table | collar_table.easting |
| Collar northing | collar_table.northing | |
| Collar elevation | collar_table.elevation | |
| Collar azimuth | collar_table.azimuth | |
| Collar dip | collar_table.dip | |
| Survey depth | survey_table = drillhole.survey_table | survey_table.depth |
| Survey dip | survey_table.dip | |
| Survey azimuth | survey_table.azimuth | |
| Geology to depth | geology_table = drillhole.geology_table | geology_table.to_depth |
| Geology from depth | geology_table.from_depth | |
| Geology thickness | geology_table.thickness | |
| Geology rock type | geology_table.rock_type | |
| Geology horizon | geology_table.horizon | |
| Assay to depth | assay_table = drillhole.assay_table | assay_table.to_depth |
| Assay from depth | assay_table.from_depth | |
| Assay thickness | assay_table.thickness | |
| Downhole to depth | downhole_table = drillhole.downhole_table | downhole_table.to_depth |
| Downhole from depth | downhole_table.from_depth | |
| Downhole thickness | downhole_table.thickness | |
| Quality to depth | quality_table = drillhole.quality_table | quality_table.to_depth |
| Quality from depth | quality_table.from_depth | |
| Quality thickness | quality_table.thickness | |
| Custom field in custom table | # For non-built-in tables, they must be accessed by name. |
# Custom fields must be accessed by name. |
-
Attempting to access a table the drillhole does not have will raise a TableNotFoundError.
-
Attempting to access a field a table does not contain will raise a FieldNotFoundError .
The example below is a more practical example. This script iterates over the drillholes in a drillhole database and counts every rock type. When it is finished, it writes a report to the report window containing every rock type in the database and the count of intervals that had that rock type.
import collections

from mapteksdk.project import Project
from mapteksdk.geologycore import Drillhole, DrillholeDatabase
from mapteksdk.data import ObjectID
from mapteksdk.operations import object_pick, write_report

def count_rock_types(project: Project, database_id: ObjectID[DrillholeDatabase]
    ) -> collections.Counter:
  """Count the rock types in the drillhole database.

  Parameters
  ----------
  project
    The Project containing the drillhole database to summarise.
  database_id
    Object ID of the drillhole database to summarise.

  Returns
  -------
  collections.Counter
    A counter object containing the counts of every rock type in the
    drillhole database.
  """
  counts = collections.Counter()
  for drillhole_id in project.get_children(database_id).ids():
    if not drillhole_id.is_a(Drillhole):
      # Skip non-drillholes.
      continue
    with project.read(drillhole_id) as drillhole:
      drillhole: Drillhole
      geology_table = drillhole.geology_table
      lithology_values = geology_table.rock_type.values
      counts.update(lithology_values)

  return counts

if __name__ == "__main__":
  with Project() as project:
    picked_drillhole = object_pick(label="Pick database to summarise")
    target_database = picked_drillhole.parent
    counts = count_rock_types(project, target_database)

    # Generate a report which prints out the rock types one per line with their
    # counts.
    report_lines = [
      f"{rock_type} : {count}" for rock_type, count in counts.most_common()
    ]

    report_lines.insert(0, "Rock type : Interval count")

    # Write the report to the application and print it to standard output.
    print(*report_lines, sep="\n")
    write_report(
      f"Summary of: {target_database.path}",
      "\n".join(report_lines)
    )
Describing the displayed table of a drillhole
This example prompts for the user to pick on a drillhole. The script adds a report to the report window that includes the minimum, maximum and mean of each numeric field in the displayed table of the drillhole.
from mapteksdk.project import Project
from mapteksdk.geologycore import Drillhole
from mapteksdk.operations import object_pick, write_report

if __name__ == "__main__":
  with Project() as project:
    drillhole_id = object_pick(label="Pick a drillhole to describe")
    if not drillhole_id.is_a(Drillhole):
      raise ValueError("The picked object was not a drillhole.")

    with project.read(drillhole_id) as drillhole:
      drillhole: Drillhole
      displayed_table = drillhole.displayed_table
      report_title = f"Summary of: {drillhole.name}"
      with displayed_table.dataframe() as frame:
        write_report(report_title, str(frame.describe()))
Setting the visualisation of the drillhole
The following example demonstrates how to set the field and colour map used to colour a drillhole in the viewer. Note that the script only colours the picked drillhole. It does not consider the entire drillhole database.
import numpy as np

from mapteksdk.project import Project
from mapteksdk.data import StringColourMap
from mapteksdk.geologycore import Drillhole
from mapteksdk.operations import object_pick

def generate_rock_type_map(project: Project, rock_types: np.ndarray
    ) -> StringColourMap:
  """Generates a colour map based on the given array.

  The colour map has every unique element in the rock_types array as a key.
  The colours vary from red to blue based on the order the unique values in
  rock_types are found.

  Parameters
  ----------
  project
    The Project to use to create the colour map.
  rock_types
    Array of strings. Each unique string is used as a key in the colour map.

  Returns
  -------
  StringColourMap
    The colour map object. It is closed when returned. It is also an orphan.
  """
  with project.new(None, StringColourMap) as colour_map:
    # Pass the result to np.array because colour_map.legend does not
    # support masked arrays.
    colour_map.legend = np.array(np.unique(rock_types))
    colour_count = len(colour_map.legend)
    # The colours vary from red to blue based on the order they ended up
    # in for the colour map.
    colour_map.colours = [
      [255 * (x / colour_count),
        0,
        255 - (255 * (x / colour_count)),
        255]
        for x in range(colour_count)
    ]

  return colour_map

if __name__ == "__main__":
  with Project() as project:
    picked_drillhole = object_pick(label="Pick drillhole to colour.")
    with project.edit(picked_drillhole) as drillhole:
      drillhole: Drillhole
      if not drillhole.id.is_a(Drillhole):
        raise TypeError("This script only supports drillholes")

      field_to_colour_by = drillhole.geology_table.rock_type
      colour_map = generate_rock_type_map(project, field_to_colour_by.values)
      drillhole.set_visualisation(field_to_colour_by, colour_map)
Setting the desurvey method
The desurvey method of a drillhole database allows for setting (or reading) the desurvey method used to calculate the geometry of the drillhole based on the dip and plunge values in the survey table of the database.
The Python SDK supports the following desurvey methods:
|
The survey information is ignored and the hole will be straight. |
|
|
Each drillhole interval following a survey measurement is positioned using that measurement. |
|
|
Each drillhole interval preceding a survey measurement is positioned using that measurement. |
|
|
Each drillhole interval about a survey measurement is positioned using that measurement as a tangent. |
|
|
Similar to DesurveyMethod.TANGENT, except the length of the tangent can be configured using the tangent_length property in the database. |
|
| An undefined desurvey method. | |
| Indicates the Python SDK does not support the desurvey method. |
The following animation shows the differences between the DesurveyMethod.NONE, DesurveyMethod.SEGMENT_FOLLOWING, DesurveyMethod.SEGMENT_PRECEDING and DesurveyMethod.TANGENT desurvey methods (the azimuth of each drillhole alternates between -90 degrees and 90 degrees, and the dip is always -45 degrees):
-
The DesurveyMethod.NONE tangent method results in a completely straight hole.
-
The segment preceding and following tangent methods are almost identical. The only difference is if each measurement is used to angle the drillhole before or after a survey measurement.
-
The DesurveyMethod.TANGENT method doesn’t handle the unnaturally sharp curves in the drillhole database used above. It is optimised for the natural curves more typical in real-world drillholes and thus it often performs poorly on unrealistic synthetic data.
The following animation is the same, except it uses a drillhole database with more natural curves, and consequently the DesurveyMethod.TANGENT method (the recommended method) fares much better:
Editing the values in a field
The values stored in a field can be edited by assigning new values to the field’s values array.
The following example demonstrates converting all of the values in the rock type field to lowercase. This is useful for databases with inconsistent casing.
For example, different drilling operators may input the same rock type using different cases (e.g. the ore rock type could be represented as “Ore”, “ORE” or “ore”). The application sees these as three rock distinct and different rock types instead of the same rock type. This script lowercases all of these (i.e. to “ore”) allowing the application to see them as the same rock type.
import numpy as np

from mapteksdk.project import Project
from mapteksdk.geologycore import Drillhole
from mapteksdk.operations import object_pick

if __name__ == "__main__":
  with Project() as project:
    picked_drillhole = object_pick(label="Pick database to lowercase rock type")
    target_database = picked_drillhole.parent
    for drillhole_id in project.get_children(target_database).ids():
      if not drillhole_id.is_a(Drillhole):
        continue

      with project.edit(drillhole_id) as drillhole:
        drillhole: Drillhole
        geology_table = drillhole.geology_table
        rock_type = geology_table.rock_type
        rock_type.values = np.char.lower(rock_type.values)
Note: Editing the values array only allows for editing the existing values. It does not allow for new values to be added or for values to be removed (See Adding new rows to the table and Removing rows from a table).
Note: Lowercasing strings can change the meaning in certain languages.
Handling invalid values
The values property of a field is stored as a numpy masked array. This allows for elements of an array to be marked as invalid. For example, an interval with no data for a field should be marked as “invalid” instead of storing a valid but nonsensical value (e.g. -99).
-
The field.values property returns the values stored in the field, including invalid values.
-
This array will include invalid values.
-
For float fields, an invalid value will usually have the value NaN (Not a Number).
-
For integer fields, an invalid value will have a valid but unspecified value.
-
For string fields, an invalid value will typically be the empty string.
-
-
The field.values.mask property returns an array representing which values are valid.
-
If field.values.mask[i] is True, then field.values[i] is invalid.
-
If field.values.mask[i] is False, then field.values[i] is valid.
-
-
Fields that store booleans do not support invalid values.
Essentially in code:
# The values stored in the field. Some may be invalid.
field.values
# The validity of the values. True indicates invalid, False indicates valid.
field.values.mask
Because field.values may contain invalid values, performing calculations on it directly can get incorrect results due to using the invalid values.
For example, consider an assay table with the following fields and values:
| To depth | From depth | Ore | Ore.mask |
|---|---|---|---|
| 0.00 | 1.05 | NaN | True |
| 1.05 | 2.10 | 0.13 | False |
| 2.10 | 3.15 | 0.15 | False |
| 3.15 | 4.20 | NaN | True |
| 4.20 | 5.25 | 0.14 | False |
The Ore column represents the values stored in that field and the Ore.mask column shows which values are invalid.
-
A mask of True indicates invalid.
-
Invalid values are still stored in the field. Operations are expected to ignore them.
If you were to calculate the mean value of the “Ore” field directly the result would be NaN (NaN + any other number = NaN). Thus it is necessary to filter out the invalid values when performing calculations. This can be done manually, as shown in the following snippet:
# NOTE: This fragment is incomplete and won’t run by itself.
ore_field = assay_table.field_by_name("Ore")
to_depth = assay_table.to_depth
from_depth = assay_table.from_depth

# Invert the mask to get an array where True indicates valid
# and False indicates invalid.
ore_validity = ~ore_field.values.mask

# This filters out every interval that does not have a valid ore value.
valid_to_depth = to_depth.values[ore_validity]
valid_from_depth = from_depth.values[ore_validity]
valid_ore = ore_field.values[ore_validity]
# Now do something useful with this information.
The above script would filter the fields down to the following:
| Valid from depth | Valid to depth | Valid ore |
|---|---|---|
| 1.05 | 2.10 | 0.13 |
| 2.10 | 3.15 | 0.15 |
| 4.20 | 5.25 | 0.14 |
Calculating the mean on valid_ore would correctly return 0.14 because the NaNs have been filtered out.
A simpler alternative is to use the numpy.ma.mean function, which ignores invalid values in the inputs. The numpy.ma package contains many utility functions for performing calculations with invalid values.
Adding new rows to the table
New rows can be added to a table by calling the add_row() or add_rows() function.
The add_row() function:
-
Adds a single new row to the table.
-
By default the new row will be added to the end of the table.
-
The index argument allows for specifying the index at which the new row should be added.
For example, given a table:
# NOTE: This fragment is incomplete and won’t run by itself.
# Add a row at the end of the table.
table.add_row()

# Add a row at the start of the table.
table.add_row(index=0)

# Add a row at index i in the table.
table.add_row(index=i)
The add_rows() function:
-
Adds multiple new rows to the table at once.
-
If adding more than one row, this is significantly more efficient than calling add_row() multiple times.
-
By default the new rows will be added to the end of the table.
-
Similar to the singular case, the optional index argument allows rows to be added at other positions in the table.
For example:
# NOTE: This fragment is incomplete and won’t run by itself.
# Add 10 rows to the end of the table
table.add_rows(10)

# Add 10 rows to the start of the table
table.add_rows(10, index=0)

# Add 10 rows at index i in the table.
table.add_rows(10, index=i)
The newly added rows are initially full of invalid values. After adding rows to a table, it is the caller’s responsibility to provide the new rows with values. See Add a new table to a database for a full example that adds rows to a table and populates the values.
Removing rows from a table
Rows can be removed from a table by calling the remove_row() or remove_rows() function.
The remove_row() function removes the row at the specified index. The values that were stored in that row are deleted and cannot be recovered.
The remove_rows() function removes the specified number of rows starting at the specified index. The values that were stored in those rows are deleted and cannot be recovered.
# NOTE: This fragment is incomplete and won’t run by itself.
# Remove the ith row from the table.
table.remove_row(i)

# Remove three rows, starting from the ith row from the table.
table.remove_rows(i, 3)
The following example uses a primitive pick to allow the user to click on an interval and then the row corresponding to that interval is deleted.
from mapteksdk.project import Project
from mapteksdk.geologycore import Drillhole
from mapteksdk.operations import (primitive_pick, SelectablePrimitiveType, PickFailedError)

if __name__ == "__main__":
  with Project() as project:
    while True:
      try:
        edge = primitive_pick(
          SelectablePrimitiveType.EDGE,
          label="Pick an interval of a drillhole to delete.")
        with project.edit(edge.path) as drillhole:
          drillhole: Drillhole
          if not isinstance(drillhole, Drillhole):
            raise ValueError("You must pick a drillhole.")
          displayed_table = drillhole.displayed_table
          displayed_table.remove_row(edge.index)
      except PickFailedError:
        break
Accessing the points and edges
Drillholes possess limited edge and point properties. This allows querying the points and edges currently used to display the drillhole.
from mapteksdk.project import Project
from mapteksdk.geologycore import Drillhole
from mapteksdk.operations import object_pick, write_report

if __name__ == "__main__":
  with Project() as project:
    drillhole_id = object_pick(label="Pick a drillhole to query edges for")

    if not drillhole_id.is_a(Drillhole):
      raise ValueError("This script only supports drillholes.")

    with project.edit(drillhole_id) as drillhole:
      points = "\n".join(
        f"{x:.3f}, {y:.3f}, {z:.3f}" for x, y, z in drillhole.points)
      edges = "\n".join(f"{start}, {end}" for start, end in drillhole.edges)
      message = (f"Points (X, Y, Z):\n{points}\n"
                f"Edges (Start, end):\n{edges}")
      write_report(f"{drillhole.id.name}", message)
Note that:
-
The points and edges returned by these properties are based on the drillhole’s visualisation. If the drillhole is edited they will not change until the drillhole is saved.
-
The points and edges of a drillhole database cannot be edited.
-
The points and edges are calculated based on:
-
The collar point
-
The intervals in the displayed table.
-
The values in the survey table.
-
The desurvey method of the drillhole database.
-
The intervals used to display a drillhole are considered edges and thus edge picks can be used to write scripts that operate on specific intervals. This is demonstrated by the following script, which prints the values in the interval the user picks.
from mapteksdk.project import Project
from mapteksdk.geologycore import Drillhole
from mapteksdk.operations import (
  primitive_pick, write_report, SelectablePrimitiveType)

if __name__ == "__main__":
  with Project() as project:
    edge = primitive_pick(
      SelectablePrimitiveType.EDGE,
      label="Pick an interval in a drillhole to query.")

    with project.edit(edge.path) as drillhole:
      drillhole: Drillhole
      if not drillhole.id.is_a(Drillhole):
        raise ValueError("This script only supports drillholes.")

      field_description = {}
      displayed_table = drillhole.displayed_table
      for field in displayed_table.fields:
        field_description[field.name] = field.values[edge.index]

      write_report(
        f"Interval {edge.index} of {edge.path}",
        "\n".join(f"{key} : {value}" for key, value in field_description.items())
      )
Writing the tables to a CSV
This example demonstrates writing the contents of a drillhole database to a folder of CSV files with one CSV per table. This may be inefficient compared to the exporter available in Vulcan GeologyCore, however it demonstrates how the data in different drillholes can be aggregated into a single pandas dataframe.
import os
import pathlib

from mapteksdk.project import Project
from mapteksdk.geologycore import Drillhole, DrillholeDatabase
from mapteksdk.operations import object_pick
from mapteksdk.data import ObjectID
import pandas as pd

# Path to the directory containing the script.
SCRIPT_DIRECTORY = pathlib.Path(os.path.dirname(__file__))

def gather_table_dataframes(
    project: Project,
    database_id: ObjectID[DrillholeDatabase],
    table_name: str) -> pd.DataFrame:
  """Get a dataframe of the specified table for every drillhole.

  This iterates over every drillhole in the database and concatenates
  the dataframes of the specified table into a single dataframe.

  Parameters
  ----------
  project
    Project to use to open the drillholes.
  database_id
    Object ID of the drillhole database to read drillholes from.
  table_name
    Name of the table to concatenate the dataframes for.

  Returns
  -------
  pd.DataFrame
    The dataframes for the specified table for every drillhole in the
    specified database concatenated into a single dataframe.

  Warnings
  --------
  This loads all the values in the table for every drillhole which may be
  very slow or impossible for large drillhole databases (or drillhole
  databases containing a large number of text fields).
  """
  dataframes: list[pd.DataFrame] = []
  for drillhole_id in project.get_children(database_id).ids():
    if not drillhole_id.is_a(Drillhole):
      continue

    with project.read(drillhole_id) as drillhole:
      drillhole: Drillhole
      table = drillhole.table_by_name(table_name)
      with table.dataframe() as table_frame:
        dataframes.append(table_frame)

  return pd.concat(dataframes)

if __name__ == "__main__":
  with Project() as project:
    picked_drillhole = object_pick(label="Pick database to save to CSV.")
    target_database = picked_drillhole.parent

    # Make the output directory before generating the output files
    # to make sure it is valid.
    output_path = SCRIPT_DIRECTORY / "output" / target_database.name
    os.makedirs(output_path, exist_ok=True)

    with project.edit(target_database) as database:
      table_names = [table.name for table in database.tables]

    # This will iterate over every drillhole in the database for every
    # table. Though the dataframes for each table could be generated
    # simultaneously in a single loop that would limit this script to small
    # databases because it would require every table in every drillhole
    # to be loaded into memory at the same time.
    # This approach means only one table is loaded into memory at a time,
    # which allows for larger databases to be exported.
    for table_name in table_names:
      table_path = output_path / f"{table_name}.csv"
      table_frame = gather_table_dataframes(project, target_database, table_name)
      table_frame.to_csv(table_path, index=False)
Drillhole database operations
Accessing fields and tables in a database
Similar to drillholes, a drillhole database contains tables and fields. The primary difference is:
-
Tables and fields read from a drillhole contain values that can be read or edited, but what tables/fields exist and the properties of tables and fields cannot be changed.
-
Tables and fields read from a drillhole database allow for the tables and fields to be edited and for new ones to be added, but they do not contain any values.
Essentially:
-
DrillholeDatabase defines the structure of the data stored in drillholes.
-
Drillhole objects store data in the structure defined by the database.
-
The following table summarises which operations are available on tables in drillholes and drillhole databases.
| Operation | Drillhole | Database |
|---|---|---|
| Get table name | Yes | Yes |
| Get table type | Yes | Yes |
| Set table type | No | Yes (new tables only) |
| Get row count | Yes | No |
| Access fields | Yes | No |
| Add rows | Yes | No |
| Delete rows | Yes | No |
| Pandas dataframe | Yes | No |
| Add fields | No | Yes |
This table summarises the operations available on fields read from drillholes and drillhole databases.
| Operation | Drillhole | Database |
|---|---|---|
| Read field name | Yes | Yes |
| Edit field name | No | Yes (new fields only) |
| Read field type | Yes | Yes |
| Set field type | No | Yes |
| Read field data type | Yes | Yes |
| Set field data type | No | Yes (new fields only) |
| Read field unit | Yes | Yes |
| Edit field unit | No | Yes |
| Get values | Yes | No |
| Set values | Yes | No |
Add a new drillhole to a drillhole database
-
The DrillholeDatabase.new_drillhole() function adds a new hole to the drillhole database.
-
It accepts a single argument, the hole ID. This is a string representing an ID used to uniquely identify the hole within the database.
-
It returns the drillhole’s object ID. This is the ID used to represent the drillhole in the project.
-
-
When the drillhole is created it contains a single empty row in its collar table. All other tables are empty.
-
To make the drillhole appear in the application you must, at a minimum, write values into the northing and easting fields in the collar table.
-
To make the drillhole appear with intervals, you must add fields to at least one table with to and from depth fields and call set_visualisation() to set a colour map to use to colour the new drillhole.
-
-
You must close the drillhole database before opening the newly created drillhole, otherwise it will raise an OrphanDrillholeError, because the drillhole has not finished being added to the database until it is closed.
To add a new drillhole to a drillhole database:
-
Open the database for editing.
-
Call new_drillhole() on the database and pass the ID of the new drillhole.
-
Close the database.
-
Open the drillhole for editing.
-
Set the collar point for the new drillhole.
-
Populate the other tables for the drillhole.
The above process is demonstrated in the following script:
from mapteksdk.project import Project
from mapteksdk.geologycore import DrillholeDatabase

if __name__ == "__main__":
  with Project() as project:
    database_path = "path/to/database"
    # To add a new drillhole to a database, first open the database for editing.
    with project.edit(database_path) as database:
      database: DrillholeDatabase
      # Use new drillhole to add the new drillhole.
      drillhole_id = database.new_drillhole("DRILLHOLE_ID")

    # Once the database is closed, open the drillhole for editing.
    with project.edit(drillhole_id) as drillhole:
      # Set the collar point of the new drillhole.
      drillhole.raw_collar = [0, 0, 0]
      # Now populate any other tables and fields the drillhole has data for.
      # Note that tables (aside from the collar table) initially contain
      # no rows so the first operation to perform on each table
      # is table.add_rows(number_of_rows_in_table).
It is possible to call new_drillhole() multiple times to create multiple drillholes in a single Project.edit() block of the database.
Which tables and fields need to be filled out for a drillhole depends on the database.
See Creating a drillhole database from scratch for an example that creates a drillhole and adds values to all of its fields.
Add a new field to an existing table
-
New fields can be added to a table in a database via the add_field() function. This accepts:
-
The name of the new field.
-
The type of data that is stored in the field.
-
A description of the field.
-
Optional: The “field type” of a field.
-
Optional: The unit of the data for the field. As of version 1.4, the SDK only supports creating fields with distance or angle units.
-
Optional: The index to add the field at. If not specified, the field will be added at the end of the table.
-
-
The newly added field will initially be empty for all drillholes. To populate it, you will need to open each drillhole and write values to it.
-
Most field types do not support duplicates. Attempting to add a field with the same field type as an existing field will raise a DuplicateFieldTypeError .
-
The following field types support duplicates and the above error will never be raised:
-
Rock type
-
Horizon
-
None
-
-
The following example demonstrates adding a total depth field to a drillhole database. Errors are reported via the report window.
from mapteksdk.project import Project
from mapteksdk.geologycore import (
  DrillholeDatabase, DrillholeFieldType,
  DuplicateFieldTypeError, DuplicateFieldNameError)
from mapteksdk.operations import write_report, object_pick
from mapteksdk.data import ObjectID

def add_total_depth_to_database(
    project: Project, database_id: ObjectID[DrillholeDatabase]):
  """Adds a total depth field to the database.

  Parameters
  ----------
  project
    The Project which contains the drillhole database.
  database_id
    The object id of the database to add the total depth field to.

  Raises
  ------
  RuntimeError
    If the database already contains a maximum depth field.
  """
  with project.edit(database_id) as database:
    database: DrillholeDatabase
    if not database.id.is_a(DrillholeDatabase):
      raise ValueError(f"'{database.id.path}' is not a drillhole database.")

    collar_table = database.collar_table

    try:
      collar_table.add_field(
        "Max depth",
        float,
        "The maximum depth of the drillhole",
        field_type=DrillholeFieldType.TOTAL_DEPTH
      )
    except (DuplicateFieldTypeError, DuplicateFieldNameError):
      raise RuntimeError(
        f"'{database.id.path}' already contained a total depth field."
      )

REPORT_TITLE = "Add total depth"

if __name__ == "__main__":
  with Project() as project:
    picked_drillhole = object_pick(label="Pick database to add total depth to.")
    target_database = picked_drillhole.parent
    try:
      add_total_depth_to_database(project, target_database)

      write_report(
        REPORT_TITLE,
        f"Successfully added max depth to: {target_database.path}"
      )
    except Exception as error:
      write_report(REPORT_TITLE, str(error))
Note: The example above only adds the total depth field to the database, it does not assign any values into the field for any drillholes, resulting in the total depth being undefined for all drillholes. For a script that also populates the total depth field, see Add total depth and automatically calculate values(this script is a simplified version of that example).
Note: This script reports errors via the report window if it can connect to an application.
Note: Different fields can be added by passing different field types to the field_type parameter.
Note: The field_type parameter is optional. If it is not specified, the new field has no type.
Add a new table to a database
New tables can be added to a database by the add_table() function. This takes:
-
The name of the new table.
-
The table type of the new table.
Note that:
-
The new table is created in a valid and consistent state.
-
The new table will contain all of the required fields for its table_type (For example, a newly created Survey table will contain Depth, Azimuth and Dip fields).
-
The only exception to this is tables of type DrillholeTableType.OTHER . These tables are created containing no fields and at least one field must be added before they are in a valid state.
-
-
The newly created table is immediately available via the properties on the drillhole database.
-
This allows additional fields to be added to the table.
-
This also allows for the existing fields to be edited if required.
-
-
Once the drillhole database has been saved, the table will be available in all drillholes in the database. The table will not initially contain any rows for any drillhole.
-
After adding a table, you should close the drillhole database before opening any drillholes.
This example demonstrates adding a survey table to a drillhole database. This allows the angle of the holes to be provided.
from mapteksdk.project import Project
from mapteksdk.geologycore import (
  DrillholeDatabase, Drillhole, DuplicateTableTypeError, DrillholeTableType,
  FieldNotFoundError)
from mapteksdk.operations import object_pick
import numpy as np

def populate_survey_table(drillhole: Drillhole):
  """Populates the survey table for the drillhole.

  This adds rows to the survey table for each 10 units of depth.
  The dip goes from -82 degrees to -42 degrees.
  The azimuth varies from 151 degrees to 185 degrees.

  This function assumes that the dip and azimuth values are stored
  in radians.

  Parameters
  ----------
  drillhole
    The drillhole to set the survey table values for.

  Raises
  ------
  ValueError
    If the maximum depth of the drillhole couldn't be determined.
  """
  # Try to derive the maximum depth of the drillhole from:
  # 1: The max depth field in the collar table.
  # 2: The maximum to_depth value in the displayed table.
  try:
    max_depth = drillhole.collar_table.total_depth.values[0]
  except (FieldNotFoundError, IndexError):
    max_depth = np.max(drillhole.displayed_table.to_depth.values)
  except Exception as error:
    raise ValueError("Failed to derive total depth for drillhole") from error

  # This generates one row in the survey table for each 10 units.
  row_count = int(max_depth // 10)
  survey_table = drillhole.survey_table
  survey_table.add_rows(row_count)

  # The dip will go from -82 at the top of the hole to -42 degrees
  # at the bottom of the hole.
  start_dip = np.radians(-82)
  end_dip = np.radians(-42)

  # The azimuth will go from 151 degrees at the top of the hole to 185 degrees
  # at the bottom of the hole.
  start_azimuth = np.radians(151)
  end_azimuth = np.radians(185)

  # The depth goes from 0 to the maximum depth.
  survey_table.depth.values = np.linspace(
    start=0,
    stop=max_depth,
    num=row_count,
    dtype=float)
  # Populate the azimuth and dip fields using the above limits.
  survey_table.azimuth.values = np.linspace(
    start=start_azimuth,
    stop=end_azimuth,
    num=row_count,
    dtype=float)
  survey_table.dip.values = np.linspace(
    start=start_dip,
    stop=end_dip,
    num=row_count,
    dtype=float)

if __name__ == "__main__":
  with Project() as project:
    picked_drillhole = object_pick(label="Pick database to add total depth to.")
    target_database = picked_drillhole.parent

    # First add the survey table to the database.
    with project.edit(target_database) as database:
      database: DrillholeDatabase
      if not database.id.is_a(DrillholeDatabase):
        raise TypeError("Database path is not a database.")

      try:
        database.add_table("SURVEY", DrillholeTableType.SURVEY)
      except DuplicateTableTypeError as error:
        raise ValueError(
          "Cannot add a survey table to a database which already contains one."
        ) from error

    # Now fill out the values in the survey table for each drillhole.
    for drillhole_id in project.get_children(target_database).ids():
      if not drillhole_id.is_a(Drillhole):
        continue
      with project.edit(drillhole_id) as drillhole:
        drillhole: Drillhole
        populate_survey_table(drillhole)
The following animation shows the script in action on a small, randomly generated drillhole database.

Edit the properties of an existing field
If a drillhole database is open for editing, it is possible to update the following properties of an existing field:
-
The description of the field
-
The field type of the field
-
The unit of the data stored in the field
The following example demonstrates changing a rock type field to a horizon field. This would be useful for programmatically correcting a database where the stratigraphy information was incorrectly imported as rock type information.
from mapteksdk.project import Project
from mapteksdk.geologycore import DrillholeDatabase, DrillholeFieldType
from mapteksdk.operations import object_pick

if __name__ == "__main__":
  with Project() as project:
    picked_drillhole = object_pick(label="Pick database to change rock type to horizon.")
    target_database = picked_drillhole.parent

    with project.edit(target_database) as database:
      if not database.id.is_a(DrillholeDatabase):
        raise ValueError("This script only supports drillhole databases.")
      database: DrillholeDatabase
      # Get the rock type field.
      geology_table = database.geology_table
      rock_type = geology_table.rock_type

      # Edit the description and field to be for a horizon field.
      rock_type.description = "Stratigraphy layer"
      rock_type.field_type = DrillholeFieldType.HORIZON
Note: Editing the field type can place the table into an inconsistent state where it doesn’t have all of its required fields. This will cause an error to be raised when the database is saved().
Note: The field type can only be changed to field types that support the data type and unit of the data stored in the field. For example, it is impossible to change a “Rock type” field to a “To depth” field because the data types are incompatible (string and numeric respectively).
Note: The unit can only be changed to a unit supported by the field type. For example, it is an error to set the unit of the “To depth” field to radians because that field does not support angle units.
Note: Non-numeric fields do not support units. Attempting to assign units to them will raise an error.
Creating a drillhole database from scratch
Drillhole databases can be created through Project.new() .
Below is the simplest script that creates a drillhole database.
from mapteksdk.project import Project
from mapteksdk.geologycore import DrillholeDatabase

if __name__ == "__main__":
  with Project() as project:
    with project.new("drillholes/example_basic_database", DrillholeDatabase):
      pass
This script doesn’t create an interesting drillhole database.
-
The database doesn’t contain any drillholes.
-
The database only contains a collar table. (To check this, right click on the database in the explorer and select Edit Database Design….)
-
The collar table only contains a “Northing” field and an “Easting” field.
Thus the database created by the simple script can only represent the collar point of a drillhole and only in two dimensions.
To make a useful drillhole database, it needs more tables, fields and of course drillholes. This is demonstrated in the following example:
from mapteksdk.project import Project
from mapteksdk.geologycore import (
  DrillholeDatabase, DrillholeTableType, DrillholeFieldType)

if __name__ == "__main__":
  with Project() as project:
    with project.new("drillholes/example_basic_database", DrillholeDatabase
        ) as database:

      # Add a geology table to the database. This table starts with
      # to and from depth fields, so those fields do not need to be added
      # manually.
      database.add_table("Geology", DrillholeTableType.GEOLOGY)

      geology_table = database.geology_table
      geology_table.add_field(
        "Rock type", # The name of the field.
        str, # The type of data stored in the field.
        "The type of rock in the interval", # Description of the field.
        field_type=DrillholeFieldType.ROCK_TYPE # The type of the field.
      )

      # Now add a drillhole to the database.
      drillhole_id = database.new_drillhole("example-1")

    # Populate the drillhole.
    with project.edit(drillhole_id) as drillhole:
      # Assign the collar point of the drillhole to a northing of 12
      # and an easting of -11.4.
      drillhole.raw_collar = (12.0, -11.4)

      # Get a reference to the drillhole geology table.
      geology_table = drillhole.geology_table

      # Add five intervals to the drillhole.
      geology_table.add_rows(5)

      # Assign values to the from depth to define the intervals.
      geology_table.from_depth.values = [0.0, 1.1, 2.25, 3.22, 4.18]

      # This copies the second from depth value to the first to depth
      # value and so on for the entire drillhole.
      # Thus after this line the to depth values will be:
      # [1.1, 2.25, 3.22, 4.18, NaN]
      # (NaN is 'Not a Number' indicating an invalid value).
      # This ensures that there are no gaps in the intervals of the drillhole.
      geology_table.to_depth.values[:-1] = geology_table.from_depth.values[1:]

      # Assign the final to depth value.
      geology_table.to_depth.values[-1] = 5.22

      # Assign the rock types for each interval.
      geology_table.rock_type.values = [
        "DIRT",
        "ROCK",
        "ORE",
        "ROCK",
        "ORE"
      ]
The above example creates a simple database that can store the collar location of a drillhole and the rock type in each interval and adds a single drillhole to it.
An assay, downhole or quality table could have been used instead of (or in addition to) a geology table to define the intervals for the drillhole.
The created drillhole appears as a grey tube in the application. See Setting the visualisation of the drillhole for how to programmatically define a colour map or use the visualisation options in Vulcan GeologyCore to view the data properly.
Delete a field
The Python SDK also allows for the deletion of fields from the database by calling delete() on the field in the database. This is useful for removing irrelevant or incorrect fields from the database.
The following example demonstrates deleting the “from depth” field from a quality table. This results in a quality table with only a “to depth” field.
from mapteksdk.project import Project
from mapteksdk.geologycore import DrillholeDatabase, DrillholeTableType

if __name__ == "__main__":
  with Project() as project:
    with project.new("drillholes/only_to_depth", DrillholeDatabase) as database:
      # When the Quality table is created, it contains both a "To depth"
      # and a "From depth" field.
      database.add_table("Quality", DrillholeTableType.QUALITY)
      quality_table = database.quality_table

      # Calling delete on the from depth field will delete it.
      quality_table.from_depth.delete()

      quality_table.add_field("ORE_PURITY", float, "The purity of the ore")
Note: Deleting a field permanently deletes all the values in that field for all drillholes in the database. There is currently no way to undo this operation.
Note: Deleting a field can place the table into an invalid state (e.g. the table does not contain its required fields). This error is not caught until the changes to the database are saved().
Note: This is useful for removing fields that were automatically created because the SDK added a field (e.g. a from depth and to depth) when creating a table because a field was required but it didn’t know which one to use. It is easier to delete one of the fields then it is to add it initially.
Using the survey table to handle curved drillholes
In real life, drillholes are rarely straight holes into the ground. Instead due to various factors the drillhole will curve. For example, the angle the drill was placed into the ground, the steadiness of the drill machine, the hardness of the material being drilled through and many other factors will cause the drillhole to curve in various ways.
This information is represented in the survey table. This table contains three built-in fields:
-
Depth: The depth at which each measurement was taken
-
Dip: The dip measured at each depth
-
Azimuth: The azimuth measured at each depth
These three fields, along with the desurvey information of the drillhole database is used to determine the points and edges used to display the drillhole.
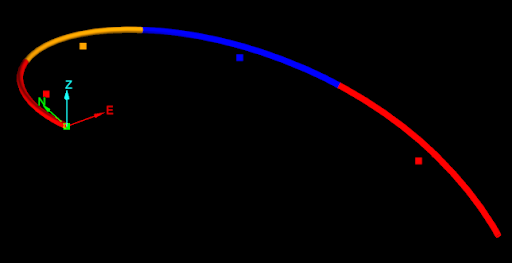
The following example is a fun example that demonstrates how to create a drillhole that is shaped and coloured like a candy cane (shown in the screenshot below).

import numpy as np

from mapteksdk.project import Project
from mapteksdk.data import StringColourMap, ObjectID
from mapteksdk.data.units import DistanceUnit, AngleUnit
from mapteksdk.geologycore import (
  DrillholeDatabase, DrillholeFieldType, DrillholeTableType)
from mapteksdk.operations import open_new_view

def generate_database(
    project: Project,
    path: str,
    distance_unit: DistanceUnit,
    angle_unit: AngleUnit) -> ObjectID[DrillholeDatabase]:
  """Generates a drillhole database with fields in non-standard units.

  Parameters
  ----------
  project
    The project to create the database in.
  path
    The path to give the newly created database.
  distance_unit
    The unit for distance fields.
  angle_unit
    The unit for angle fields.

  Returns
  -------
  ObjectID[DrillholeDatabase]
    The object id of the newly created database.
  """
  with project.new(path, DrillholeDatabase, overwrite=True) as database:
    collar_table = database.collar_table

    # Set the northing and easting field to use the specified unit.
    collar_table.northing.unit = distance_unit
    collar_table.easting.unit = distance_unit

    # Add an elevation field.
    collar_table.add_field(
      "Elevation",
      float,
      "Elevation above sea level",
      field_type=DrillholeFieldType.ELEVATION,
      unit=distance_unit,
      )

    # Add a survey table and set the units.
    database.add_table("Survey", DrillholeTableType.SURVEY)
    survey_table = database.survey_table
    survey_table.azimuth.unit = angle_unit
    survey_table.depth.unit = distance_unit
    survey_table.dip.unit = angle_unit

    # Add a geology table and set the units.
    database.add_table("Geology", DrillholeTableType.GEOLOGY)
    geology_table = database.geology_table
    geology_table.to_depth.unit = distance_unit
    geology_table.from_depth.unit = distance_unit

    # The rock type field stores strings so doesn't allow units.
    geology_table.add_field(
      "Rock type",
      str,
      "The type of rock",
      field_type=DrillholeFieldType.ROCK_TYPE)
  return database.id

def generate_drillhole(
    project: Project,
    database_id: ObjectID[DrillholeDatabase],
    drillhole_name: str,
    collar_point: list):
  """Generates a drillhole which looks like a candy cane.

  Parameters
  ----------
  project
    The project containing the drillhole database.
  database_id
    The object id of the drillhole database to create the drillhole in.
  drillhole_name
    The name to give the newly created drillhole.
  collar_point
    The collar point for the newly created drillhole.
  """
  # Total rows in the drillhole.
  total_rows = 40

  # The number of stripes to give the candy cane.
  stripe_count = 20

  # Number of rows used for the curve of the candy cane.
  curve_rows = 20

  # Start and end dip values used to generate the curve of the
  # candy cane.
  start_dip = 90
  end_dip = -90

  # Start and end azimuth values used to generate the curve of the
  # candy candy.
  start_azimuth = 15
  end_azimuth = 30

  # Total depth for the drillhole.
  total_depth = 10

  with project.edit(database_id) as database:
    drillhole_id = database.new_drillhole(drillhole_name)

  with project.edit(drillhole_id) as drillhole:
    # Set the collar point.
    drillhole.raw_collar = collar_point

    survey_table = drillhole.survey_table

    if (survey_table.azimuth.unit is not AngleUnit.DEGREES
        or survey_table.dip.unit is not AngleUnit.DEGREES):
      raise ValueError(
        "This script only supports databases which store azimuth and dip "
        "in degrees.")

    survey_table.add_rows(total_rows)

    # The depth values are equally spaced down the drillhole.
    survey_table.depth.values = np.linspace(0, total_depth, total_rows)

    # The first curve_rows rows form the curve of the candy cane.
    survey_table.azimuth.values[:curve_rows] = np.linspace(
      start_azimuth, end_azimuth, curve_rows)
    survey_table.dip.values[:curve_rows] = np.linspace(
      start_dip, end_dip, curve_rows)

    # The remaining rows use the same azimuth and dip values to form the
    # straight part of the candy cane.
    survey_table.azimuth.values[curve_rows:] = end_azimuth
    survey_table.dip.values[curve_rows:] = end_dip

    geology_table = drillhole.geology_table
    geology_table.add_rows(stripe_count)

    # The from depth values start at 0 and reach the to depth.
    # stripe_count + 1 causes this to generate one more interval than
    # needed. The [:-1] then discards this interval.
    # This ensures that the final from depth value is one interval length before
    # the total depth of the drillhole.
    geology_table.from_depth.values = np.linspace(
      0, total_depth, stripe_count + 1)[:-1]

    # Set the to depth values to exactly match up with the from depth values,
    # except for the last row. This ensures no overlapping intervals.
    geology_table.to_depth.values[:-1] = geology_table.from_depth.values[1:]
    # The final to depth is the total depth of the drillhole.
    geology_table.to_depth.values[-1] = total_depth

    # Set the rock type for every even interval to "R".
    geology_table.rock_type.values[::2] = "R"
    # Set the rock type for every odd interval to "W".
    geology_table.rock_type.values[1::2] = "W"

    # Create a string colour map to use for the rock type.
    # "R" is coloured red.
    # "W" is coloured white.
    with project.new(None, StringColourMap) as colour_map:
      colour_map.legend = ["R", "W"]
      colour_map.colours = [[255, 0, 0, 255], [255, 255, 255, 255]]

    drillhole.set_visualisation(geology_table.rock_type, colour_map)

if __name__ == "__main__":
  with Project() as project:
    database_id = generate_database(
      project,
      "drillholes/candy_cane_db",
      DistanceUnit.METRE,
      AngleUnit.DEGREES)

    collar_point = [0, 0, 0]

    # Calling this function with multiple different names and collar points
    # allows for creating multiple drillholes in the database.
    drillhole_id = generate_drillhole(
      project,
      database_id,
      "Candy_cane",
      collar_point)

    open_new_view(database_id)
Note: Depth defaults to being stored in metres.
Note: Dip and Azimuth default to being stored in radians.
Note: The depth values in the survey table need not correspond to the to or from depth values in any other table.
ISIS and CSV-backed databases
All of the above examples have used internal drillhole databases. However the DrillholeDatabase and Drillhole classes also support drillhole databases backed by Isis and CSV databases.
-
To open an Isis or CSV database, it must be imported into Vulcan GeologyCore.
-
This ensures it has a path in the project, which allows it to be opened with the Project class.
-
-
Isis and CSV databases support most of the operations supported by internal databases.
-
The following operations are not available for Isis and CSV databases:
-
Adding new tables to the database
-
Adding new fields to tables
-
Editing the fields description, type and unit
-
Useful examples
The following is a larger, more practical example that combines many of the concepts shown in the above sections.
Copying a drillhole
Iterating over the tables and fields of a drillhole (or a drillhole database) is useful for when all tables and fields should be treated the same. The following example uses this to allow the caller to pick a drillhole and then to pick a point. It copies the picked drillhole and sets the collar point of the copy to be the picked point. This is demonstrated in the following animation:
from __future__ import annotations

from mapteksdk.project import Project
from mapteksdk.data import ObjectID
from mapteksdk.geologycore import (
  Drillhole, DrillholeDatabase, DrillholeTableType, TableNotFoundError)
from mapteksdk.operations import (
  object_pick, coordinate_pick, PickFailedError, active_view)

def copy_drillhole(
    project: Project,
    source_id: ObjectID[Drillhole],
    new_collar: list[float]) -> ObjectID[Drillhole]:
  """Create a copy of the drillhole with the specified collar point.

  The copy is in the same database as the source drillhole and its tables
  contain all the same values, except for the collar point which is
  set to new_collar.

  Parameters
  ----------
  project
    Project to use to open the drillhole.
  source_id
    Object id of the drillhole to copy.
  new_collar
    Array-like of floats to set as the collar point for the new drillhole.

  Returns
  -------
  ObjectID[Drillhole]
    The object id of the copied drillhole.
  """
  original_name = source_id.name
  database_id: ObjectID[DrillholeDatabase] = oid.parent

  # Create the new drillhole.
  with project.edit(database_id) as database:
    new_drillhole_id = database.new_drillhole(f"{original_name}_copy")

  with project.read(oid) as drillhole:
    with project.edit(new_drillhole_id) as new_drillhole:
      drillhole: Drillhole
      # Copy the values from the source drillhole to the copy drillhole.
      for table in drillhole.tables:
        # Skip tables with no rows.
        if table.row_count == 0:
          continue
        new_table = new_drillhole.table_by_name(table.name)
        # Rows need to be added to each table except for the collar table.
        if new_table.table_type is not DrillholeTableType.COLLAR:
          new_table.add_rows(table.row_count)
        for field in table.fields:
          new_field = new_table.field_by_name(field.name)
          new_field.values = field.values

      # Set the collar point to be the given collar point.
      new_drillhole.raw_collar = new_collar

      # Attempt to set the displayed field.
      try:
        displayed_field_name = drillhole.displayed_field.name
        displayed_table_name = drillhole.displayed_table.name
        new_displayed_table = new_drillhole.table_by_name(displayed_table_name)
        new_displayed_field = new_displayed_table.field_by_name(displayed_field_name)
        new_drillhole.set_visualisation(new_displayed_field, drillhole.get_colour_map())
      except TableNotFoundError:
        # There was no displayed table.
        pass

    return new_drillhole_id

with Project() as project:
  try:
    while True:
      oid = object_pick(label="Pick a drillhole to copy")
      if not oid.is_a(Drillhole):
        continue
      new_collar = coordinate_pick(label="Pick collar for copy of drillhole")

      copy_id = copy_drillhole(project, oid, new_collar)

      # Add the newly created drillhole the currently active view.
      view = active_view()
      view.add_objects([copy_id])
  except PickFailedError:
    pass
Add total depth and automatically calculate values
This script adds a total depth field to a drillhole database and then iterates over every drillhole in the database and calculates the deepest depth measurement recorded on the drillhole and sets that as the maximum depth. The result of the script is run via the report window.
from mapteksdk.project import Project
from mapteksdk.geologycore import (
  DrillholeDatabase, BaseDrillholeTable, DrillholeFieldType, DrillholeTableType,
  DuplicateFieldTypeError, DuplicateFieldNameError, Drillhole)
from mapteksdk.operations import write_report, object_pick
from mapteksdk.data import ObjectID

def add_total_depth_to_database(
    project: Project, database_id: ObjectID[DrillholeDatabase]):
  """Adds a total depth field to the database.

  Parameters
  ----------
  project
    The Project which contains the drillhole database.
  database_id
    The object id of the database to add the total depth field to.

  Raises
  ------
  RuntimeError
    If the database already contains a maximum depth field.
  """
  with project.edit(database_id) as database:
    database: DrillholeDatabase
    if not database.id.is_a(DrillholeDatabase):
      raise ValueError(f"'{database.id.path}' is not a drillhole database.")

    collar_table = database.collar_table

    try:
      collar_table.add_field(
        "Max depth",
        float,
        "The maximum depth of the drillhole",
        field_type=DrillholeFieldType.TOTAL_DEPTH
      )
    except (DuplicateFieldTypeError, DuplicateFieldNameError):
      raise RuntimeError(
        f"'{database.id.path}' already contained a total depth field."
      )

def populate_total_depth(
    project: Project, database_id: ObjectID[DrillholeDatabase]):
  """Populates the total depth field of the drillholes in the database.

  Parameters
  ----------
  project
    The Project which contains the drillhole database.
  database_id
    Object ID of the drillhole database containing the drillholes to populate
    the total depth field for.
  """
  for drillhole_id in project.get_children(database_id).ids():
    # Skip non-drillholes.
    if not drillhole_id.is_a(Drillhole):
      continue

    # Set the maximum depth for each drillhole.
    with project.edit(drillhole_id) as drillhole:
      drillhole: Drillhole
      max_depth = get_drillhole_total_depth(drillhole)
      collar_table = drillhole.collar_table
      collar_table.total_depth.values = max_depth

def get_drillhole_total_depth(drillhole: Drillhole) -> float:
  """Calculate the total depth of a drillhole based on its fields.

  This returns the maximum depth value read from any field in the drillhole's
  assay, downhole, geology, quality or survey tables.

  Parameters
  ----------
  drillhole: Drillhole
    The drillhole to calculate the total depth of.

  Returns
  -------
  float
    The total depth of the drillhole.
  """
  tables_with_depths = (
        DrillholeTableType.ASSAY,
        DrillholeTableType.DOWNHOLE,
        DrillholeTableType.GEOLOGY,
        DrillholeTableType.QUALITY,
        DrillholeTableType.SURVEY
      )

  # Generate a list of maximum depths for each table with the specific
  # types.
  max_depths = []
  for table_type in tables_with_depths:
    # Iterating over tables_by_type allows this script to work correctly
    # on databases with multiple tables with the same type.
    for table in drillhole.tables_by_type(table_type):
      max_depths.append(get_drillhole_table_total_depth(table))
  # Return the maximum max depth from any table.
  if max_depths:
    return max(max_depths)
  else:
    # The database had no tables which the max depth could be read from.
    return 0

def get_drillhole_table_total_depth(table: BaseDrillholeTable) -> float:
  """Get the maximum depth value in any field in a table.

  This returns the greatest depth value in the to depth, from depth or
  depth field in the given table.

  Parameters
  ----------
  table
    The table to calculate the maximum depth of. This can be any table which
    has to depth, from depth or depth fields.

  Returns
  -------
  float
    The deepest to depth, from depth or depth value found in the table.
  """
  field_types = (
    DrillholeFieldType.TO_DEPTH,
    DrillholeFieldType.FROM_DEPTH,
    DrillholeFieldType.DEPTH,
  )

  # Generate a list of max depths in each relevant field in the table.
  max_depths = []
  for field_type in field_types:
    try:
      field = table.fields_by_type(field_type)[0]
    except IndexError:
      # An IndexError indicates the table doesn't have this field. Move
      # onto the next one.
      continue
    max_depths.append(max(field.values))

  # Return the maximum depth.
  return max(max_depths)

REPORT_TITLE = "Add total depth"

if __name__ == "__main__":
  with Project() as project:
    picked_drillhole = object_pick(label="Pick database to add total depth to.")
    target_database = picked_drillhole.parent
    try:
      add_total_depth_to_database(project, target_database)
      populate_total_depth(project, target_database)

      write_report(
        REPORT_TITLE,
        f"Successfully added max depth to: {target_database.path}"
      )
    except Exception as error:
      write_report(REPORT_TITLE, str(error))
Querying a point at depth
Consider the following drillhole database containing a single drillhole (download drillhole database):

The naive approach for getting the midpoint of each interval would be to take the start and end point of each interval, add them together and then divide by two. For example, using the following code (assuming the drillhole was opened as target_drillhole).
mid_points = [
        (target_drillhole.points[a] + drillhole.points[b]) / 2
        for a, b in drillhole.edges
    ]
None of the mid-points generated by the naive approach are on the drillhole, as seen in the image below.
The cause of this problem is easier to see if the edges of drillhole are extracted (see Extracting points and edges from a drillhole):

The naive approach calculated the mid-points as if each interval of the drillhole was a straight line from the start point to the end point. The script ignored that the drillhole curves in each interval. So how can a script generate accurate mid-points of intervals while taking into account the curves of each interval? The answer is the Drillhole.point_at_depth() function.
Drillhole.point_at_depth() accepts a depth along the drillhole and returns the point at that depth down the drillhole, taking into account the curves of the interval. This allows for generating accurate midpoints for intervals in a drillhole as shown in the following animation:
The script demonstrated by this animation is shown below:
from mapteksdk.project import Project
from mapteksdk.geologycore import Drillhole
from mapteksdk.data import PointSet
from mapteksdk.operations import object_pick, active_view
import numpy as np

def extract_mid_points(target_drillhole: Drillhole) -> np.ndarray:
    """Extracts the mid points of the displayed field of the drillhole.

    Parameters
    ----------
    target_drillhole
    Drillhole to extract the mid points for.

    Returns
    -------
    numpy.ndarray
    Numpy array containing the midpoints.

    Raises
    ------
    TableNotFoundError
    If the drillhole has no displayed table.
    """
    table = target_drillhole.displayed_table
    mid_depths = (table.to_depth.values + table.from_depth.values) / 2

    mid_points = np.empty((table.row_count, 3), np.float64)

    mid_points[:] = [
        target_drillhole.point_at_depth(x) + target_drillhole.converted_collar
        for x in mid_depths
    ]
    return mid_points

if __name__ == "__main__":
    with Project() as project:
        drillhole_id = object_pick(
            object_types=(Drillhole,),
            label="Pick a drillhole to extract mid-points from.")

    with project.read(drillhole_id) as drillhole:
        extracted_points = extract_mid_points(drillhole)
        displayed_field = drillhole.displayed_field
        displayed_field_values = displayed_field.values
        displayed_field_name = displayed_field.name
        colour_map_id = drillhole.get_colour_map()

    with project.new(
            f"cad/extracted_mid_points/{drillhole_id.name}", PointSet) as point_set:
        point_set.points = extracted_points
        point_set.point_attributes[displayed_field_name] = displayed_field_values
        point_set.point_attributes.set_colour_map(
        displayed_field_name, colour_map_id)

    view = active_view()
    view.add_object(point_set)
    project.set_selected([point_set])
Editing pandas dataframes
By default, any changes to the dataframe returned by table.dataframe() are not propagated back to the drillhole. However by setting the save_changes flag on the dataframe to True, any changes to any of the columns are written back to the drillhole when the with block ends. This is useful for performing operations on the entire table at once.
-
You cannot add or remove fields from the drillhole via a pandas dataframe. If a column of the dataframe is dropped, no changes are made to its values.
-
Rows can be added by appending rows to the dataframe.
-
Rows can be removed by removing rows from the dataframe.
-
Adding or removing rows (or rearranging rows) via pandas dataframes may corrupt the data in columns that are not included in the dataframe.
Sort by From Depth
If the intervals in a drillhole are sorted, it is easier to spot issues such as overlapping intervals. The easiest way to sort a table in a drillhole database by the from depth field, or any field, is by first converting it to a pandas dataframe and then using its sort function (with inplace=True). The following example allows the user to pick a drillhole. It then sorts the geology table by From Depth and drops any duplicate rows from the table.
from mapteksdk.project import Project
    from mapteksdk.geologycore import Drillhole
    from mapteksdk.operations import object_pick

    if __name__ == "__main__":
        with Project() as project:
            oid = object_pick(
                object_types=Drillhole,
                label="Pick a drillhole to sort and drop duplicates.")

            with project.edit(oid) as drillhole:
                geology_table = drillhole.geology_table
                with geology_table.dataframe(save_changes=True, include_hole_id=False
                        ) as frame:
                    frame.sort_values(by="FROM_DEPTH", inplace=True)
                    frame.drop_duplicates(inplace=True)
Sort entire database by from depth
The previous example script is quite limited—it only affects a single table of a single drillhole. It is trivial to expand the script to operate on every table for every drillhole in a drillhole database by iterating over both the drillholes and the tables.
Important: Sorting every table in every drillhole may take a long time for large databases.
from mapteksdk.project import Project
from mapteksdk.geologycore import Drillhole
from mapteksdk.operations import object_pick

if __name__ == "__main__":
    with Project() as project:
        oid = object_pick(
            object_types=Drillhole,
            label="Pick a drillhole in the database to sort and drop duplicates.")

        database_id = oid.parent

        for drillhole_id in project.get_children(database_id).ids():
            # Skip non-drillholes in the database.
            if not drillhole_id.is_a(Drillhole):
                continue
            with project.edit(drillhole_id, Drillhole) as drillhole:
                for table in drillhole.tables:
                    try:
                        # Get the name of the from depth field.
                        from_depth_name = table.from_depth.name
                    except AttributeError:
                        # Skip tables without a from depth field.
                        continue

                    with table.dataframe(save_changes=True, include_hole_id=False
                            ) as frame:
                        frame.sort_values(by=from_depth_name, inplace=True)
                        frame.drop_duplicates(inplace=True)
Extracting points and edges from a drillhole
This script demonstrates how to extract the points and edges of a drillhole into an edge network (download drillhole database):
from mapteksdk.project import Project
from mapteksdk.data import ObjectID, EdgeNetwork, StringColourMap
from mapteksdk.geologycore import Drillhole
from mapteksdk.operations import object_pick, active_view

def extract_drillhole_edges(
    project: Project,
    drillhole_id: ObjectID[Drillhole]) -> ObjectID[EdgeNetwork]:
    """Extracts the edges from a drillhole.

    This copies the points and edges from the drillhole. If the drillhole
    is coloured using a string colour map, the colour of the drillhole is
    also copied to the edge network.

    This ignores the desurvey information of the drillhole. The points are
    joined via straight edges even if the drillhole is curved.

    Parameters
    ----------
    project
        Project containing the drillhole.
    drillhole_id
        ObjectID of the drillhole to use to create an EdgeNetwork.

    Returns
    -------
    ObjectID[EdgeNetwork]
        Object ID of the created edge network. Its path will be the path to
        the drillhole with "_edges" appended to it.
    """
    with project.read(drillhole_id) as drillhole:
        with project.new(drillhole_id.path + "_edges", EdgeNetwork) as network:
            network.points = drillhole.points
            network.edges = drillhole.edges

            colour_map = drillhole.get_colour_map()
            # colour_map.get(value) isn't implemented for NumericColourMaps, so
            # this only works for StringColourMaps.
            if colour_map and colour_map.is_a(StringColourMap):
                displayed_field = drillhole.displayed_field
                with project.read(drillhole.get_colour_map(), StringColourMap
                        ) as colour_map:
                    # The number of edges in a drillhole is equal to the number
                    # of rows in the displayed table, so this should always construct
                    # an appropriately sized list.
                    network.edge_colours = [
                        colour_map.get(value) for value in displayed_field.values
                    ]
    return network.id

def main():
    with Project() as project:
        drillhole_id = object_pick(
            object_types=(Drillhole,),
            label="Pick a drillhole to extract edges from"
        )
        network = extract_drillhole_edges(project, drillhole_id)
        view = active_view()
        view.add_object(network)

if __name__ == "__main__":
    main()
The following animation shows the script being run on a procedurally generated highly curved drillhole:
-
The script copies the points and edges from the drillhole and thus it connects the edges of each displayed interval. This does not take the curvature of the drillhole along each interval into account. To take this into account when extracting points, see Querying a point at depth.
-
If the drillhole was completely straight (i.e. a desurvey method of none), then the edges extracted would exactly correspond to the edges of the drillhole.
-
The extracted edge network contains a copy of the points, edges and colours of the drillhole. It will not update if the drillhole is changed.
