2D Text
2D text is a label positioned at a specific location in 3D space that maintains a constant size and orientation on the screen, regardless of the zoom level or camera orientation. A single 2D text label is represented in the SDK with the Text2D class.
Text2D properties
Use the following properties to customise your Text2D object:
| Set the text to display in the label. | |
|
Set the font style of the label to one of the following values: |
|
| Set the point size of the label text. | |
| Set the location of the label as an XYZ coordinate. | |
| Set the colour of the text. | |
|
Set the horizontal alignment of your 2D text object to one of the following enum values: |
|
|
Set the vertical alignment of your 2D text object to one of the following enum values: |
2D text examples
The following examples demonstrate how to create and customise 2D text labels in a 3D view. You will learn how to create a basic Text2D object, modify its properties such as text content, size, and colour, and apply 2D text labels to specific points along a line to display relevant information.
Creating a Text2D object
The example below demonstrates creating a Text2D object and placing it at the origin.
from mapteksdk.project import Project
from mapteksdk.data import Text2D
project = Project() # Connect to default project

object_path = "scrapbook/text_example"

# Create Text
with project.new(object_path, Text2D, overwrite=True) as text:
    text.text = 'hello world'
    text.location = [0, 0, 0]
    # Colours are R,G,B,A, where A is Alpha (255 = opaque)
    text.colour = [38, 128, 0, 255] # Light Green
    text.size = 100

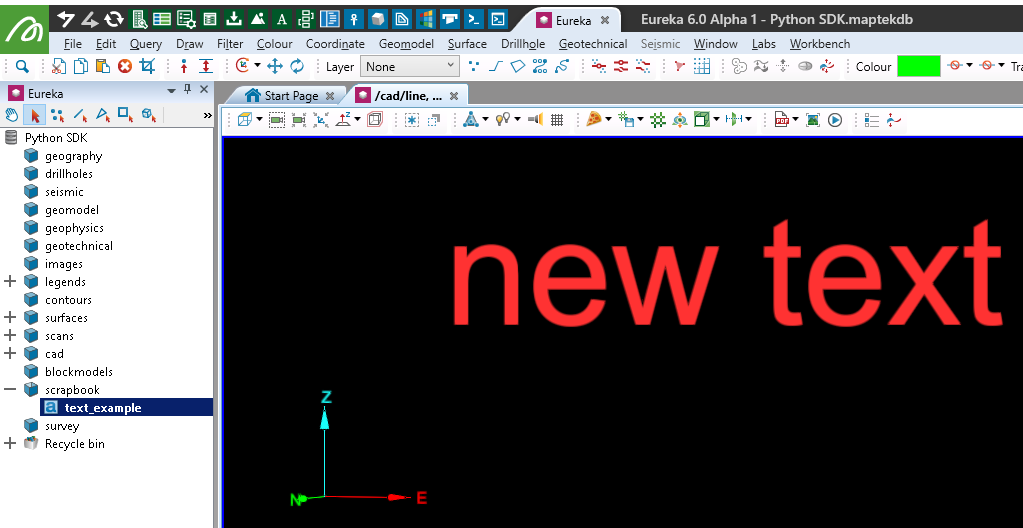
Editing Text2D properties
The example below modifies the colour, size, text, and position of the text object created in the last example.
from mapteksdk.project import Project
project = Project() # Connect to default project

object_path = "scrapbook/text_example"

# Create Text
with project.edit(object_path) as text:
    text.text = 'new text'
    text.location = [50, 50, 50]
    # Colours are R,G,B,A, where A is Alpha (255 = opaque)
    text.colour = [255, 50, 50, 255]
    text.size = 150
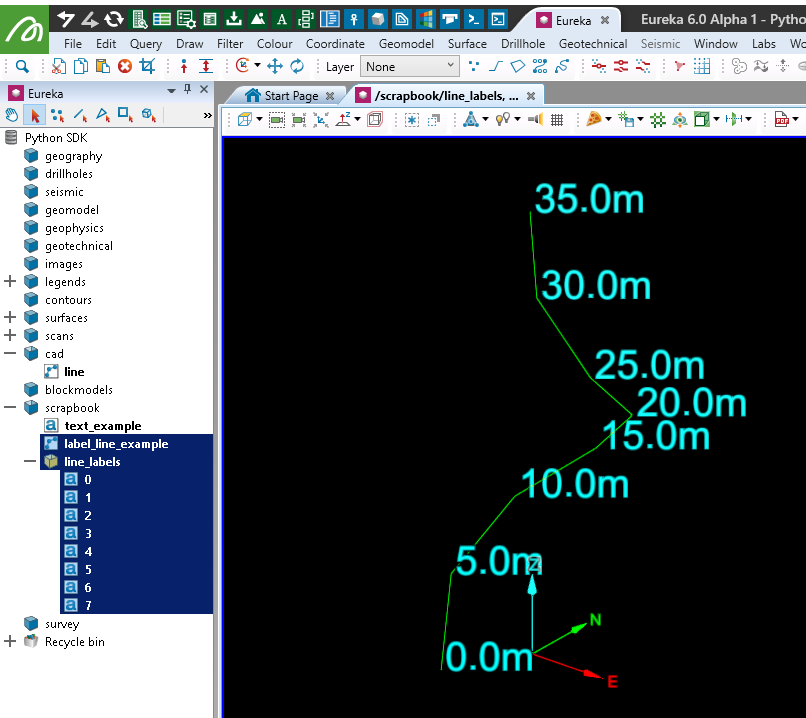
Labelling point heights along a line with text
The following example demonstrates how to add 2D text at each point of a 3D polyline, labelling each point with its height.
from mapteksdk.project import Project
from mapteksdk.data import Text2D, Polyline
project = Project() # Connect to default project

# Create a swirl line that rises in height
line_path = "scrapbook/label_line_example"
labels_path = "scrapbook/line_labels"

with project.new(line_path, Polyline, overwrite=True) as line:
    line.points = [[10, 0, 0], [7, 5, 5], [9, 10, 10], [15, 12, 15],
                   [20, 10, 20], [20, 5, 25], [15, 5, 30], [12, 8, 35]]

# Delete labels container if it exists
project.delete(labels_path)

with project.read(line.id) as line:
    for label_id, point in enumerate(line.points):
        # Create text at point
        with project.new(
          "{}/{}".format(labels_path, label_id),
          Text2D,
          overwrite=True) as text:
            text.text = "{}m".format(point[2])
            text.location = point
            text.colour = [point[2], 255, 255, 255]
            text.size = 40