Colour Maps
Colour maps, also referred to as legends in Maptek applications, associate colours with numeric ranges or string values. Colour maps can be applied to objects of most spatial data types to highlight physical trends or attributes. You can use the Maptek Python SDK to access legends created in the software, or programmatically create colour maps that can be used in scripts or made available for use in the application.
Colour map examples
The following examples demonstrate how to create and apply various types of colour maps within the Maptek Python SDK. These examples cover different scenarios such as string and numeric colour maps, and how to use them to enhance the visual representation of spatial data objects.
Creating a string colour map
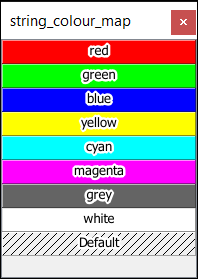
In this example, we create a colour map and a dense block model, and then apply the colour map to the block model.
"""Example 1: Colouring a dense block model using a string colour map."""
from mapteksdk.project import Project
from mapteksdk.data import StringColourMap, DenseBlockModel
project = Project()
with project.new_or_edit("legends/string_colour_map", StringColourMap) as string_map:
# The names associated with the colours in the colour map. Note that these names are case-sensitive.
# ie: red is valid, but Red is an invalid.
string_map.legend = ["red", "green", "blue", "yellow", "cyan", "magenta", "grey", "white"]
string_map.colours = [[255, 0, 0], # red
[0, 255, 0], # green
[0, 0, 255], # blue
[255, 255, 0], # yellow
[0, 255, 255], # cyan
[255, 0, 255], # magenta
[100, 100, 100], # black
[255, 255, 255]] # gray
# cutoff specifies how to colour invalid values. In this case invalid values will be coloured
# transparent.
string_map.cutoff = [0, 0, 0, 0]
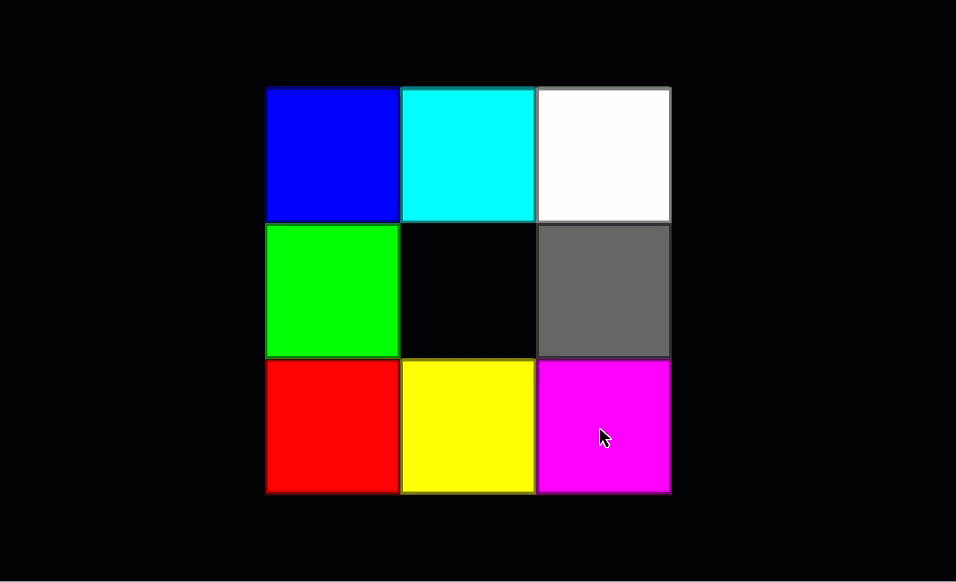
# Now use the colour map to colour a block model.
with project.new("blockmodels/coloured_block_model", DenseBlockModel(
x_res=1, y_res=1, z_res=1, x_count=3, y_count=3, z_count=1
)) as coloured_model:
# First a block attribute must be created to colour by.
# Note that the block in the middle has an invalid value so will be invisible.
coloured_model.block_attributes["colours"] = [
"red", "green", "blue",
"yellow", "invalid", "cyan",
"magenta", "grey", "white",
]
# Now that the attribute has been added, we can assign the colour map to it.
coloured_model.block_attributes.set_colour_map("colours", string_map)
Running this script will create the colour map and dense block model shown below:
Creating a numeric colour map
In this example, we create a numeric colour map and a dense block model, and then apply the colour map to the block model.
"""Example 2: Colouring a dense block model using a solid numeric colour map.
There are two types of numeric colour map - solid and interpolated. They are
differentiated by the interpolated property of the colour map.
"""
from mapteksdk.project import Project
from mapteksdk.data import NumericColourMap, DenseBlockModel
project = Project()
with project.new_or_edit("legends/numeric_map_exp", NumericColourMap) as solid_map:
solid_map.interpolated = False
# For non-interpolated (solid) colour maps there is one less colour than range.
solid_map.ranges = [0, 10, 20, 30, 40, 50, 60, 70]
solid_map.colours = [[255, 0, 0], # 0 < value <= 10 are coloured this colour (Red).
[0, 255, 0], # 10 < value <= 20 are coloured this colour (Green).
[0, 0, 255], # 20 < value < 30 are coloured this colour (Blue).
[255,50,100], # 30
[250,255,40], # 40
[100, 30, 255], #50
[45, 45, 45], #60
]
# Colours below zero are coloured this colour. In this case it is semi-transparent red.
solid_map.lower_cutoff = [255, 0, 0, 100]
# Colours greater than the highest range, in this case it is semi-transparent blue.
solid_map.upper_cutoff = [0, 0, 255, 100]
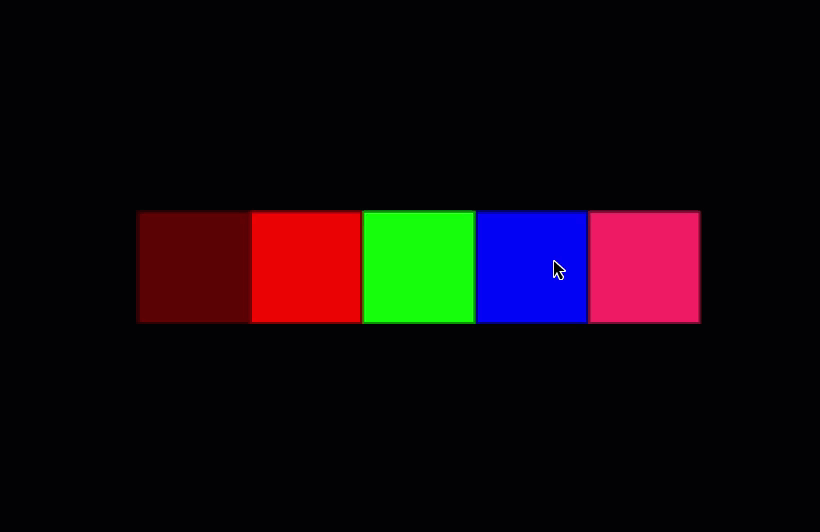
with project.new("blockmodels/dense_solid_colours", DenseBlockModel(
x_count=5, y_count=1, z_count=1, x_res=1, y_res=1, z_res=1
), overwrite=True) as solid_model:
solid_model.block_attributes["solid_colour"] = [-5, 5, 15, 25, 35]
solid_model.block_attributes.set_colour_map("solid_colour", solid_map)
Running this script will create the colour map and dense block model shown below:

Applying a colour map to an object
In this example, we create an interpolated numeric colour map and a dense block model, and then apply the colour map to the block model.
An interpolated colour map is one where the colour for a given numeric value is interpolated based on the distance of the value from a range boundary.
"""Example 4: Colouring a block model using a numeric colour map."""
from mapteksdk.project import Project
from mapteksdk.data import NumericColourMap, DenseBlockModel
project = Project()
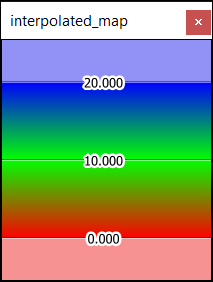
with project.new_or_edit("legends/interpolated_map", NumericColourMap) as interpolated_map:
interpolated_map.interpolated = True
# For interpolated colour maps the number of colours is equal to the number of ranges.
interpolated_map.ranges = [0, 10, 20]
interpolated_map.colours = [[255, 0, 0],
# Colours between 0 and 10 will smoothly transition from the colour above (red)
# to the colour below (green)
[0, 255, 0],
# Colours between 10 and 20 will smoothly transition from the colour above (green)
# to the colour below (blue)
[0, 0, 255],
]
# Colours below zero are coloured this colour. In this case it is semi-transparent red.
interpolated_map.lower_cutoff = [255, 0, 0, 100]
# Colours greater than the highest range, in this case it is semi-transparent blue.
interpolated_map.upper_cutoff = [0, 0, 255, 100]
# Use the colour map to colour a blockmodel.
with project.new("blockmodels/dense_interpolated_colours", DenseBlockModel(
x_count=11, y_count=1, z_count=1, x_res=1, y_res=1, z_res=1
), overwrite=True) as interpolated_model:
# Create a block attribute to colour by.
# From left to right when viewing from above:
# The first block's value is -1 which is below the minimum so is coloured by lower_offcut.
# As the value increases from 2 to 10 the blocks get progressively more green.
# As the value increases from 10 to 18 the blocks get progressively more blue.
# And finally the last block's value is 22 which is above the maximum so is coloured by upper_offcut.
interpolated_model.block_attributes["interpolated_colour"] = [-1, 2, 4, 6, 8, 10, 12, 14, 16, 18, 22]
interpolated_model.block_attributes.set_colour_map("interpolated_colour", interpolated_map)
Running this script will create the colour map and dense block model shown below:
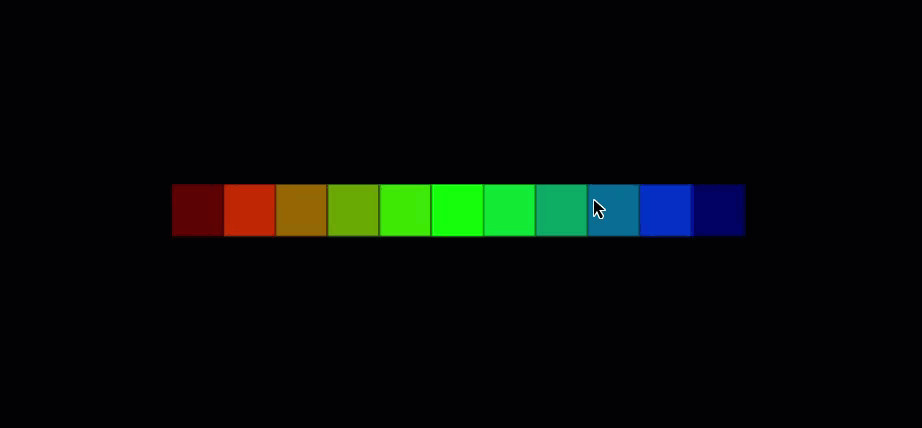
Getting colours from a numeric colour map
Consider the following colour map:

It transitions from red at -20 to yellow at -10, then to green at 0, then to cyan at 10 and finally to blue at 20. But given this, how can you know what colour it would give at 19.5? Or at 0.55? How does the application determine what colour should be given a specific value?
Rather than worry about the specific mathematics of colour interpolation, it is significantly easier to use the NumericColourMap.colours_for() method as demonstrated in this snippet:
def colours_for(project: Project, colour_map_id: ObjectID[NumericColourMap]):
    with project.read(colour_map_id) as colour_map:
        # It accepts a list of values to allow for multiple to be queried at once.
        values = [19.5, 0.55]
        results = colour_map.colours_for([19.5, 0.55])
        for value, colour in zip(values, results):
            print(f"{value} : {colour}")
Output with the colour map shown above:
19.5 : [  0  12 255 255]
0.55 : [  0 255  14 255]
The NumericColourMap.colours_for() method accepts a sequence of numbers and returns the corresponding colours from the ColourMap, taking into account the interpolation and the upper and lower cutoff.
This can be useful when exporting to a format that doesn’t support colour maps or legends.
Important: If the colour map has a unit (e.g. radians, degrees, metres, or yards) then the values passed to colours_for() are assumed to be in SI units (radians for angles, metres for distance, etc.) rather than the displayed unit.
Removing a colour map
Use the Topology.remove_colour_map() method to remove the colour map associated with an object. For example, the following script will remove the colour map from all selected objects:
from mapteksdk.data import Topology
from mapteksdk.project import Project, Selection


def main(project: Project, selection: Selection[Topology]):
    for oid in selection:
        with project.edit(oid) as topology:
            topology.remove_colour_map()


if __name__ == "__main__":
    with Project() as project:
        selection = project.get_selected().where(Topology)

        with project.undo():
            main(project, selection)
Example: reading point colours using the associated colour map
The following snippet demonstrates how to determine what the point colours would be if an object was coloured by the given point attribute:
colour_map.colours_for(
    data_object.point_attributes[attribute_name]
)
The following script makes use of the above code snippet to extract coloured points from the picked object using the colour map if the object is coloured using a colour map and the point colours array if it is not coloured by a colour map. The script assumes the following:
-
colour_mapis a NumericColourMap -
data_objectis a DataObject subclass with point attributes -
attribute_nameis the name or AttributeKey for the attribute to get the point colours for
import os


import numpy as np
from mapteksdk.project import Project, OverwriteMode
from mapteksdk.data import PointSet, NumericColourMap, StringColourMap, ObjectID
from mapteksdk.operations import (
    object_pick,
    active_view,
    show_message,
    show_toast_notification,
    Severity,
)


SCRIPT_NAME = os.path.basename(__file__)


def get_point_colours_from_colour_map(project: Project, oid: ObjectID) -> np.ndarray:
    """Read the point colours of the object.


    Unlike accessing the point colours directly, this will return correct
    values even for objects which are coloured by colour maps.


    Parameters
    ----------
    project
      Project to use to read the object.
    oid
      ObjectID of the object to read the colours of.


    Returns
    -------
    np.ndarray
      Array of the colours for each point.


    Raises
    ------
    ValueError
      If the object does not have point colours, or is using an unsupported
      colour map.
    """
    with project.read(oid) as data_object:
        colour_map_id = data_object.get_colour_map()
        if colour_map_id is None:
            # The object is not coloured via a colour map.
            try:
                return data_object.point_colours
            except AttributeError:
                raise ValueError("The object does not have point colours.") from None
        colour_map_attribute = None
        try:
            colour_map_attribute = data_object.point_attributes.colour_map_attribute
        except AttributeError:
            # The point_attributes property was missing.
            raise ValueError("The object does not have point colours.") from None
        if colour_map_attribute is None:
            # The object has a colour map, but it is not associated with the
            # point colours.
            try:
                return data_object.point_colours
            except AttributeError:
                raise ValueError("The object does not have point colours.") from None
        with project.read(data_object.get_colour_map()) as colour_map:
            if isinstance(colour_map, (NumericColourMap, StringColourMap)):
                return colour_map.colours_for(
                    data_object.point_attributes[colour_map_attribute]
                )
            raise ValueError(f"Unsupported colour map type: {colour_map.id.type_name}")


def extract_coloured_points(
    project: Project, object_id: ObjectID
) -> ObjectID[PointSet]:
    """Extract coloured points from another object.


    This will read the point colours from numeric colour maps associated with
    an object if one is available.


    Parameters
    ----------
    project
      Project to use to read the existing object and create the new object.
    object_id
      Existing object to read the points and point colours from.


    Raises
    ------
    ValueError
      If the existing object does not have points.
    """
    baked_point_colours = get_point_colours_from_colour_map(project, object_id)
    with project.new(
        f"{object_id.path}_coloured_points",
        PointSet,
        overwrite=OverwriteMode.UNIQUE_NAME,
    ) as point_set:
        with project.read(object_id) as read_object:
            point_set.points = read_object.points
            point_set.point_colours = baked_point_colours
    return point_set.id


def main(project: Project):
    """Allow the user to pick an object and then extract coloured points.


    Parameters
    ----------
    project
      Project to use for the object pick and creating or reading objects.
    """
    oid = object_pick(label="Pick an object to extract coloured points from.")
    view = active_view()
    result_oid = extract_coloured_points(project, oid)
    # Remove the picked object and replace it with the extracted points.
    if view is not None:
        view.add_object(result_oid)
        view.remove_object(oid)


if __name__ == "__main__":
    with Project() as main_project:
        try:
            with main_project.undo():
                main(main_project)
                show_toast_notification(SCRIPT_NAME, "Completed")
        except Exception as error:
            message = f"{type(error).__name__}: {str(error)}"
            show_message(SCRIPT_NAME, message, Severity.ERROR)
            raise
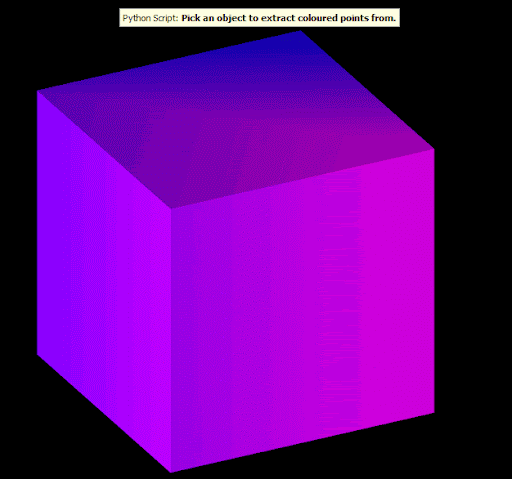
The following animation demonstrates running this script on a simple cube coloured based on its point colours:
Example: baked colour by facet attribute
The following snippet demonstrates how to colour a surface by facet attribute using a numeric colour map, without associating that colour map with the object:
surface.facet_colours = colour_map.colours_for(
    data_object.facet_attributes[attribute_name])
The following script uses this to colour a surface by a facet area attribute, which the script also calculates:
import os


import numpy as np
from mapteksdk.project import Project, OverwriteMode
from mapteksdk.data import PointSet, NumericColourMap, StringColourMap, ObjectID
from mapteksdk.operations import (
    object_pick,
    active_view,
    show_message,
    show_toast_notification,
    Severity,
)


SCRIPT_NAME = os.path.basename(__file__)


def get_point_colours_from_colour_map(project: Project, oid: ObjectID) -> np.ndarray:
    """Read the point colours of the object.


    Unlike accessing the point colours directly, this will return correct
    values even for objects which are coloured by colour maps.


    Parameters
    ----------
    project
      Project to use to read the object.
    oid
      ObjectID of the object to read the colours of.


    Returns
    -------
    np.ndarray
      Array of the colours for each point.


    Raises
    ------
    ValueError
      If the object does not have point colours, or is using an unsupported
      colour map.
    """
    with project.read(oid) as data_object:
        colour_map_id = data_object.get_colour_map()
        if colour_map_id is None:
            # The object is not coloured via a colour map.
            try:
                return data_object.point_colours
            except AttributeError:
                raise ValueError("The object does not have point colours.") from None
        colour_map_attribute = None
        try:
            colour_map_attribute = data_object.point_attributes.colour_map_attribute
        except AttributeError:
            # The point_attributes property was missing.
            raise ValueError("The object does not have point colours.") from None
        if colour_map_attribute is None:
            # The object has a colour map, but it is not associated with the
            # point colours.
            try:
                return data_object.point_colours
            except AttributeError:
                raise ValueError("The object does not have point colours.") from None
        with project.read(data_object.get_colour_map()) as colour_map:
            if isinstance(colour_map, (NumericColourMap, StringColourMap)):
                return colour_map.colours_for(
                    data_object.point_attributes[colour_map_attribute]
                )
            raise ValueError(f"Unsupported colour map type: {colour_map.id.type_name}")


def extract_coloured_points(
    project: Project, object_id: ObjectID
) -> ObjectID[PointSet]:
    """Extract coloured points from another object.


    This will read the point colours from numeric colour maps associated with
    an object if one is available.


    Parameters
    ----------
    project
      Project to use to read the existing object and create the new object.
    object_id
      Existing object to read the points and point colours from.


    Raises
    ------
    ValueError
      If the existing object does not have points.
    """
    baked_point_colours = get_point_colours_from_colour_map(project, object_id)
    with project.new(
        f"{object_id.path}_coloured_points",
        PointSet,
        overwrite=OverwriteMode.UNIQUE_NAME,
    ) as point_set:
        with project.read(object_id) as read_object:
            point_set.points = read_object.points
            point_set.point_colours = baked_point_colours
    return point_set.id


def main(project: Project):
    """Allow the user to pick an object and then extract coloured points.


    Parameters
    ----------
    project
      Project to use for the object pick and creating or reading objects.
    """
    oid = object_pick(label="Pick an object to extract coloured points from.")
    view = active_view()
    result_oid = extract_coloured_points(project, oid)
    # Remove the picked object and replace it with the extracted points.
    if view is not None:
        view.add_object(result_oid)
        view.remove_object(oid)


if __name__ == "__main__":
    with Project() as main_project:
        try:
            with main_project.undo():
                main(main_project)
                show_toast_notification(SCRIPT_NAME, "Completed")
        except Exception as error:
            message = f"{type(error).__name__}: {str(error)}"
            show_message(SCRIPT_NAME, message, Severity.ERROR)
            raise
The following animation demonstrates this script in action using the truck surface (see Markers to get the truck).
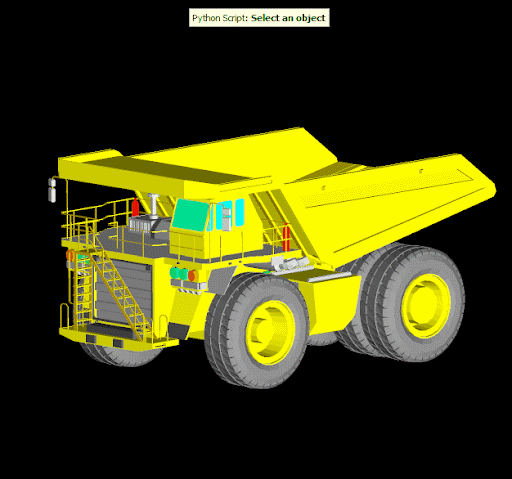
The small facets in areas with a lot of detail are coloured red, while the large facets in areas of lower detail are coloured orange or green. The largest facets (not shown in animation as they are on the bottom of the truck) are coloured blue.
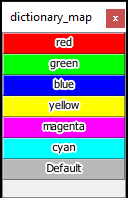
Accessing a colour map like a dictionary
The colours of string colour maps can be accessed as if the object were a dictionary of colours. The following script demonstrates how to use this feature to create a colour map in a more readable manner:
from mapteksdk.project import Project
from mapteksdk.data import StringColourMap

if __name__ == "__main__":
  with Project() as project:
    with project.new("legends/dictionary_map", StringColourMap) as colour_map:
      colour_map["red"] = [255, 0, 0, 255]
      colour_map["green"] = [0, 255, 0, 255]
      colour_map["blue"] = [0, 0, 255, 255]
      colour_map["yellow"] = [255, 255, 0, 255]
      colour_map["magenta"] = [255, 0, 255, 255]
      colour_map["cyan"] = [0, 255, 255, 255]
      # The cut off colour is transparent grey.
      colour_map.cutoff = [100, 100, 100, 100]
This script creates the following colour map:
String colour maps support the full dictionary interface, as demonstrated in the following examples:
# This script is a fragment and cannot run on its own.
# Get the colour associated with red.
# This would raise an error if red is not in the colour map.
red = colour_map["red"]

# The get function will return the cut off if the colour doesn't exist.
orange = colour_map.get("orange")

# Del can be used to delete colours from the map.
del colour_map["red"]

# It is also possible to check if a key exists in the colour map.
if "red" in colour_map:
    print("No red in this colour map...")
Getting many colours from a string colour map
While treating a string colour map like a dictionary is effective for retrieving a single colour, it is generally more efficient to use the StringColourMap.colours_for() method when you need to retrieve a large number of colours. For instance, if you have a string colour map and a block property with string attributes, you can obtain an array of colours corresponding to each block by using the following code:
model.block_colours = string_colour_map.colours_for(model.block_attributes["geocode"])
The following script demonstrates how to set the block colours of a dense block model using this approach:
from mapteksdk.project import Project, OverwriteMode
from mapteksdk.data import DenseBlockModel, StringColourMap
from mapteksdk.operations import open_new_view


creation_parameters = {
    "row_count": 2,
    "col_count": 2,
    "slice_count": 2,
    "row_res": 0.5,
    "col_res": 0.5,
    "slice_res": 0.5,
}


ROCK = "ROCK"
ORE = "ORE"
RICH_ORE = "RICH_ORE"


with Project() as project:
    with project.new(
        "blockmodels/baked_colours",
        DenseBlockModel(**creation_parameters),
        overwrite=OverwriteMode.UNIQUE_NAME,
    ) as model, project.new(None, StringColourMap) as colour_map:
        colour_map.legend = [ROCK, ORE, RICH_ORE]
        colour_map.colours = [[100, 100, 100, 255]]
        colour_map[ROCK] = [100, 100, 100, 255]
        colour_map[ORE] = [25, 25, 200, 255]
        colour_map[RICH_ORE] = [10, 200, 200, 255]


        model.block_attributes["geocode"] = [
            ORE,
            RICH_ORE,
            ORE,
            ORE,
            ROCK,
            ROCK,
            ROCK,
            ROCK,
        ]
        # :NOTE: model.block_attributes.set_colour_map("geocode", colour_map.id)
        # might be preferable in this case because that would cause the colours
        # to update when the block attribute is updated.
        model.block_colours = colour_map.colours_for(model.block_attributes["geocode"])
        print(model.block_colours)


    open_new_view([model.id])
The output from the StringColourMap.colours_for() method displays the block colours array:
[[ 25  25 200 255]
[ 10 200 200 255]
[ 25  25 200 255]
[ 25  25 200 255]
[100 100 100 255]
[100 100 100 255]
[100 100 100 255]
[100 100 100 255]]
This array represents the actual colours assigned to each block as determined by the colour map. Using model.block_attributes.set_colour_map("geocode", colour_map) would not provide this detailed colour information.
Colour map case sensitivity
Consider the following script:
from mapteksdk.project import Project
from mapteksdk.data import StringColourMap, DenseBlockModel, ObjectID
from mapteksdk.operations import open_new_view

def create_dense_block_model_with_attribute(
        path: str,
        target_project: Project) -> ObjectID[DenseBlockModel]:
    """Creates a dense block model with the 'Type' block attribute.

    This block attribute contains strings that have differing casing.

    Parameters
    ----------
    path
        Path to create the block model at.
    target_project
        Project to use to create the block model.

    Returns
    -------
    ObjectID
        Object ID of the newly created block model.
    """
    with target_project.new(
            path, DenseBlockModel(
                row_count=3, col_count=4, slice_count=1,
                row_res=0.5, col_res=0.5, slice_res=1.5
            )) as model:
        model.block_attributes["Type"] = [
            "IRON", "Iron", "iron", "IRon",
            "COPPER", "Copper", "copper", "COpper",
            "COBALT", "Cobalt", "cobalt", "CoBalt"
        ]
        return model.id

if __name__ == "__main__":
    with Project() as project:
        block_id = create_dense_block_model_with_attribute(
            "block models/examples/case_sensitive",
            project)
        with project.edit(block_id) as edit_model:
            with project.new(None, StringColourMap) as colour_map:
                colour_map.case_sensitive = True
                colour_map["IRON"] = [255, 0, 0, 255]
                colour_map["copper"] = [0, 255, 0, 255]
                colour_map["Cobalt"] = [0, 0, 255, 255]
                colour_map.cutoff = [100, 100, 100, 255]
            edit_model.block_attributes.set_colour_map("Type", colour_map)
        open_new_view([block_id])
The intention is to create a block model where:
-
Blocks in the top row (representing iron) are blue
-
Blocks in the middle row (representing copper) are green
-
Blocks in the bottom row (representing cobalt) are red
However, the block model created by the script looks like this:
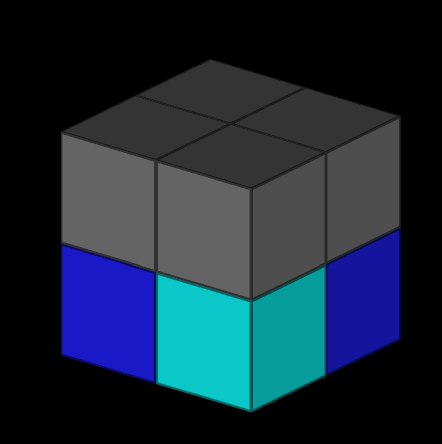
Most blocks appear grey, indicating that the block attribute values do not match the colour map entries. The issue is due to case sensitivity in the colour map. The colour map uses the following keys:
| Key | Colour |
|---|---|
| IRON | Red |
| copper | Green |
| Cobalt | Blue |
The block model contains the following values:
| COBALT | Cobalt | cobalt | CoBalt |
| COPPER | Copper | copper | COpper |
| IRON | Iron | iron | IRon |
The block model contains values with different combinations of uppercase and lowercase characters, such as IRON, Iron, iron, IRon, etc. As a result, only the values with exact casing match the keys in the colour map, while the others default to the cutoff colour. This is a common problem for drillhole databases, especially when strings are entered manually by many different people.
To cause a colour map to be case insensitive, the script needs to set the StringColourMap.case_sensitive flag to False. Below is the same script, but with the case sensitive flag set to False.
from mapteksdk.project import Project
from mapteksdk.data import StringColourMap, DenseBlockModel, ObjectID
from mapteksdk.operations import open_new_view

def create_dense_block_model_with_attribute(
        path: str,
        target_project: Project) -> ObjectID[DenseBlockModel]:
    """Creates a dense block model with the 'Type' block attribute.

    This block attribute contains strings that have differing casing.

    Parameters
    ----------
    path
        Path to create the block model at.
    target_project
        Project to use to create the block model.

    Returns
    -------
    ObjectID
        Object ID of the newly created block model.
    """
    with target_project.new(
            path, DenseBlockModel(
                row_count=3, col_count=4, slice_count=1,
                row_res=0.5, col_res=0.5, slice_res=1.5
            )) as model:
        model.block_attributes["Type"] = [
            "IRON", "Iron", "iron", "IRon",
            "COPPER", "Copper", "copper", "COpper",
            "COBALT", "Cobalt", "cobalt", "CoBalt"
        ]
        return model.id

if __name__ == "__main__":
    with Project() as project:
        block_id = create_dense_block_model_with_attribute(
            "block models/examples/case_insensitive",
            project)
        with project.edit(block_id) as edit_model:
            with project.new(None, StringColourMap) as colour_map:
                colour_map.case_sensitive = False
                colour_map["IRON"] = [255, 0, 0, 255]
                colour_map["copper"] = [0, 255, 0, 255]
                colour_map["Cobalt"] = [0, 0, 255, 255]
                colour_map.cutoff = [100, 100, 100, 255]
            edit_model.block_attributes.set_colour_map("Type", colour_map)
        open_new_view([block_id])
This script creates the following block model:
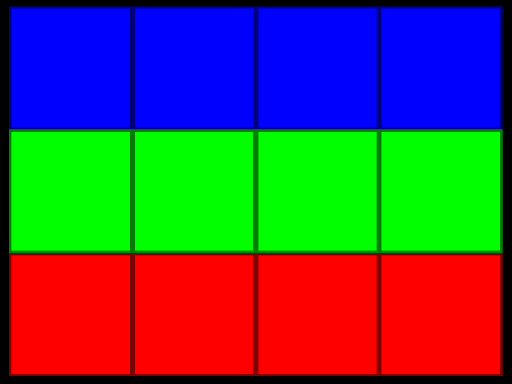
Because the colour map is case insensitive, the block model is coloured correctly regardless of the casing of the strings.
-
Data containing inconsistent casing is common when data is entered manually.
-
Some people will prefer different casing (e.g. “IRON”, “iron”, “Iron”)
-
There is also the possibility of typographical errors due to holding down the Shift key too long (“IRon”).
-
An alternative to making the colour map case sensitive is to fix the data using a script that makes all of the values consistently cased.
-
A case sensitive colour map can have different colours for different cases of the same key (e.g. “iron”, “Iron” and “IRON” could be coloured differently).
-
A case-insensitive colour map considers all keys that only differ by case to be identical (e.g. “iron”, “Iron”, “IRON” are all considered the same key).
