Dense Block Models
A dense block model is a block model where all the blocks are the same size, meaning that block properties store their values with the same level of detail over the entire extent of the model. The use of a dense block model is appropriate if the data being modelled has a similar resolution across the entire area. A dense block model is represented in the SDK with the DenseBlockModel class.
DenseBlockModel properties
The following properties and methods are specific to DenseBlockModel:
Set the visibility of a DenseBlockModel for a specified slice, row and column. By default, block_visibility_3d is set to True. |
|
| Set the selection of a DenseBlockModel for a specified slice, row and column. |
Dense block model 3D attributes
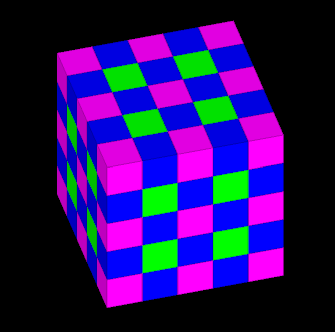
The DenseBlockModel.block_attributes_3d property provides three-dimensional access to block attributes, allowing indexing by slice, column, and row rather than just index. For example, the following script demonstrates how to create a block attribute with all zero values. It then increments the value for blocks in odd rows, columns, or slices (blocks in even rows, columns, and slices retain a value of 0, while those in odd positions are set to 3). The block model is then coloured according to this attribute, producing a regularly repeating pattern.
from mapteksdk.project import Project, OverwriteMode
from mapteksdk.data import DenseBlockModel, NumericColourMap, ObjectID
from mapteksdk.operations import open_new_view
import numpy as np

VARIABLE_NAME = "Example"


def create_colour_map(project: Project) -> ObjectID[NumericColourMap]:
    with project.new(None, NumericColourMap) as colour_map:
        colour_map.interpolated = False
        colour_map.ranges = [-0.5, 0.5, 1.5, 2.5, 3.5]
        colour_map.colours = [
            [255, 0, 0, 255],
            [0, 255, 0, 255],
            [0, 0, 255, 255],
            [255, 0, 255, 255],
        ]
        colour_map.lower_cutoff = [0, 0, 0, 120]
        colour_map.upper_cutoff = [0, 0, 0, 120]
    return colour_map.id


def create_block_model(
    project: Project, colour_map_id: ObjectID[NumericColourMap]
) -> ObjectID[DenseBlockModel]:
    with project.new(
        "block models/block_attributes_3d",
        DenseBlockModel(
            col_count=5,
            row_count=5,
            slice_count=5,
            col_res=1.0,
            row_res=1.0,
            slice_res=1.0,
        ),
        overwrite=OverwriteMode.UNIQUE_NAME,
    ) as model:
        model.block_attributes[VARIABLE_NAME] = np.zeros(
            model.block_count, dtype=np.int32
        )
        model.block_attributes_3d[VARIABLE_NAME][::2, :, :] += 1
        model.block_attributes_3d[VARIABLE_NAME][:, ::2, :] += 1
        model.block_attributes_3d[VARIABLE_NAME][:, :, ::2] += 1


        model.block_attributes.set_colour_map(VARIABLE_NAME, colour_map_id)
        return model.id


def main(project: Project):
    colour_map_id = create_colour_map(project)
    model_id = create_block_model(project, colour_map_id)
    open_new_view([model_id])


if __name__ == "__main__":
    with Project() as main_project:
        main(main_project)
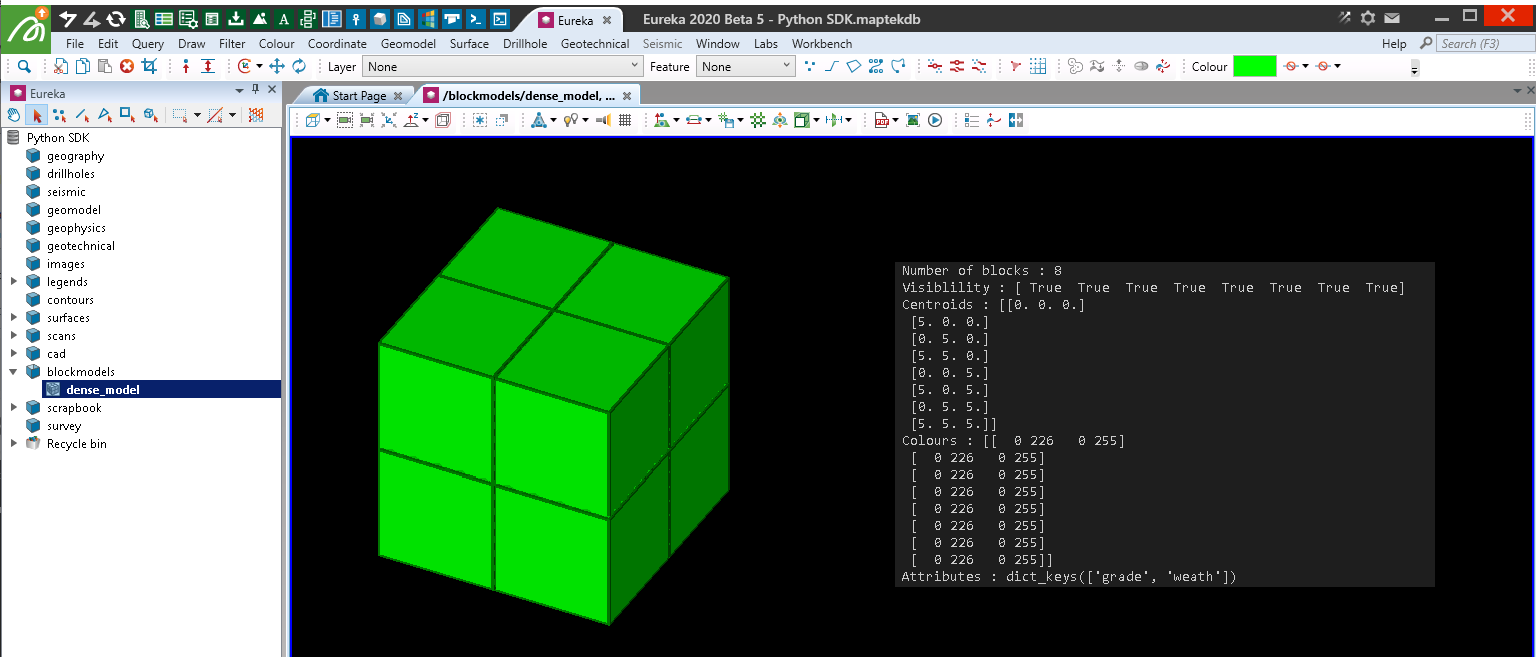
Below is a screenshot of the newly created block model:
Dense block model examples
The following examples illustrate common tasks and operations with dense block models using the SDK.
Creating a dense block model
Certain properties of a block model cannot be modified after creation. Therefore, the DenseBlockModel type requires some additional parameters when using Project.new() that are not required for several other object types. The following example demonstrates how to create a dense block model with specific dimensions and resolutions:
from mapteksdk.project import Project
from mapteksdk.data import DenseBlockModel
import numpy as np


project = Project()  # Connect to default project


# Create empty block model
row_size = 5.0  # Size of blocks in the row direction.
column_size = 5.0  # Size of blocks in the column direction.
slice_size = 5.0  # Size of blocks in the slice direction.
row_count = 2  # Number of rows.
column_count = 2  # Number of columns.
slice_count = 2  # Number of slices.


with project.new(
    "blockmodels/dense_model",
    DenseBlockModel(
        row_count=row_count,
        col_count=column_count,
        slice_count=slice_count,
        row_res=row_size,
        col_res=column_size,
        slice_res=slice_size,
    ),
) as model:
    grade = np.array([1.2, 1.5, 6.5, 4.3, 7.3, 8.7, 4.2, 5.5], dtype=np.float32)
    weath = np.array(["ox", "ox", "ox", "tr", "tr", "fr", "fr", "fr"])
    model.save_block_attribute("grade", grade)
    model.save_block_attribute("weath", weath)
    # Display model parameters
    print(f"Number of blocks : {model.block_count}")
    print(f"Visiblility : {model.block_visibility}")
    print(f"Centroids : {model.block_centroids}")
    print(f"Colours : {model.block_colours}")
    print(f"Attributes : {model.block_attributes.names}")
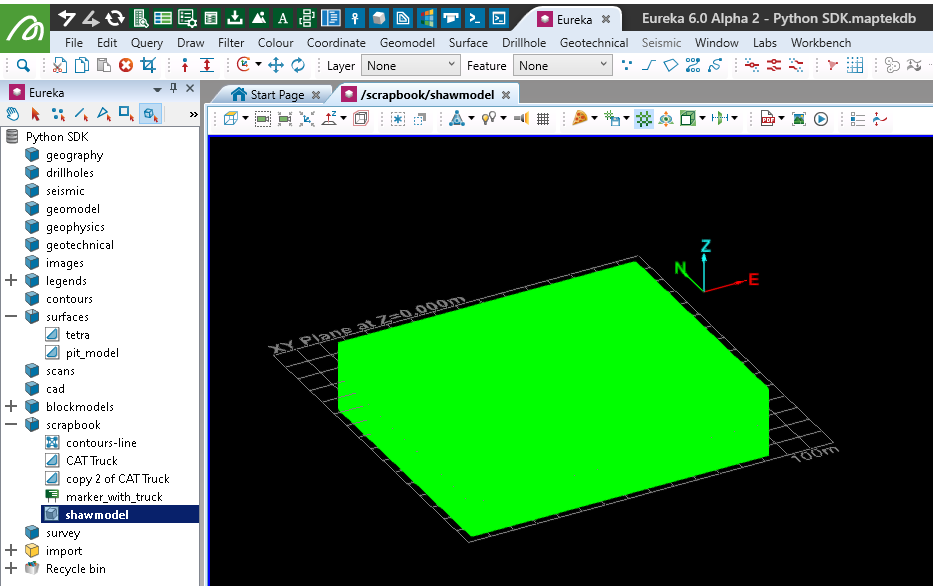
Importing a block model from a BMF file
This example illustrates how to import a block model from a Vulcan block model file (.bmf).
Note: To run the remaining example scripts provided on this page, first download and extract shawmodel_reg.zip to a folder on your system. The example scripts reference the folder location F:\Python SDK Help\data\. You will need to update this location in the scripts to match the folder where you extracted the files.
from mapteksdk.project import Project
from mapteksdk.data import io

project = Project() # Connect to default project

# The file path to the Vulcan block model to import:
bmf_path = "F:/Python SDK Help/data/shawmodel_reg.bmf"
imported = io.import_bmf(bmf_path)
if imported:
    # Assign a path to the object
    project.rename_object(imported, "/scrapbook/shawmodel", overwrite=True)
else:
    print("Could not import the block model")
Listing block model attributes
This example demonstrates how to list the attributes of a DenseBlockModel.
from mapteksdk.project import Project
from mapteksdk.data import DenseBlockModel
from mapteksdk.operations import object_pick


project = Project()  # Connect to default project


model_oid = object_pick(
    object_types=DenseBlockModel,
    label="Pick a model to list block attributes of."
)
with project.edit(model_oid) as model:
    print(f"Block attributes : {model.block_attributes.names}")


# Output:
# Block attributes :
#   dict_keys(['au', 'batter', 'bench', 'berm', 'blockid',
#   'cu', 'density', 'ebv', 'equivalent', 'lens',
#   'lg_pit', 'material', 'mined', 'ore_cycle', 'ore_distance',
#   'ore_prod_time', 'pit', 'recovery', 'region', 'tonnage', 'total_au_g',
#   'total_cu_tonnes', 'value0', 'value1', 'value2', 'waste_cycle',
#   'waste_production', 'waste_time', 'zones'])
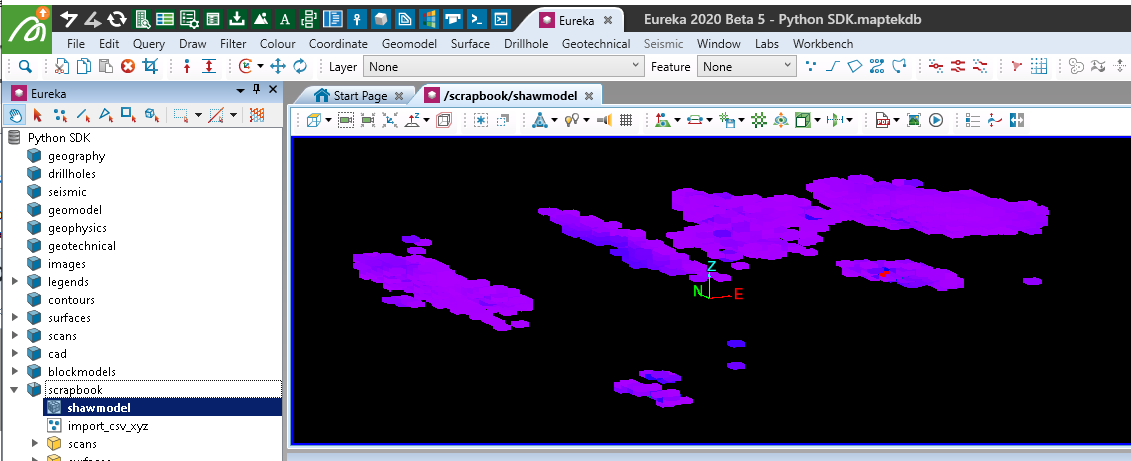
Filtering block visibility by attribute
This example illustrates how to filter the visibility of blocks in a DenseBlockModel based on a specific attribute value.
from mapteksdk.project import Project

project = Project() # Connect to default project

# Hide blocks with attribute "au" < 5
with project.edit("scrapbook/shawmodel") as bm:
    au_filter = bm.block_attributes["au"]
    # Reset current visibility status
    bm.block_visibility[:] = True
    # Hide all blocks below fitler value
    bm.block_visibility[(au_filter < 5)] = False
Performing calculations on a block model
This example demonstrates how to use NumPy to perform calculations on block model attributes.
import numpy as np
from mapteksdk.project import Project
project = Project() # Connect to default project

au_price = 1320
cu_price = 3.02

with project.read("/scrapbook/shawmodel") as bm:
    # np.copy() used as the object arrays will be read only
    # due to use of proj.read()
    au = np.copy(bm.block_attributes["au"])
    cu = np.copy(bm.block_attributes["cu"])

    # Set anything with values less than zero to zero (-99 or -9)
    au[au < 0] = 0
    cu[cu < 0] = 0

    # Calculate the new values
    au_oz = au * (1/31.1035)
    cu_lb = cu * 2240

    # Calculate the new equivalent
    au_eq = (au_oz * au_price + cu_lb * cu_price) / au_price

    print('Average au : {:.3f}'.format(au.mean()))
    print('Average cu : {:.3f}'.format(cu.mean()))
    print('Average au_eq : {:.3f}'.format(au_eq.mean()))

# Output:
# Average au : 0.108
# Average cu : 0.062
# Average au_eq : 0.321
