Filled Polygons
A filled polygon is a polygon where all or part of its interior is coloured. A filled polygon is represented in the SDK with the FilledPolygon class.
Filled polygon examples
The following examples demonstrate how to create and manipulate filled polygons using the FilledPolygon class in the SDK.
Creating filled polygons
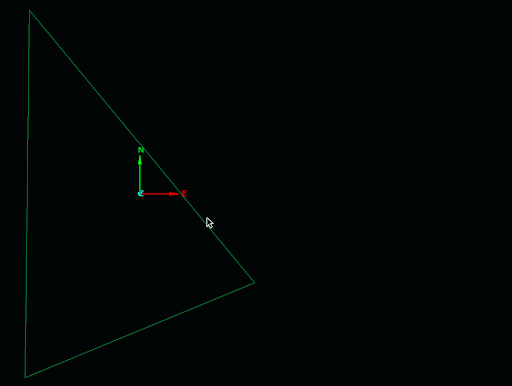
To create a filled polygon within an application, you can typically right-click on a regular polygon and select Edit > Fill polygon from the context menu, as illustrated below.
While creating a filled polygon from a regular polygon might make them appear similar, interacting with each type is programmatically is quite different. FilledPolygon objects can represent much more complex shapes than regular polygons. Unlike regular polygons, points cannot be directly assigned to FilledPolygon objects. Instead, the FilledPolygon.add_loop() method is used, as demonstrated in the following script:
from mapteksdk.project import Project, OverwriteMode
from mapteksdk.data import FilledPolygon, ObjectID
from mapteksdk.operations import open_new_view


def create_basic_filled_polygon(project: Project) -> ObjectID[FilledPolygon]:
    with project.new("cad/basic_filled_polygon",
                     FilledPolygon,
                     overwrite=OverwriteMode.UNIQUE_NAME) as filled_polygon:
        filled_polygon.add_loop(
            [[-1, -1, 0], [1, -1, 0], [1, 1, 0], [-1, 1, 0]]
        )
    return filled_polygon.id


if __name__ == "__main__":
    with Project() as main_project:
        polygon_id = create_basic_filled_polygon(main_project)
        open_new_view([polygon_id])
This script creates the filled polygon shown below:
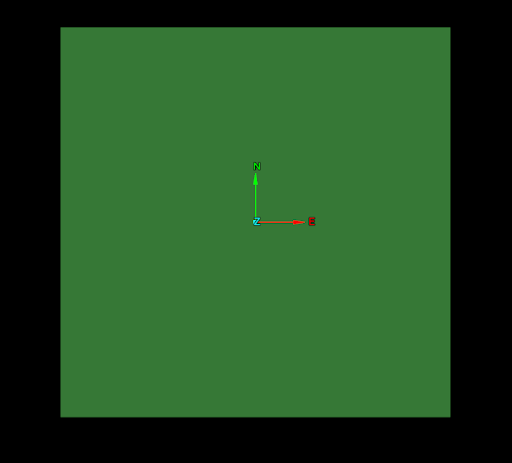
The manner of adding points used in the script is required because a FilledPolygon object may include multiple valid polygons. For example, consider the following script. It adds two loops using the FilledPolygon.add_loop() method: one representing a square with an edge length of 2.0 metres and another with an edge length of 1.0 metre.
from mapteksdk.project import Project, OverwriteMode
from mapteksdk.data import FilledPolygon, ObjectID
from mapteksdk.operations import open_new_view


def create_basic_filled_polygon(project: Project) -> ObjectID[FilledPolygon]:
    with project.new("cad/two_loop_filled_polygon",
                      FilledPolygon,
                      overwrite=OverwriteMode.UNIQUE_NAME) as filled_polygon:
        filled_polygon.add_loop(
            [[-1.0, -1.0, 0], [1.0, -1.0, 0], [1.0, 1.0, 0], [-1.0, 1.0, 0]]
        )
        filled_polygon.add_loop(
            [[-0.5, -0.5, 0], [0.5, -0.5, 0], [0.5, 0.5, 0], [-0.5, 0.5, 0]]
        )
    return filled_polygon.id


if __name__ == "__main__":
    with Project() as main_project:
        polygon_id = create_basic_filled_polygon(main_project)
        open_new_view([polygon_id])
This script results in a filled polygon with an outer square and a hole in the middle, as shown below:
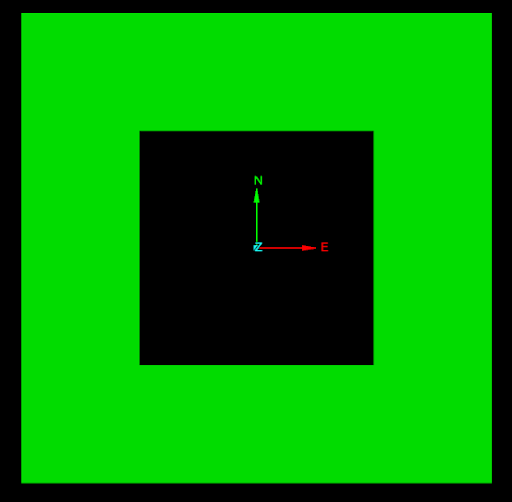
The first loop of points defines the outer square, while the second loop of points defines the “hole” in the middle of that square. In this way, FilledPolygon allows for more complicated shapes to be represented by the object than a regular polygon would.
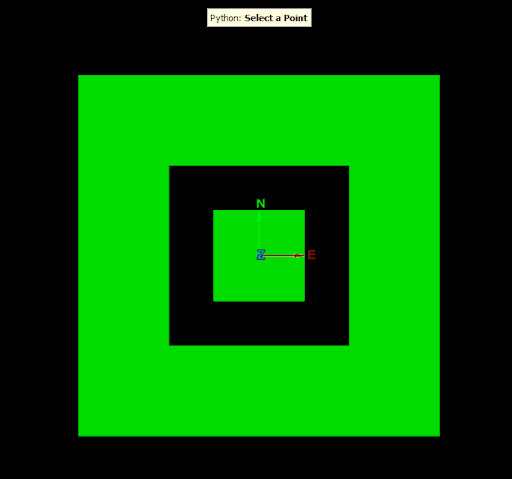
The next example adds a third square polygon half the size of the second polygon.
from mapteksdk.project import Project, OverwriteMode
from mapteksdk.data import FilledPolygon, ObjectID
from mapteksdk.operations import open_new_view


def create_basic_filled_polygon(project: Project) -> ObjectID[FilledPolygon]:
    with project.new("cad/three_loop_filled_polygon",
                     FilledPolygon,
                     overwrite=OverwriteMode.UNIQUE_NAME) as filled_polygon:
        filled_polygon.add_loop(
            [[-1.0, -1.0, 0], [1.0, -1.0, 0], [1.0, 1.0, 0], [-1.0, 1.0, 0]]
        )
        filled_polygon.add_loop(
            [[-0.5, -0.5, 0], [0.5, -0.5, 0], [0.5, 0.5, 0], [-0.5, 0.5, 0]]
        )
        filled_polygon.add_loop(
            [[-0.25, -0.25, 0], [0.25, -0.25, 0], [0.25, 0.25, 0], [-0.25, 0.25, 0]]
        )
    return filled_polygon.id


if __name__ == "__main__":
    with Project() as main_project:
        polygon_id = create_basic_filled_polygon(main_project)
        open_new_view([polygon_id])
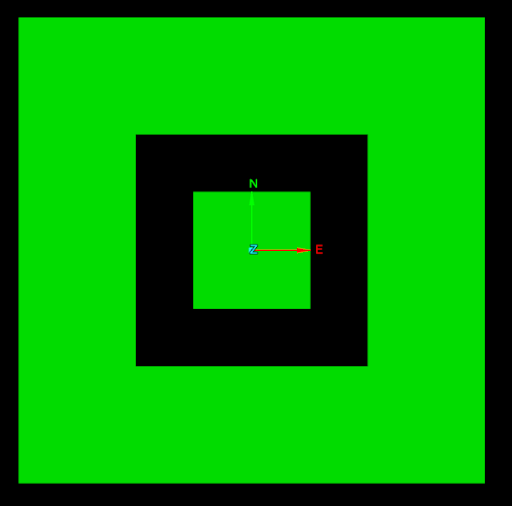
This script produces a filled polygon with an additional smaller square, as shown below.
Additive and subtractive loops
Loops within a filled polygon are classified as either additive or subtractive. Additive loops define areas filled with colour, while subtractive loops define areas within additive loops that remain unfilled. The classification of loops is based on the following rules:
-
The outermost loop is always additive.
-
Any loop inside an additive loop is subtractive.
-
Any loop inside a subtractive loop is additive.
-
The order in which loops are added does not affect their classification. Whether a loop is additive or subtractive is determined solely by its geometry.
-
Loops can share points as long as they do not overlap. In such cases, the object will contain two points with the same coordinates, which can be selected independently and have different properties.
-
If any two loops overlap, the object becomes degenerate.
Editing all points of a filled polygon
While there are no setter functions for the points and edges of a filled polygon, these properties can be read and edited, allowing for operations such as incrementing the Z coordinate of all points. The following script demonstrates this.
from mapteksdk.project import Project
from mapteksdk.data import FilledPolygon, ObjectID
from mapteksdk.operations import object_pick


def increase_filled_polygon_z(
        project: Project,
        polygon_id: ObjectID[FilledPolygon]):
    """Increase the z coordinate of all points in the filled polygon by 1.


    Parameters
    ----------
    project
      The Project to use to open the Filled Polygon.
    ObjectID
      Object ID of the filled polygon to increase the z coordinate of.
    """
    with project.edit(polygon_id) as filled_polygon:
        filled_polygon.points[:, 2] += 1


if __name__ == "__main__":
    with Project() as main_project:
        oid = object_pick(
            object_types=FilledPolygon,
            label="Pick a filled Polygon increment z of.")
        increase_filled_polygon_z(main_project, oid)
The result of running this script is demonstrated in the following animation:

The loops property
The FilledPolygon.loops property returns a sequence of Loop objects. These represent each of the loops that make up the filled polygon. This allows for reading the points and edges of each loop, as demonstrated in the following script:
from mapteksdk.project import Project
from mapteksdk.data import FilledPolygon, ObjectID
from mapteksdk.operations import object_pick


def print_filled_polygon_points_and_edges(
        project: Project,
        polygon_id: ObjectID[FilledPolygon]):
    """Print the points and edges of a filled polygon.


    Parameters
    ----------
    project
      The Project to use to open the Filled Polygon.
    ObjectID
      Object ID of the filled polygon to print the points and edges of.
    """
    with project.read(polygon_id) as read_polygon:
        for i, loop in enumerate(read_polygon.loops):
            print(f"Points in loop {i}:\n", loop.points)
            print(f"Edges in loop {i}:\n", loop.edges)


if __name__ == "__main__":
    with Project() as main_project:
        oid = object_pick(
            object_types=FilledPolygon,
            label="Pick a filled Polygon to print points and edges of.")
        print_filled_polygon_points_and_edges(main_project, oid)
Running this script and clicking on the three-loop filled polygon from an earlier example will produce the following output:
Points in loop 0
[[-1. -1.  0.]
[ 1. -1.  0.]
[ 1.  1.  0.]
[-1.  1.  0.]]
Edges in loop 0
[[0 1]
[1 2]
[2 3]
>[3 0]]
Points in loop 1
[[-0.5 -0.5  0. ]
[ 0.5 -0.5  0. ]
[ 0.5  0.5  0. ]
[-0.5  0.5  0. ]]
Edges in loop 1
[[4 5]
[5 6]
[6 7]
[7 4]]
Points in loop 2
[[-0.25 -0.25  0.  ]
[ 0.25 -0.25  0.  ]
[ 0.25  0.25  0.  ]
[-0.25  0.25  0.  ]]
Edges in loop 2
[[ 8  9]
[ 9 10]
[10 11]
[11  8]]
The main use of the FilledPolygon.loops property is performing operations on all points within the same loop. Often, this requires knowing which loop a specific point is in. This can be achieved using the FilledPolygon.point_to_loop() method, which accepts a point index and returns the loop that contains that point. The following script uses this to select every point in the same loop as the picked point:
from mapteksdk.project import Project
from mapteksdk.data import FilledPolygon
from mapteksdk.operations import primitive_pick, SelectablePrimitiveType


if __name__ == "__main__":
    with Project() as project:
        primitive = primitive_pick(SelectablePrimitiveType.POINT)
        oid = project.find_object(primitive.path)
        if oid is None:
            raise RuntimeError("Picked object no longer exists")
        if oid.is_a(FilledPolygon):
            with project.edit(oid, FilledPolygon) as filled_polygon:
                loop = filled_polygon.point_to_loop(primitive.index)
                loop.point_selection = True
This script is demonstrated in the following animation:
Note: Setting point_selection to True for the loop will only affect points within that loop. Points in other loops remain unaffected, ensuring that only points in the same loop as the selected point are chosen.
Appending points to an existing loop
The Loop.append_points() method can be used to append points to an existing loop. For example, the following line of code appends a single point to a loop in a filled polygon:
loop.append_points([0, 0, 0])
To append multiple points, provide a sequence of points:
loop.append_points(
	[(0.2, 0.2, 0.0), (-0.2, 0.2, 0.0), (-0.2, -0.2, 0.0), (0.2, -0.2, 0.0)]
)
-
Points are always appended after the final point in the loop. It is not possible to insert a point between two existing points within a loop.
-
Appending points can result in a fragmented points array, where adjacent points do not share the same loop.
Removing points from an existing loop
To remove points from a loop, use the Loop.remove_points() method, specifying the index of the point within the loop. For example:
loop.remove_points(index)
will remove the point
loop.points[index]
To remove multiple points at once, provide a sequence of indices:
# This will remove the points with indices 1, 2 and 3.
loop.remove_points([1, 2, 3])
-
Removing points may result in a fragmented points array, where adjacent points do not share the same loop.
-
A DegenerateTopologyError will be raised if removing points would result in a loop with less than three points. To remove the entire loop, use FilledPolygon.remove_loop() instead.
-
Removing a loop will invalidate all of the arrays and loop objects within the FilledPolygon object, as the indices of loops and points will change.
Removing an entire loop
To remove a loop from a filled polygon, use the FilledPolygon.remove_loop() method. You can specify the loop by its index:
filled_polygon.remove_loop(index)
Alternatively, if you have the loop object, you can remove it by finding its index within the loops array:
filled_polygon.remove_loop(filled_polygon.loops.index(loop))
-
Deleting the only loop in the object will result in a DegenerateTopologyError.
-
Removing a loop will invalidate all of the arrays and loop objects within the FilledPolygon object, as the indices of loops and points will change.
