Importing and Exporting Data
The Maptek Python SDK provides built-in functions for importing and exporting a wide variety of file formats. Most of the functions for common file formats are defined in mapteksdk.data.io, while a few functions specific to PointStudio are defined in mapteksdk.pointstudio.io.
Summary of import and export functions
The import and export support for various file formats is summarised in the table below.
Note: There are two main types of import function in the SDK. Older SDK import functions such as import_maptekobj() return an ObjectID. Newer functions such as import_autocad_exchange_file() return either a single ImportedObject, or a sequence of ImportedObject , depending on whether the file format supports storing multiple objects. Refer to the table below for the return type of each import function, and see the examples on this page for usage.
| Extension | Format name | Import function | Import return type | Export function |
|---|---|---|---|---|
.*
|
(Any supported file format) |
Sequence[ImportedObject] |
- | |
.00t
|
Vulcan triangulation | |||
.3di
|
Maptek 3DI scan | - | ||
.3dp
|
Maptek 3DP scan | - | ||
.3dr
|
Maptek 3DR scan | - | ||
.3dv
|
Scan grid text | - | ||
.arch_d
|
Vulcan archive |
Sequence[ImportedObject] |
- | |
.asc
|
ASCII scan file | - | ||
.bdf
|
Vulcan block model definition | |||
.bmf
|
Vulcan block model | |||
.dgd.isis
|
Vulcan design database |
Sequence[ImportedObject] |
- | |
.dwg
|
AutoCAD DWG |
Sequence[ImportedObject] |
- | |
.dxb
|
AutoCAD DXF |
Sequence[ImportedObject] |
- | |
.e57
|
E57 | - | ||
.ecw
|
Enhanced Compression Wavelet | - | ||
.fls
|
Faro scan | - | ||
.hgt
|
SRTM height file | - | ||
.ixf |
Optech IXF |
Sequence[ImportedObject] |
- | |
.jp2
|
JPEG 2000 | - | ||
.jpg
|
JPEG image | - | ||
.kml
|
Keyhole markup language | - | ||
.las
|
LAS lidar data | - | ||
.laz
|
Compressed LAS data | - | ||
.maptekobj
|
Maptek object | |||
.mpc, .toc |
Mantis MPC format | - | ||
.obj
|
Wavefront OBJ |
Sequence[ImportedObject] |
- | |
.ply
|
Polygon file format | - | ||
.png
|
PNG image | - | ||
.ptg
|
Leica Cyclone PTG |
Sequence[ImportedObject] |
- | |
.ptx
|
Leica Cyclone PTX |
Sequence[ImportedObject] |
- | |
.r3s
|
Maptek R3 scan | - | ||
.scd
|
Vulcan legend |
Sequence[ImportedObject] |
- | |
.shp
|
ESRI shapefile | - | ||
.zfs
|
Z+F scan | - |
Import functions returning an ObjectID
Import functions that return an ObjectID import a single object into the project, but do not assign a path to it. After successfully importing the data, you need to call the Project.add_object() method to assign the imported object to a path. You need to explicitly name the object in the supplied path.
Note: To run the example scripts provided in this section, first download and extract Maptek_PythonSDK_Sample_IO_Files_20200108.zip to a folder on your system. The example scripts reference the folder location F:\Python SDK Help\data\. You will need to update this location in the scripts to match the folder where you extracted the files.
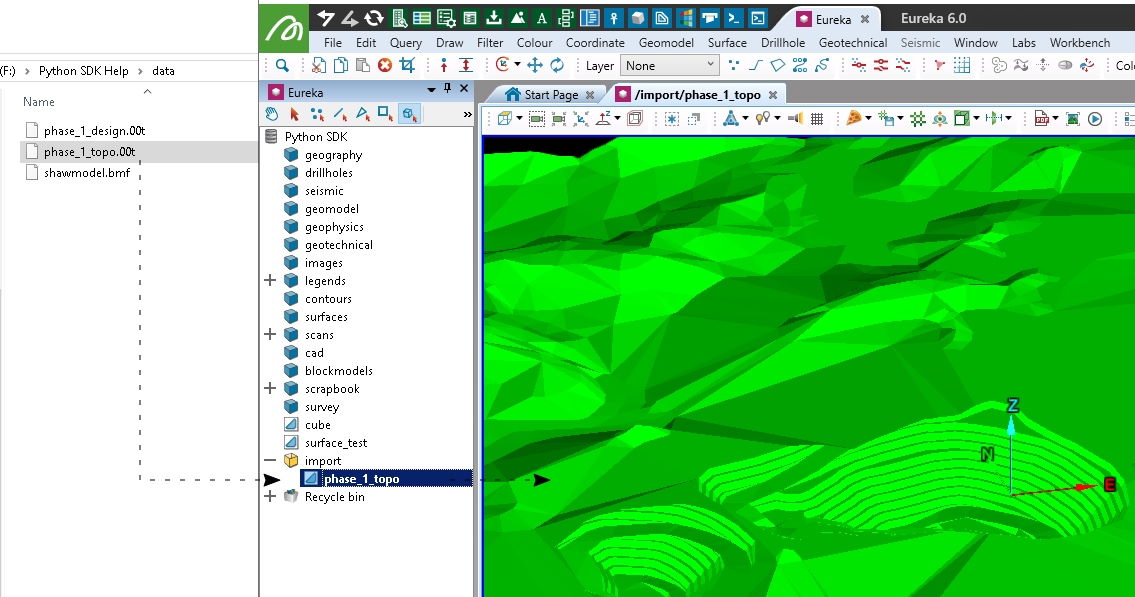
Importing a .00t file
Use import_00t() to import a Vulcan triangulation file (.00t) as a surface object, as demonstrated in the following script:
from mapteksdk.project import Project
from mapteksdk.data import io
from mapteksdk.data.units import DistanceUnit
project = Project() # Connect to default project
# The file path you have exported the sample data to:
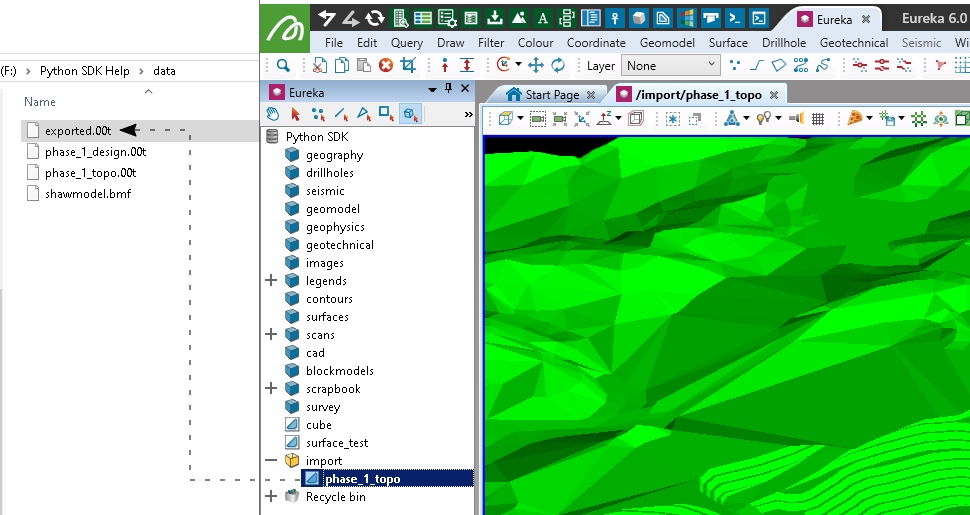
file_path = "F:\Python SDK Help\data\phase_1_topo.00t"
# Import the 00t:
imported_surface = io.import_00t(file_path, DistanceUnit.meter)
if imported_surface:
# Successful imported, now assign a path
# After add_object, set imported_surface as the new ObjectID:
imported_surface = project.add_object(
full_path="import/phase_1_topo",
new_object=imported_surface,
overwrite=True)
else:
print("{} failed to import.".format(file_path))
Important: You need to make sure that you specify the correct unit for the file in the import function.
See also: Surfaces
Importing a .bmf file
Use import_bmf() to import a Vulcan block model file .bmf, as demonstrated in the following script:
from mapteksdk.project import Project
from mapteksdk.data import io
from mapteksdk.data.units import DistanceUnit

project = Project() # Connect to default project

# The file path you have exported the sample data to:
file_path = "F:\Python SDK Help\data\shawmodel_reg.bmf"
# Import the bmf:
imported_blockmodel = io.import_bmf(file_path, DistanceUnit.meter)

if imported_blockmodel:
    # Successful imported, now assign a path
    # After add_object, set imported_surface as the new ObjectID:
    imported_blockmodel = project.add_object(
        "import/shawmodel",
        imported_blockmodel,
        overwrite=True)
else:
    print("{} failed to import.".format(file_path))
Important: You need to make sure that you specify the correct unit for the file in the import function.

See also: Overview
Importing a .maptekobj file
A Maptek object file (.maptekobj) is a binary file that stores objects exported from certain Maptek applications such as PointStudio, GeologyCore, and BlastLogic. See Exporting to a .maptekobj file on this page for more information on Maptek object files. Use import_maptekobj() to import Maptek object files, as demonstrated in the following script:
import os
from mapteksdk.project import Project
from mapteksdk.data import io
project = Project() # Connect to default project
# Use the folder you have stored example maptekobj files in:
maptekobj_path = "F:\\Python SDK Help\\data"
maptekobj_files = ["single_object.maptekobj", "multiple_objects.maptekobj", "objects_in_container.maptekobj"]
def assign_path(object_id, object_path):
# Use the rename_object function to move it from nowhere into a path
saved = project.rename_object(object_id, object_path, overwrite=True)
print("Stored: {}".format(object_path)) if saved else print("Failed to store: {}".format(object_path))
return object_path
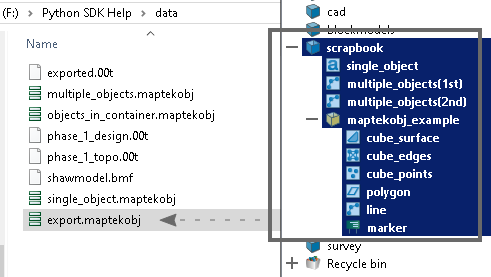
def store_maptekobj_objects(maptekobj_id, parent_path = "scrapbook"):
if "\\" in maptekobj_id.name:
# multiple objects were exported, but not stored within a VisualContainer
for item in project.get_children(maptekobj_id).ids():
assign_path(item, "{}/{}".format(parent_path, item.name))
else:
# Single object exported, or VisualContainer with multiple objects
assign_path(maptekobj_id, "{}/{}".format(parent_path, maptekobj_id.name))
if __name__ == "__main__":
for file_name in maptekobj_files:
file_name = os.path.join(maptekobj_path, file_name)
# Import the maptekobj, providing an ObjectID as a result
imported_data = io.import_maptekobj(file_name)
if imported_data:
store_maptekobj_objects(imported_data)
else:
print("Failed to import {}".format(file_name))
# Expected output:
# >> Stored: scrapbook/single_object
# >> Stored: scrapbook/multiple_objects(1st)
# >> Stored: scrapbook/multiple_objects(2nd)
# >> Stored: scrapbook/maptekobj_example
Note: To account for nested objects, this script uses special handling to store imported objects in the project rather than using Project.add_object().
Running this script will result in several objects being imported, similar to what is shown in the image below.
Import functions returning an ImportedObject
Some import functions return an ImportedObject. An ImportedObject is a named tuple that includes the ObjectID of the imported object and a suggested name for it. After successfully importing data, you need to call the Project.add_object() method to assign the imported object to a path. To use the suggested object name, include the name field of the ImportedObject tuple as part of the path. See Importing a .3dp file below for an example.
If the file format supports containing multiple objects, the import will return a sequence of ImportedObject tuples, with each element representing a single imported object. You can pass the sequence directly into Project.add_objects() to add all imported objects into a specified container. See Importing an .obj file below for an example.
Note: To run the example scripts provided in this section, download and extract io_examples.zip to a folder on your system. The extracted files include the example scripts and the required data files. The scripts will not work if they are moved without the accompanying data folder.
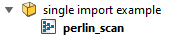
Importing a .3dp file
Maptek 3DP scan files (.3dp) are used to store lidar data. A single 3DP file will only ever contain a single scan. You can use the import_3dp() function to import a 3DP file as a scan object, as demonstrated in the following script:
import pathlib

from mapteksdk.data import io
from mapteksdk.operations import open_new_view
from mapteksdk.project import Project, OverwriteMode

SCRIPT_DIR = pathlib.Path(__file__).parent

def main(project: Project):
    imported_object = io.import_3dp(SCRIPT_DIR / "data" / "perlin_scan.3dp")
    project.add_object(
        f"scans/single import example/{imported_object.name}",
        imported_object.oid,
        overwrite=OverwriteMode.UNIQUE_NAME,
    )
    open_new_view([imported_object.oid])

if __name__ == "__main__":
    with Project() as main_project:
        main(main_project)
Running this script imports the scan from the file perlin_scan.3dp and adds it the container scans/single import example using the object name perlin_scan supplied by the ImportedObject. It will look like this in the project of the connected application:
See also: Scans
Importing an .obj file
Wavefront OBJ files (.obj) can contain multiple objects. Use the import_obj() function to import .obj files, as demonstrated in the following script:
import pathlib

from mapteksdk.data import io
from mapteksdk.operations import open_new_view
from mapteksdk.project import Project, OverwriteMode

SCRIPT_DIR = pathlib.Path(__file__).parent

def main(project: Project):
    imported_objects = io.import_obj(SCRIPT_DIR / "data" / "cubes.obj")
    project.add_objects(
        "surfaces/many import example",
        imported_objects,
        overwrite=OverwriteMode.UNIQUE_NAME,
    )
    open_new_view([imported_object.oid for imported_object in imported_objects])

if __name__ == "__main__":
    with Project() as main_project:
        main(main_project)
After running this script, you will see this in the project of the connected application:
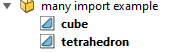
Each imported object receives its name from the .obj file.
Tip: The import functions make no guarantees that the names of imported objects are unique. Therefore, it is recommended to always pass OverwriteMode.UNIQUE_NAME to Project.add_objects() to prevent objects with the same name overwriting each other.
Handling formats unsupported by the application
If the connected application does not support a file format, the import function will raise an ImportFormatNotSupportedError. This commonly occurs when using mapteksdk.pointstudio.io functions without a connection to PointStudio.
For example, the script below imports an E57 scan when connected to PointStudio but exits if connected to GeologyCore:
import pathlib

from mapteksdk.errors import ImportFormatNotSupportedError
from mapteksdk.pointstudio import io
from mapteksdk.operations import open_new_view
from mapteksdk.project import Project, OverwriteMode

SCRIPT_DIR = pathlib.Path(__file__).parent

def main(project: Project):
    try:
        imported_object = io.import_e57_scan(SCRIPT_DIR / "data" / "perlin_scan.e57")
    except ImportFormatNotSupportedError:
        print("Importing e57 scans is not supported by the connected application.")
        return
    project.add_object(
        f"scans/not supported example/{imported_object.name}",
        imported_object.oid,
        overwrite=OverwriteMode.UNIQUE_NAME,
    )
    open_new_view([imported_object.oid])

if __name__ == "__main__":
    with Project() as main_project:
        main(main_project)
Importing an image
You can use the import_image() function to import an image such as JPEG or PNG. Unlike other import functions, import_image() does not use the connected application’s import functionality. Instead, it relies on the Pillow library (installed with mapteksdk), allowing it to import any image format supported by Pillow rather than just those supported by the application.
Usage example:
imported_raster = io.import_image(image_path)
However, this imports the raster without associating it with an object, which is often not useful. Typically, the raster is immediately registered to a Surface. The script below demonstrates this, modifying the example Rasters > Creating a raster from an image file to use import_image() instead of the raster constructor:
import pathlib

from mapteksdk.project import Project, OverwriteMode
from mapteksdk.data import Raster, Surface, RasterRegistrationTwoPoint, io
from mapteksdk.operations import open_new_view, request_file

def get_image_path() -> pathlib.Path:
    return request_file(
        title="Pick an image", extensions={"image files": ("png", "jpg")}
    )

if __name__ == "__main__":
    with Project() as project:
        image_path = get_image_path()
        image_name = image_path.name

        imported_raster = io.import_image(image_path)

        with project.edit(imported_raster.oid, Raster) as raster:
            raster.title = image_name
            with project.new(
                f"surfaces/{image_name}", Surface, overwrite=OverwriteMode.UNIQUE_NAME
            ) as canvas:
                canvas.points = [
                    [0, 0, 0],
                    [raster.width, 0, 0],
                    [0, raster.height, 0],
                    [raster.width, raster.height, 0],
                ]
                canvas.facets = [[0, 1, 3], [0, 2, 3]]
                registration = RasterRegistrationTwoPoint(
                    image_points=[[0, 0], [raster.width, raster.height]],
                    world_points=[canvas.points[0], canvas.points[-1]],
                    orientation=[0, 0, 1],
                )
                canvas.associate_raster(raster, registration)

        open_new_view([canvas.id])
As with other import functions, import_image() imports the image into the project but does not give it a path. However, rather than adding it to the project using Project.add_object(), the image should be registered to an object such as Surface.
See also: Rasters
Importing an image with a world file
Some images, such as satellite images or maps, can be linked to georeferencing information in a world file, which associates them with a specific location on the Earth's surface. The import_image_with_world_file() function imports an image file and applies it to a surface representing the extent defined by the world file. The following script demonstrates this using an image from NASA’s Blue Marble: Next Generation dataset with a corresponding world file (available on github):
import pathlib

from mapteksdk.data import io
from mapteksdk.operations import open_new_view
from mapteksdk.project import Project, OverwriteMode
from PIL import Image

SCRIPT_DIR = pathlib.Path(__file__).parent

def main(project: Project):
    # Disable the decompression bomb safety check because the image is very large.
    Image.MAX_IMAGE_PIXELS = None

    with project.progress_indicator(
        title="Importing", message="Importing image"
    ) as indicator:
        # Provide fake progress so that the user knows the import is in
        # progress.
        # This import can take several minutes, so run this script with care.
        indicator.fake_progress()
        imported_object = io.import_image_with_world_file(
            SCRIPT_DIR / "data" / "world.topo.bathy.200411.3x21600x21600.D2.jpg"
        )
        # The import is finished, set the progress indicator to be complete.
        indicator.set_progress(100)
    project.add_object(
        f"surfaces/image with world file/{imported_object.name}",
        imported_object.oid,
        overwrite=OverwriteMode.UNIQUE_NAME,
    )
    open_new_view([imported_object.oid])

if __name__ == "__main__":
    with Project() as main_project:
        main(main_project)
Running this script results in the following surface being created in the connected application:

Note: In this example, the world file (.wld) was found automatically based on the name of the image. In this case, the name of the world file must be identical to the name of the image file, apart from its extension.
Importing any file type
In addition to the format-specific import functions, the SDK also provides the import_any() function, which can be used to import any file type supported by the connected application.
To use it, simply pass the file path:
imported_objects = io.import_any(
    SCRIPT_DIR / "data" / "cubes.maptekobj",
)
For file formats that require units or coordinate systems, these must be explicitly specified, even if set to default values:
imported_objects = io.import_any(
        SCRIPT_DIR / "data" / "cubes.obj",
        unit=DistanceUnit.METRE,
        coordinate_system=None
    )
Failing to pass required inputs will raise an ImportMissingInputError.
Tip: In general, you should prefer to use format-specific import functions where possible, as their use is less error-prone. The use of import_any() is recommended when the format of the file to be imported is not known when the script is written.
Key points:
-
import_any() always returns a sequence of ImportedObject tuples, even if the file contains a single object.
-
It is possible to pass units or coordinate systems when importing formats that don't accept them (for example, a
.maptekobjfile). In this case, the unit or coordinate system will be ignored. -
If the file format is unsupported by the connected application, an ImportFormatNotSupportedError will be raised.
Note: Static type checking is limited with import_any()—it cannot deduce specific object types like it can with format-specific imports (e.g. import_e57_scan()), so auto-complete suggestions in IDEs may be less helpful.
Exporting data
The SDK provides several functions to export data to file.
Exporting to a .00t file
Use export_00t() to export a surface to a .00t file. The following script demonstrates re-exporting the surface imported from an earlier example as a .00t:
from mapteksdk.project import Project
from mapteksdk.data import io
from mapteksdk.data.units import DistanceUnit

project = Project() # Connect to default project

# The file path to export the surface to:
save_path = "F:\Python SDK Help\data\exported.00t"
# Locate ObjectID of surface to export
surface_to_export = project.find_object("import/phase_1_topo")
if surface_to_export:
    # Export to 00t:
    export_success = io.export_00t(surface_to_export, save_path, DistanceUnit.meter)
    if not export_success:
        print("Export failed")
else:
    print("Could not find surface to export in project")
Exporting to a .bmf file
Use export_bmf() to export a block model to a .bmf file. The following script demonstrates re-exporting the block model imported from an earlier example as a .bmf:
from mapteksdk.project import Project
from mapteksdk.data import io
from mapteksdk.data.units import DistanceUnit

project = Project() # Connect to default project

# The file path to export the block model to:
save_path = "F:\Python SDK Help\data\exported.bmf"
# Locate ObjectID of block model to export
blockmodel_to_export = project.find_object("import/shawmodel")
if blockmodel_to_export:
    # Export to bmf:
    export_success = io.export_bmf(blockmodel_to_export, save_path, DistanceUnit.meter)
    if not export_success:
        print("Export failed")
else:
    print("Could not find block model to export in project")
Exporting to a .maptekobj file
A Maptek object file (.maptekobj) is a binary file capable of storing a variety of object types including CAD data, surfaces, scans, block models, and more. Maptek object files are useful for the following:
-
Sharing data between Maptek projects and applications
-
Backing up project data
-
Archiving project data
Important: Objects that depend on external storage or data systems (outside of the project) may encounter issues when exported as Maptek object files. The receiving application may import the data, but might not be able to fully interpret it, particularly across different software versions.
In certain Maptek applications, such as GeologyCore or PointStudio, you can open the Maptek object file as a secondary project. This functionality provides an explorer view where you can browse the contents of the object file, which may contain multiple objects within containers.
Exporting data to a .maptekobj is similar to exporting a triangulation to a .00t file. However, if you need to export multiple objects into a single file, do this by first placing them in a VisualContainer.
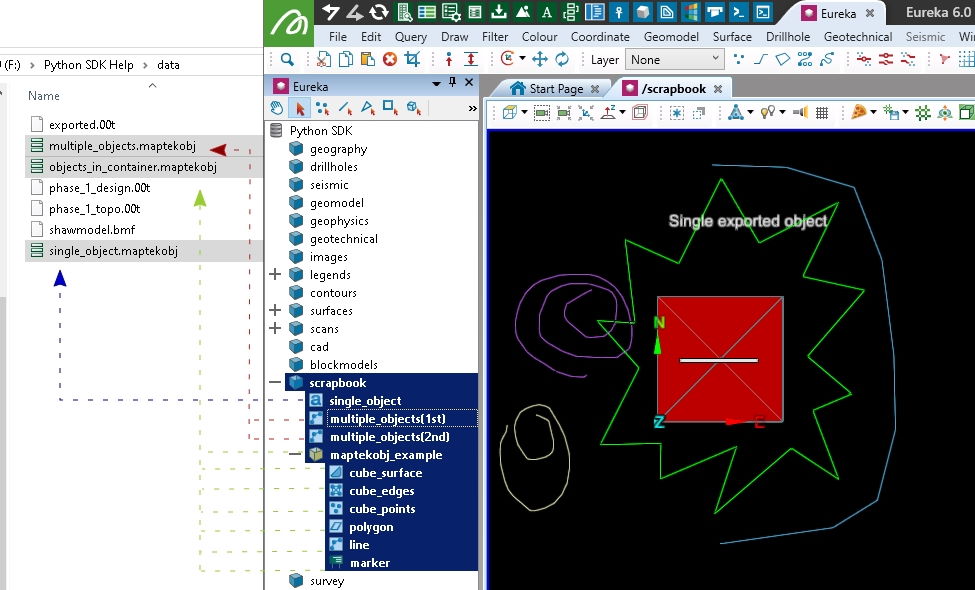
The following script exports the contents of the scrapbook container to a single .maptekobj file.
from mapteksdk.project import Project
from mapteksdk.data import io
project = Project() # Connect to default project

save_path = "F:\\Python SDK Help\\data\\export.maptekobj"

if __name__ == "__main__":
    scrapbook = project.find_object("scrapbook")
    # Export the scrapbook container and any children within it
    export_success = io.export_maptekobj(scrapbook, save_path)
    if export_success:
        print("Exported {} to {}".format(scrapbook.path, save_path))
    else:
        print("Failed to export {} to {}".format(scrapbook.path, save_path))