SubblockedBlockModel
A SubblockedBlockModel is a block model that allows for blocks that are defined when the model is created (called parent blocks) to be split into smaller blocks called subblocks.
In areas where a block is split into subblocks, more detail is stored. In areas where the parent block is not split, less detail is stored.
Subblocks are created using the add_subblock function. This function has two parameters: centroid and size. You can use the add_subblock function to add subblocks to a SubblockedBlockModel
Topics:
Adding subblocks to a SubblockedBlockModel
Here is an example of how to add subblocks to a SubblockedBlockModel
from mapteksdk.project import Project
from mapteksdk.data import SubblockedBlockModel
centroids = [[-1.5, -1, -1], [-0.5, -1, -1], [-1, 1, -1],
             [-1.5, -1, 1], [-0.5, -1, 1], [-1, 1, 1],
             [-1.5, -1, 3], [-0.5, -1, 3], [-1, 1, 3]]
sizes = [[1, 2, 2], [1, 2, 2], [2, 2, 2],
         [1, 2, 2], [1, 2, 2], [2, 2, 2],
         [1, 2, 2], [1, 2, 2], [2, 2, 2]]
project = Project()
with project.new("blockmodels/subblockmodel", SubblockedBlockModel(
        x_count=1, y_count=2, z_count=3, x_res=4, y_res=4, z_res=4
        )) as new_blocks:
    new_blocks.origin = [94, -16, 12]
    new_blocks.add_subblocks(centroids, sizes)
If you run the code, you should generate an object which looks like this:
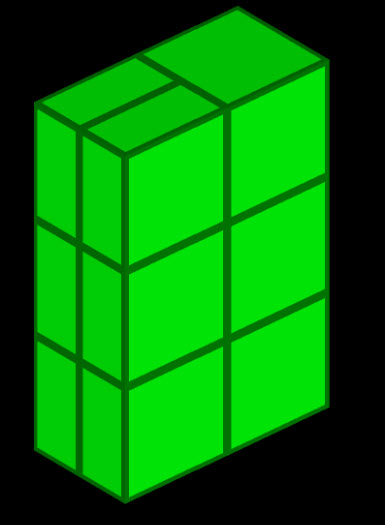
Rotating and translating a SubblockedBlockModel
By default, a SubblockedBlockModel is axis aligned and its origin is located at [0, 0, 0]. Often the data a SubBlockModel is intended to represent is not axis aligned and not at the origin. This makes it necessary to rotate and translate the model to where the data is. A SubblockedBlockModel
The following example shows creating a SubblockedBlockModel
import math

from mapteksdk.project import Project
from mapteksdk.data import SubblockedBlockModel, Axis

centroids = [[0, 0, 0], [0, 2, 0], [2, 2, 0],
             [1.5, -0.5, 0], [1.5, 0.5, 0],
             [2.5, -0.5, 0], [2.5, 0.5, 0],
             [-0.5, -0.5, 1], [-0.5, 0.5, 1],
             [0.5, -0.5, 1], [0.5, 0.5, 1],
             [0, 2, 1], [2, 2, 1]]
sizes = [[2, 2, 1], [2, 2, 1], [2, 2, 1],
         [1, 1, 1], [1, 1, 1], [1, 1, 1], [1, 1, 1],
         [1, 1, 1], [1, 1, 1], [1, 1, 1], [1, 1, 1],
         [2, 2, 1], [2, 2, 1]]

project = Project()

with project.new("blockmodels/rotated_subblocked", SubblockedBlockModel(
    x_count=2, y_count=2, z_count=2, x_res=2, y_res=2, z_res=1
    )) as new_rotated_model:
  new_rotated_model: SubblockedBlockModel
  new_rotated_model.rotate(math.radians(30), Axis.X)
  new_rotated_model.rotate(math.radians(45), Axis.Y)
  new_rotated_model.origin = [5, 3, 0]
  # Note: It is more efficient to perform all rotations and translations
  # on a block model before adding the subblocks.
  new_rotated_model.add_subblocks(centroids, sizes)
  print(new_rotated_model.block_centroids)
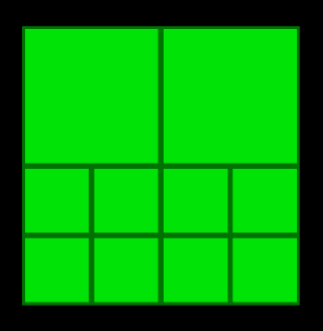
If you run this code, you will generate a model that looks like this:
![]()
The not rotated version of the above model will look like this:
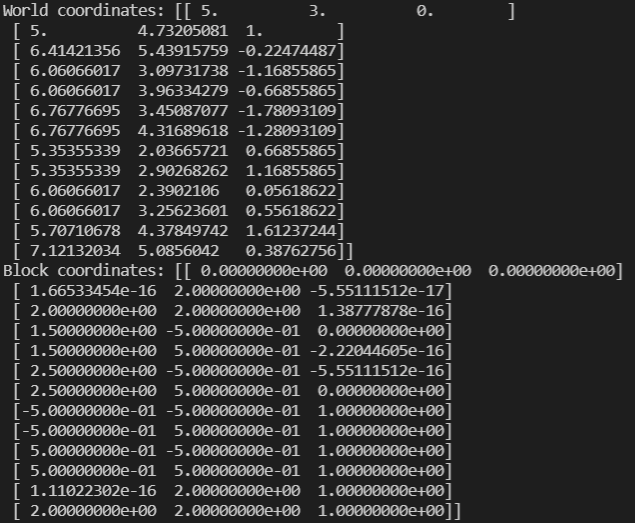
You will also produce the following printed output:
![]()
The two SubblockedBlockModels are identical except for the rotation and origin. However, the printed output shows that the centroids of the rotated model are different to the centroids passed to the add_subblocks function. This is because by default, add_subblocks assumes the coordinates are provided in what are called block coordinates (or model coordinates). This means the coordinates are specified relative to the origin and rotation of the model rather than the origin of the project. The concept of block coordinates is explained in more detail in the following section.
By default the rotation and translation of the model is handled automatically by the Maptek Python SDK. This allows the same centroids to be used to create both a rotated and an unrotated block model.
Positioning a SubblockedBlockModel using world coordinates or block coordinates
Every block model possesses its own coordinate system called the block coordinate system (or the model coordinate system). By default, the add_subblock function assumes the block centroids are specified in the block coordinate system. The block coordinate system has the following properties:
-
[0, 0, 0] in the block coordinate system is the origin of the block model. This is located in the centre of the block in the 0th row, column and slice.
-
The x direction is aligned to the columns of the model.
-
The y direction is aligned to the rows of the model.
-
The z direction is aligned to the slices of the model.
If a model is located at the origin and not rotated, the world and block coordinate systems are the same.
Adding subblocks in world coordinates
If the centroids of the subblocks are already in world coordinates (for example, if they were read from a CSV containing world coordinates) then it is not necessary to convert them to block coordinates when adding the subblocks to a model. Instead, set the use_block_coordinates flag of the add_subblocks function to false to indicate that the centroids are in world coordinates.
In the example below, we:
-
Copy the model created in the previous example
-
Add subblocks to the model in world coordinates by setting the
use_block_coordinatesflag of theadd_subblocksfunction tofalse.
Note: The next example only copies the topology of the block model and will not copy the block attributes. Use Project.copy_object to perform a full copy.
from mapteksdk.project import Project
from mapteksdk.data import SubblockedBlockModel

project = Project()

with project.read("blockmodels/rotated_subblocked") as original:
  with project.new("blockmodels/rotated_subblocked_copy",
      SubblockedBlockModel(
      x_count=2, y_count=2, z_count=2, x_res=2, y_res=2, z_res=1
      )) as copy:
    # Use the orientation property to copy the rotation of the original
    # model.
    copy.set_orientation(*original.orientation)
    # Now copy the origin and blocks.
    copy.origin = original.origin
    # use_block_coordinates=False indicates that block centroids
    # are in world coordinates and not block coordinates.
    copy.add_subblocks(
      original.block_centroids,
      original.block_sizes,
      use_block_coordinates=False)
    print("World coordinates:", original.block_centroids)
    print("Block coordinates:", original.convert_to_block_coordinates(original.block_centroids))
If you run the code above, you will copy the object created in the previous example, and print its world and block coordinates, which should look like this:
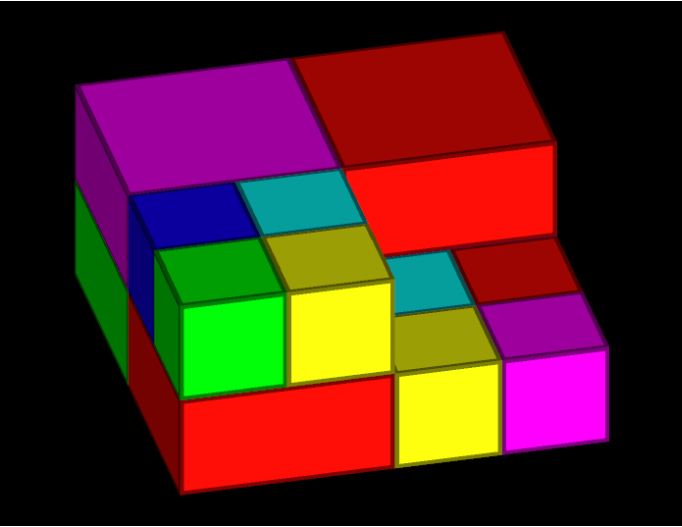
Colouring SubblockedBlockModels using a colour map
The example below shows you can colour a SubblockedBlockModel using a colour map.
from mapteksdk.project import Project
from mapteksdk.data import StringColourMap, SubblockedBlockModel

project = Project()

centroids = [[0, 0, 0], [0, 2, 0], [2, 2, 0],
             [1.5, -0.5, 0], [1.5, 0.5, 0],
             [2.5, -0.5, 0], [2.5, 0.5, 0],
             [-0.5, -0.5, 1], [-0.5, 0.5, 1],
             [0.5, -0.5, 1], [0.5, 0.5, 1],
             [0, 2, 1], [2, 2, 1]]
sizes = [[2, 2, 1], [2, 2, 1], [2, 2, 1],
         [1, 1, 1], [1, 1, 1], [1, 1, 1], [1, 1, 1],
         [1, 1, 1], [1, 1, 1], [1, 1, 1], [1, 1, 1],
         [2, 2, 1], [2, 2, 1]]

with project.new("blockmodels/coloured_subblocked", SubblockedBlockModel(
    x_count=2, y_count=2, z_count=2, x_res=2, y_res=2, z_res=1
    )) as model:
  model.add_subblocks(centroids, sizes)

  # Create a colour map.
  with project.new(None, StringColourMap) as string_map:
    string_map.legend = ["red", "green", "blue", "yellow", "cyan", "magenta"]
    string_map.colours = [[255, 0, 0, 255], [0, 255, 0, 255],
                          [0, 0, 255, 255], [255, 255, 0, 255],
                          [0, 255, 255, 255], [255, 0, 255, 255]]
    string_map.cutoff = [0, 0, 0, 200]

  # Set the colour of each block.
  model.block_attributes["colour"] = ["red", "green", "blue", "yellow",
                                      "cyan", "magenta", "red", "green",
                                      "blue", "yellow", "cyan", "magenta",
                                      "red"]

  # Use the colour map to colour the model.
  model.block_attributes.set_colour_map("colour", string_map)
If you run the above code, you should generate a SubblockedBlockModel that looks like this:
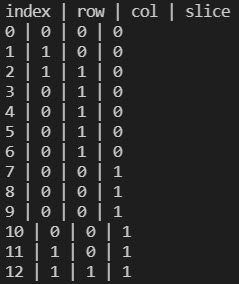
Querying which parent blocks contain subblocks
The following example demonstrates a way of working out which parent blocks in a SubblockedBlockModel contain subblocks using the block_to_grid_index property. In the example, we map a subblock from its index to the column, row and slice of the parent block which contains the subblock.
from mapteksdk.project import Project
from mapteksdk.pointstudio.operations import object_pick

project = Project()

oid = object_pick(label="Select a subblocked block model")

with project.read(oid) as model:
  block_to_grid_index = model.block_to_grid_index
  print("index | row | col | slice")
  for i, index in enumerate(block_to_grid_index):
    col = index[0]
    row = index[1]
    slice_ = index[2]
    print(f"{i} | {int(row)} | {int(col)} | {int(slice_)}")
If you run this code and select the SubblockedBlockModel from the previous example, you should generate the following printed output:
Locating subblocks and setting their visibility
We can use the grid_index property to obtain all the subblocks contained within a specific parent block specified via its row, column and slice. This allows for the same operation to be performed on all blocks within a parent block, effectively treating the subblocked block model as a dense block model. The following example demonstrates how to use the grid_index property to find all the subblocks in the parent block in the 0th row, 0th column and 1st slice and then make them invisible.
from mapteksdk.project import Project
from mapteksdk.data import SubblockedBlockModel

project = Project()

centroids = [[0, 0, 0], [0, 2, 0], [2, 2, 0],
             [1.5, -0.5, 0], [1.5, 0.5, 0],
             [2.5, -0.5, 0], [2.5, 0.5, 0],
             [-0.5, -0.5, 1], [-0.5, 0.5, 1],
             [0.5, -0.5, 1], [0.5, 0.5, 1],
             [0, 2, 1], [2, 2, 1]]
sizes = [[2, 2, 1], [2, 2, 1], [2, 2, 1],
         [1, 1, 1], [1, 1, 1], [1, 1, 1], [1, 1, 1],
         [1, 1, 1], [1, 1, 1], [1, 1, 1], [1, 1, 1],
         [2, 2, 1], [2, 2, 1]]

with project.new("blockmodels/visible_model", SubblockedBlockModel(
    x_count=2, y_count=2, z_count=2, x_res=2, y_res=2, z_res=1
    )) as model:
  model.add_subblocks(centroids, sizes)
  target_parent_block = [0, 0, 1]
  grid_index = model.grid_index(target_parent_block)
  model.block_visibility[grid_index] = False
If you run the above code, you should generate a model which looks like this:
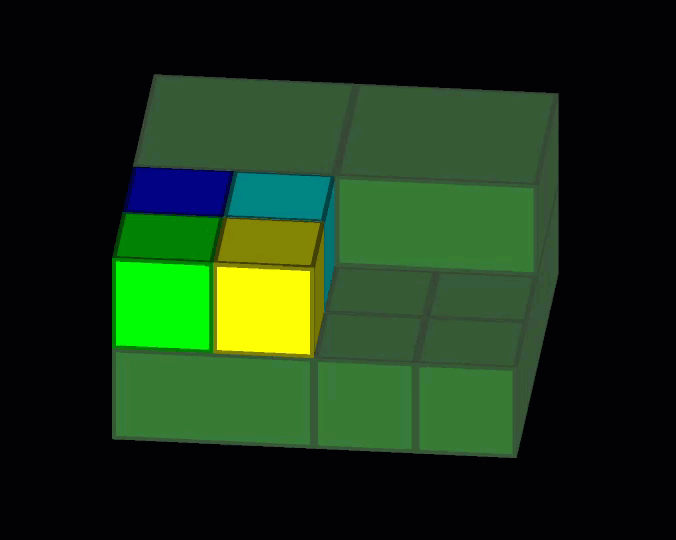
As you can see, the model is the same as that generated from the section Colouring SubblockedBlockModels using a colour map.
Topological errors for Subblocked block models
When creating a new SubblockedBlockModel, it is possible for the model to contain topological errors. These errors can cause issues with algorithms run on the model leading to erroneous results. This section covers several of the common topological errors which can occur and how to avoid them.
Subblocks outside of the block extent
If a subblock is not completely contained within a parent block, it will not appear when the model is viewed. When creating a SubblockedBlockModel, make sure that the subblocks are within a parent block.
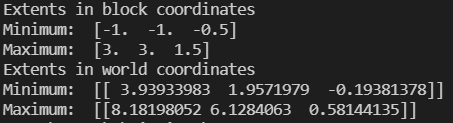
The following code demonstrates how to calculate the extents of a SubblockedBlockModel.
from mapteksdk.data.blocks import SubblockedBlockModel
import numpy

from mapteksdk.project import Project

project = Project()

with project.read("blockmodels/rotated_subblocked") as model:
  model: SubblockedBlockModel
  # [0, 0, 0] in block coordinates is the centre of the block in row 0,
  # column 0 and slice 0. This means that the block model extends for
  # half a block below [0, 0, 0].
  minimum = -0.5 * model.block_resolution

  # This is effectively number of blocks in each dimension * size of
  # each block in each dimension. This is then offset by half a block to
  # compensate for the minimum not being located at [0, 0, 0].
  maximum = (numpy.array([model.column_count, model.row_count,
                       model.slice_count]) - 0.5) * model.block_resolution
  world_minimum = model.convert_to_world_coordinates([minimum])
  world_maximum = model.convert_to_world_coordinates([maximum])

  print("Extents in block coordinates")
  print("Minimum: ", minimum)
  print("Maximum: ", maximum)

  print("Extents in world coordinates")
  print("Minimum: ", world_minimum)
  print("Maximum: ", world_maximum)
If you run the above code and have previously ran this example, you should generate the following output:
The most common mistake which leads to blocks outside of the model extent is failing to compensate for the "half block offset". The origin of a block model is located in the centre of the block in the zeroth row, column and slice and not in the bottom corner of the model. This means that the block model extends half a block below the origin. Failing to compensate for this "half block offset" usually causes the blocks in the last row, slice and column to fail to appear when the model is viewed. This issue can be fixed by adjusting all of the block centroids by half a block to compensate for this offset. Other cases are more difficult to fix and require carefully checking the extents of the blocks against the extents of the model.
Overlapping Blocks
Another common error which can occur when creating SubblockedBlockModels is overlapping blocks. In the view, these blocks will appear on top of each other with each block fighting to be on top of the other (This is called “z-fighting”). To resolve this, the offending subblocks should be removed and replaced with blocks which do not overlap.
Given an arbitrary block model, calculating if any blocks overlap can be a computationally expensive operation especially for large models. It requires comparing the extents of every block to every other block to determine if any overlap. Because of this, the SDK does not attempt to automatically check if a model contains overlapping blocks.
Subblocks do not fully fill the parent block
If a parent block contains subblocks, then the subblocks should completely fill the parent blocks. However the SDK contains no safeguards against having a parent block not completely filled with subblocks. Creators of SubblockedBlockModels should be careful to ensure they do not accidentally create models with holes in parent blocks.
