Project to Plane
Source file: project-to-plane.htm
Use the project to plane tool to fill small holes in data, such as projecting toes
on benches or behind windrows. Create lines
then project them at suitable angles to create surfaces of greater
accuracy.
-
Select the objects (lines or points) to be projected.
-
On the Edit ribbon tab, go to the Project group and select
 Project to Plane.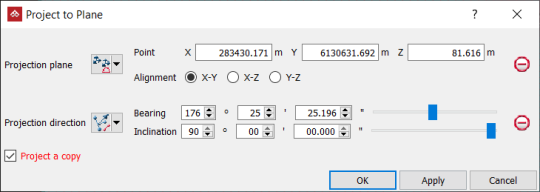
-
Select the Projection plane type using one of the options from the drop-down list.
The projection plane options are:
 Three points: Define the plane by specifying three points.
 Point and normal: Define the plane by specifying one point and defining its normal direction.
 Point and orientation: Define the plane by specifying one point and orienting the plane so the current view is its normal.
 Facet and offset: Pick a triangle to define the plane's orientation, and then specify how far above or below that facet the plane should be.
 Point, strike and dip: Define the plane by specifying a point and then providing dip/strike angles to specify the orientation of the plane through that point.
 Axis aligned: Define the plane by selecting an axis pair then picking a point to define the offset along the third axis.
 Action plane: Use the action plane of the current view.
-
Specify a Projection direction for the lines or points.
The projection direction options are:
 Two points: Define the direction by specifying two points.
 Facet: Make the direction perpendicular
to a selected facet.
Facet: Make the direction perpendicular
to a selected facet. Axis aligned: Define the direction by an axis of the view window.
 Bearing and inclination: Define the direction by a bearing and inclination angles.
 Action plane axis: Define the direction by an axis of the action plane.
-
Select Project a copy to leave the original points in place, and create copies projected to the edge. Clear this option if the points are to be moved.
-
Click OK or Apply.
