Exporting the View Window

Exporting objects in the view window are rendered into a high resolution image or to a 3D PDF or U3D file. Objects consisting of facets, edges or 3D text can be exported.

  1. Load the desired objects into a view window.

  2. On the View ribbon tab navigate to the Export group. From the Capture Scene drop-down list select one of the following methods of exporting your view:

    • Image Render to render a high resolution image of the view. see below
    • Export to PDF to export the view to a PDF file. see below
    • Export U3D to export the view to a U3D file. see below
    Tip!   Alternatively it can also be found in the view window toolbar.

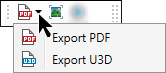
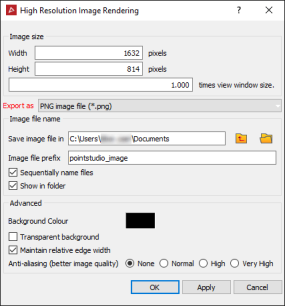
To render a high resolution image of the view select .

  1. Image size:
    • Set the Width and Height fields display the image size.
  2. To increase the size of the captured image, enter a number greater than one (1) in the times view window size field.
Note:   Any text on the screen will not increase in size.
  1. Export:
    • Select the image format from PNG, JPEG or BMP type.
    • Choose the location where the image will be saved.
    • Give it a prefix.
    • Select Sequentially name files to automatically name the images sequentially.
    • Select Show in folder to open Windows Explorer after saving the image and displaying its location.
  2. Advanced:
    • Option to change the background colour or select for transparency
    • Select to maintain edge thickness so its the same as in the view.
    • Turn on anti-aliasing for a higher image quality (but takes longer to generate)

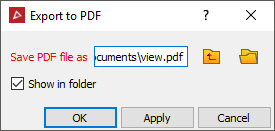
To export the view window to a PDF select .

  1. Choose a directory path to save it in.

  2. Select Show in folder to open Windows Explorer after saving the image and displaying its location.

  3. Press OK to export.

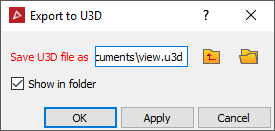
To export the view window to a U3D select .

  1. Choose a directory path to save it in.

  2. Select Show in folder to open Windows Explorer after saving the image and displaying its location.

  3. Press OK to export.