Coordinates
The Coordinates group tools enable you to define and convert coordinate systems of scans and other objects.
Tip: See Coordinate Systems for an explanation of relevant components and derivations of coordinate systems.

|
|
Define Define an object's initial coordinate system. |
|
|
Convert Convert an object to another coordinate system. |
Define
Objects and scans might not have a coordinate system associated with them. When working with various objects, or according to overall requirements of a project, it may be necessary to ensure all objects are oriented and positioned correctly.
The Define tool is used to apply an initial coordinate system to the selected object. This sets a reference system for coordinate conversions, and is required before a coordinate conversion can be performed. Objects with a coordinate system assigned can be used to flag other objects with the same system.
-
To define an object’s coordinate system, follow these steps:
-
Select the object.
-
On the Position and Filter tab, in the Coordinates group, click
 Define.
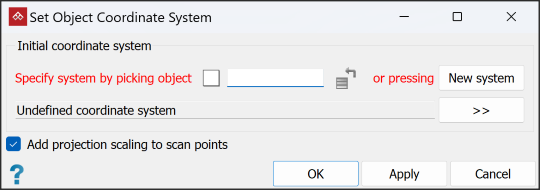
- Apply a coordinate system either automatically from another object, or manually. Do one of the following:
- To
transfer a coordinate system automatically from another object, select the field, then either:
Drag the reference object into the Specify system by picking object field.
Click on the reference object in the view window.
Or
- To apply a coordinate system manually, click New system and complete the coordinate system panel. See Set up a coordinate system manually.
-
If you are defining coordinates for raw laser scan data, select Add projection scaling to scan points. This option applies projection scaling and distortion as though transforming from a geocentric coordinate system.
-
Click OK or Apply.
-
Convert
The Convert tool transforms objects that already have an assigned coordinate system to different coordinate system. A target coordinate system can be defined either by selecting an object with that coordinate system already assigned, or by defining a new system manually.
-
To convert an object’s coordinate system, follow these steps:
-
Select the object.
-
On the Position and Filter tab, in the Coordinates group, click
 Convert.
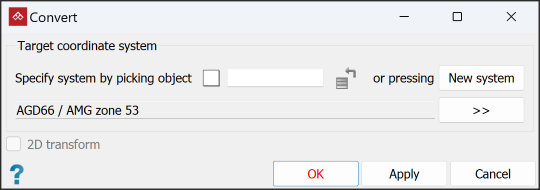
- Apply a coordinate system either automatically from another object, or manually. Do one of the following:
- To
transfer a coordinate system automatically from another object, select the field, then either:
Drag the reference object into the Specify system by picking object field.
Click on the reference object in the view window.
Or
- To apply a coordinate system manually, click New system and complete the coordinate system panel. See Set up a coordinate system manually.
-
Select 2D transform to maintain the Z coordinates of the selected points. If unselected, the conversion may result in an undesirable change to the object’s Z-coordinates.
-
Click OK or Apply.
-
Set up a coordinate system manually
This section describes setting up the Datum when manually defining the coordinate system.
Note: This operation does not have its own tool button, but is opened with the New system buttons on the Define and Convert tools (above), and via the Add... button on the Preferences tool.
-
To set up a new coordinate system, follow these steps:
-
Select New system... from one of the Coordinates tool panels.
-
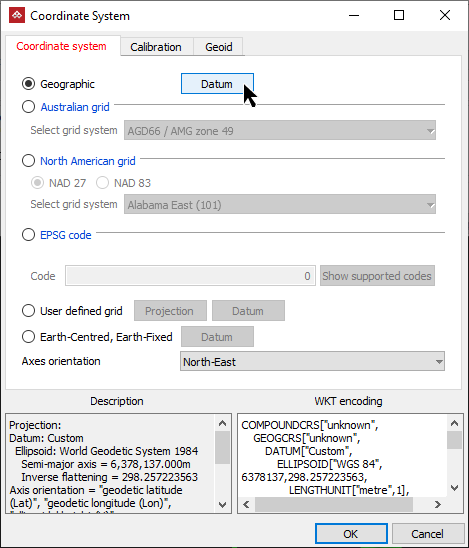
From the Coordinate system tab, select the Geographic option.
-
Click Datum.
The Coordinate system panel will open and you can specify a coordinate system.
-
-
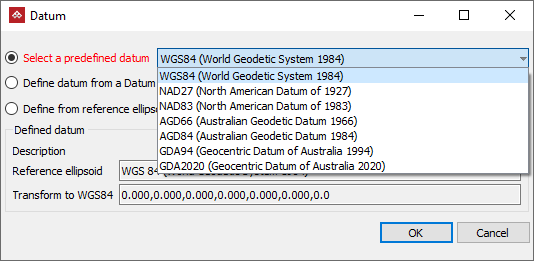
Select the required datum from the following options:
-
Select a predefined datum from the drop-down list.
-
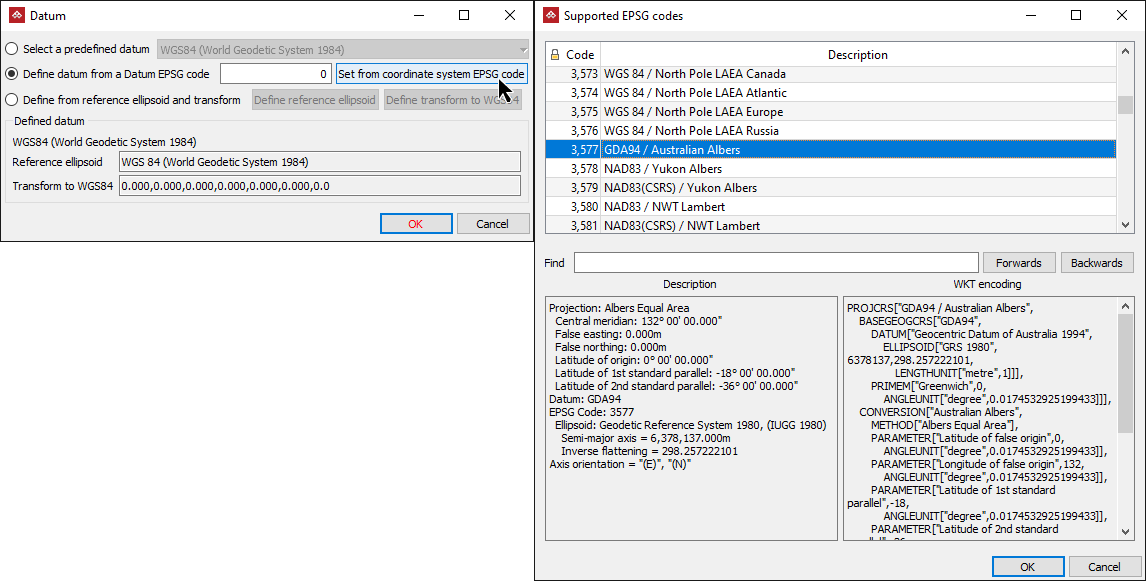
Define a datum from a Datum EPSG code either by entering the code, if known, or clicking Set from coordinate system EPSG code and selecting from the Supported EPSG Codes panel.
Tip: You can search the codes by entering either the number or a description in the Find field.
The selected EPSG code’s Description and WKT encoding will be displayed.
-
Define from reference ellipsoid and transform by Define reference ellipsoid to transform the reference ellipsoids settings by selecting the reference ellipsoid from the drop-down list at the bottom of the panel, then clicking OK.
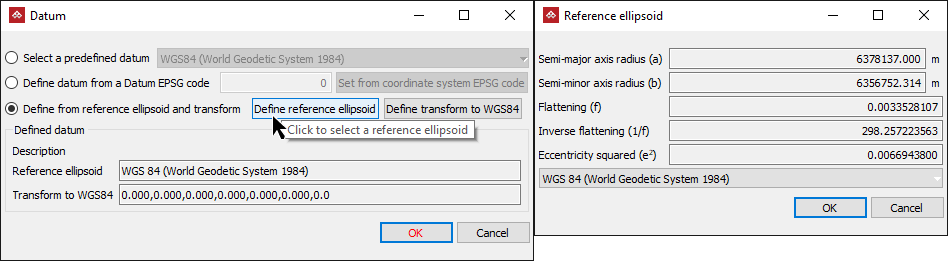
In this example the reference ellipsoid is WGS 84 (World Geodetic System 1984).
Or
-
Define from reference ellipsoid and transform by Define transform to WGS84 to transform the reference ellipsoid selected in the Reference ellipsoid field to the WGS84 system.
The Coordinate System panel opens. Complete the details, as follows:
- Select either Position Vector transformation (geog3D domain), EPSG:1037 or Position Vector transformation(geog2D domain), EPSG:9606 from the Transform type drop-down list.
- Define the seven (7) transformation parameters (coordinates, rotation and change in scale) to transform the reference ellipsoid to the WGS84 system then click OK.
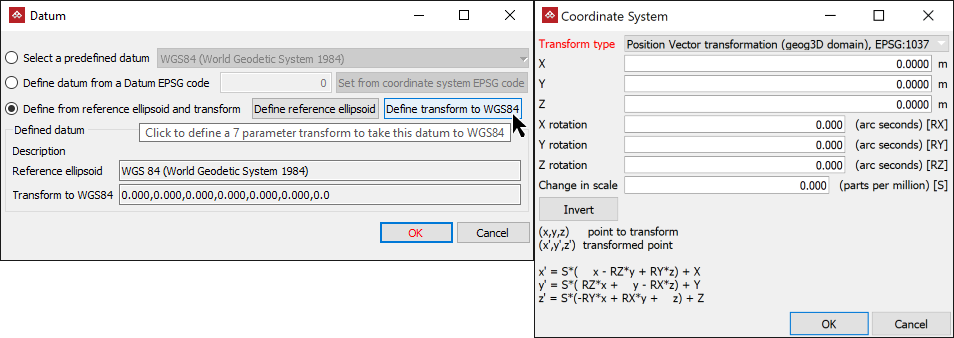
The Defined datum Description will update automatically.
Tip: To reverse the transform, click Invert on the Coordinate System panel. This will reverse WGS84 transform parameters correctly .
-
-
Click OK in the Datum panel.
-
Select the Calibration tab to apply custom offset measurements to horizontal and vertical references.
-
Select the Geoid tab to nominate Geoid setting from the following options:
- Use ellipsoid just set up.
- Use the Ausgeo09_rebased geoid.
- Use the Ww15mgh_rebased geoid.
Alternatively, click Import geoid... and import a geoid file.
Note: The Geoid file must have one of the following extensions (*.asc, *.byn, *.ggf, *.gtx).
-
Click OK.
-
Click OK or Apply in the Define Coordinate System panel.