Create/Edit Horizons
- Introduction
- Creating Horizons
- Deleting Horizons
- Editing Horizons
Introduction
Before Vulcan can draw your dragline sections, it needs to know the geology of the site. This information is stored in the dragline specification file as a list of horizons. The horizons are layers of material, and are defined by a surface (or RL) for both their top and bottom. The material between the top and bottom is then associated with a material type, which was defined in our Dragline and Equipment databases, and given display attributes of colour, line style, and fill pattern.
The top and bottom of each horizon is represented by lines called "surfaces" — not to be confused with surface models such as grids and triangulations.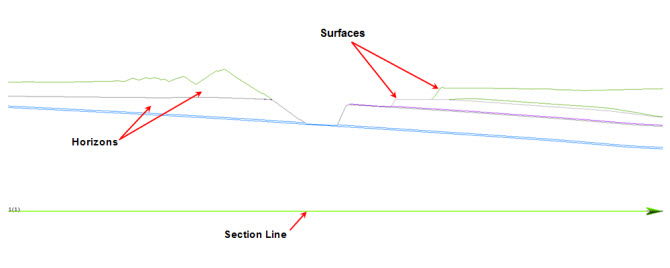
We recommend that you display your horizon legend (refer to the View > Horizon Legend option), as this will enable you to see the changes that you are making to the horizon table.
Creating Horizons
Horizons are defined through the use of RLs or surface models, either grid or triangulation. If the use of models is intended, it is not necessary that they be in the working directory.
To define the horizons of interest, follow these steps:
Select Dragline > Horizons > Create/Edit Horizons to display the Create/Edit Horizons panel.
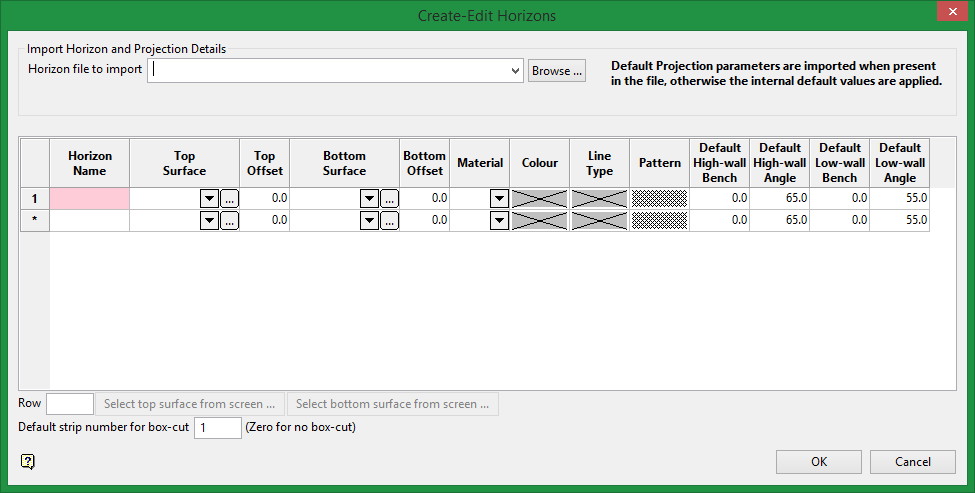
Horizon Name
Enter the name of the horizon. This name displays on the section, so it is often beneficial to keep the name as short as possible for legibility.
Top Surface
This is where the top of the horizon is defined. There are two methods to define the surface, with a surface model or an RL value for a flat surface.
- If using a surface model: Either pick the relevant model from the drop-down box or browse for the model. The Offset can be used to apply a positive or negative offset to the specified model. This is useful for creating prestrip horizons a specified distance above an existing coal surface model.
- If using an RL: The Offset value can be used to enter an absolute RL value. Using a RL value in this way will generate a top of horizon that is completely flat and co-planar to the Easting - Northing (X-Y) plane.
Bottom Surface
This is where the bottom of the horizon is defined. It can be defined in the same way as the top of the horizon.
Material
This is the material that the horizon represents, typically overburden, interburden, or coal. You can only select from materials that you have defined with swell values in the Dragline and Equipment databases.
Display Attributes
Colour
This is the colour of the graphics that will represent the horizon in your sections. Click on the colour swatch to choose a colour.
Line Type
This is the line style that will be used to outline the horizons in your sections.
Pattern
When you create blocks in your horizons (covered in "Strips" and "Blocks") it is strongly desirable that they be filled with a pattern both for legibility and for ease of selection in Vulcan.Always change the default empty fill pattern to any of the other choices.
Right-click for the Create/Edit Horizons context menu shown below.
Click OK. The horizons are drawn in all defined sections.
Tip: It is beneficial to work from the top horizon down. When this is done, the Horizon data panel will remember the lower limiting surface from the first horizon and make it the top surface for the next horizon.
Deleting Horizons
To delete a horizon, follow these steps:
Select Dragline > Horizons > Create/Edit Horizons.
Choose the desired horizon from the table and right-click.
Click Delete Rows.
Click Cancel to finish deleting horizons or select another horizon to delete and click OK. You will be asked if you want to update blocks. If you have already defined your strips and created your blocks then you should also update these, otherwise do not update the blocks.
Editing Horizons
As mentioned earlier, horizons are defined through the use of RLs or surface models — either grid or triangulation. If the use of models is intended, it is not necessary that they be in the working directory.
To edit the horizons of interest, follow these steps:
Select Dragline > Horizons > Create/Edit Horizons to display the Create/Edit Horizons panel.
Edit the relevant parameters.
Click OK.
Click Cancel to finish editing horizons. You will then be asked to update blocks. If you have already defined your strips and created your blocks then you should also update these, otherwise do not update the blocks.

