Create Holes At Points
Create Holes at Specific Points
Use the Create Holes At Points option to create a hole at each point contained in a nominated object. The object along which the holes are to be created must be loaded prior to using this option.
Instructions
Click the Create Holes At Points button on the Drill and Blast toolbar.
or
On the Drill and Blast menu, point to Create, then click Create Holes at Points to display the following interface.
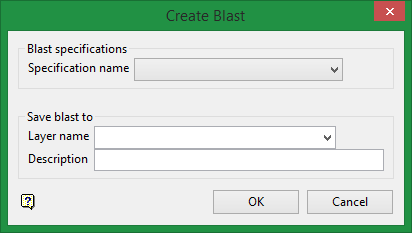
Blast specifications
Specification Name
Select the specification file required for generating the holes. The chosen specification file will be used to define hole attributes, such as hole spacing, hole naming, hole patterns, etc. Refer to the Specifications options for more information.
Save blast to
Layer Name
Select the layer that will be used to store the resulting holes.
The drop-down list contains the names of all layers found within the currently open design database. If you selected an existing layer, then the resulting data will be appended to the nominated layer. If you enter the name of an existing layer that is not currently loaded, then you will need to confirm whether you want to load the layer or replace it, i.e. overwrite its contents.
To create a new layer, enter the layer name. The layer name:
-
May contain up to 40 characters
-
Must begin with an alphanumeric character [0-9] or [a-z]
-
Cannot include space
-
Can include hyphens [-], plus signs [+], underscores [_], periods/dots [.].
-
Can include the special characters of ÁÂÃÀÇÉÊÍÓÔÕÚÜÑ that are used in the Spanish and Portuguese languages.
Description (Optional)
If you have selected an existing layer, then it's current description will be displayed. The existing description can be overwritten.
Follow these steps:
-
Select the specification file from the drop-down list.
-
Select the layer where the blast will be saved. Enter a name for a new layer. The description is optional.
-
Click OK. The Blast naming panel will be displayed.
-
Select a name for the blast, then click OK.
-
Confirm that you want to use the point names from the selected polygon or use the naming convention set up in the specification file.
Note: If you choose to use the names from the selected polygon, the points must have names already assigned to them.
-
Select t he polygon that will be used for the blast boundary.
Two options are available for nominating the side of the polygon from which the blast pattern will commence. When using Select reference line from boundary object, you will need to nominate the start and end of your reference line. You must confirm whether you require the highlighted portion or the unhighlighted portion of your reference line as the side of the boundary from which blast rows will commence.
As an alternative, a more direct option is offered also. Use Select two points and select the start and then the end of the required reference line.
Indicate the point at the start of the free face, then indicate the end point. Confirm whether to Select highlighted section or Select other section.
-
When prompted to Select reference point, click anywhere within the Vulcan window and a reference point will be snapped to the reference line. The position of this point along the reference line is not important to the outcome.
-
A preliminary layout of the blast pattern will be displayed, giving you a chance to continue or reselect the reference object.

