Insert Hole
Insert a New Hole
Use the Insert Hole option to insert a new hole into an existing row of holes.
Tip: We recommend switching to Plan view prior to using the Insert Hole option.
Instructions
Click the Insert Hole button ![]() from the Drill and Blast toolbar.
from the Drill and Blast toolbar.
or
On the Drill and Blast menu, point to Edit, and then click Insert Hole.
Indicate a reference hole, that is, a hole near to where you require the new hole to be inserted. Once a hole has been chosen, the following panel displays.
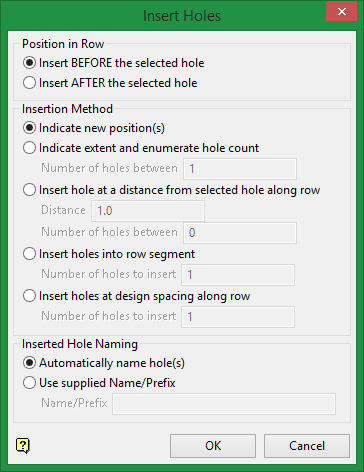
Position in Row
Insert BEFORE the selected hole
Select this option to insert a hole before the selected hole.
Insert AFTER the selected hole
Select this option to insert a hole after the selected hole.
Insertion Method
Indicate new position(s)
Select this option to indicate a position for the new hole. You may then click anywhere in the Vulcan window. Continue to click new positions to add further holes.
Indicate extent and enumerate hole count
Select this option to indicate the extent of the added row length. You will be required to enter the number of holes to be added within this nominated distance from the selected hole.
Insert hole at a distance from selected hole along row
Select this option to insert the new blast hole at a specified distance from the selected hole. You will be required to enter the distance.
Insert holes into row segment
Select this option to indicate how many holes you would like to insert between the selected hole and the hole in the nominated direction. You will be required to enter the number of holes to be inserted. Note, if insertion is beyond the end of the row, you must select the point to define the row segment for insertion. In this instance, the following panel will be presented:
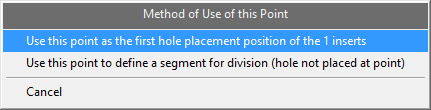
Use this point as the last hole placement position of the [number] inserts.
The required number of drillholes will be added, such that the new holes finish at the nominated point. The new holes are spaced equally along the new section of row.
Use this point to define a segment for division (hole not placed at point).
The required number of holes will be added, such that the new holes finish one drillhole space back from the nominated point. The new holes are spaced equally along the new section of row.
Cancel
Select this option to return to the Select hole from which to insert stage, without inserting additional blast holes.
Insert holes at design spacing along row
Select this option to add holes at design spacing of row. The following panel will be presented, upon clicking OK, to permit the direction of the added holes to be nominated.
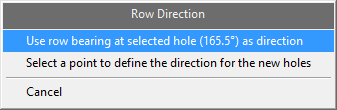
Use row bearing at selected hole as direction
Select this option to continue the blast row along the existing row bearing.
Select a point to define the direction for the new holes
Select this option to indicate a direction for the new section of the blast row
Cancel
Select this option to return to the Select hole from which to insert stage, without inserting additional blast holes.
Inserted Hole Naming
Automatically name hole(s)
Select this option to have the added holes automatically named in accordance with the existing numbering sequence of the row.
Use supplied Name/Prefix
Select this option to nominate a Name/Prefix of your choice. Both alpha and numeric characters are permitted. The supplied name will be used as is for a single hole, or as a prefix to a number for multiple holes.
Click OK.
The location of the new hole will be shown and the Select hole from which to insert prompt will display again. At this point you may either select another hole to continue to insert additional holes to the blast program, or right click to cancel.

