Merge Blasts
Use the Merge Blasts option to combine two separate blast programs into a single blast. Load both blasts prior to using this option.
Instructions
Click the Merge Blasts icon ![]() on the Drill and Blast toolbar.
on the Drill and Blast toolbar.
Or
On the Drill and Blast menu, point to Edit, and then click Merge Blasts to display the Select Master Blast prompt.
Select Master Blast
Select the blast to be used as the Master Blast for the merge. As a rule this would be the earlier blast program of the two blasts to be merged, so that naming directionality of the original blast is applied to the later blast.
Select Second Blast
Select the second of the two blasts involved in the merge operation. The Merge Blasts panel will then appear.
Merge Blasts
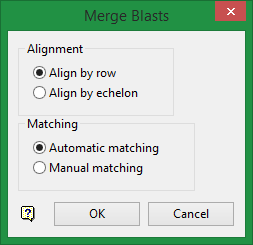
Alignment
Align by row
Select this option to apply the row numbering pattern of each row of the Master Blast to the respective aligned row of the Second Blast.
The example below shows the use of this option,
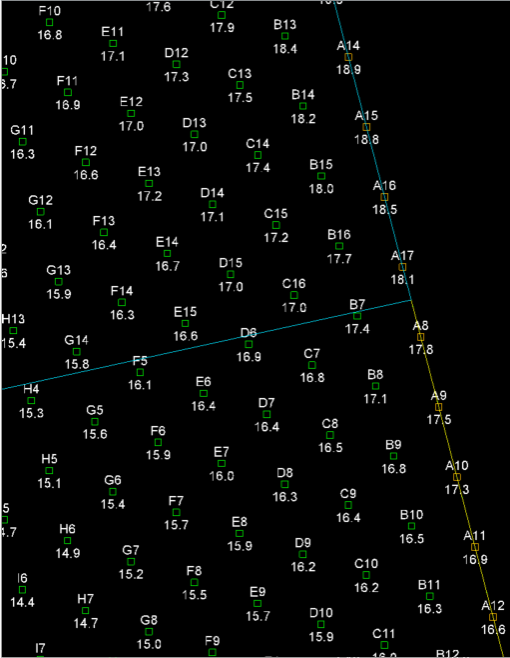
Before - Note that the naming sequence of each row restarts at the boundary (blue line).
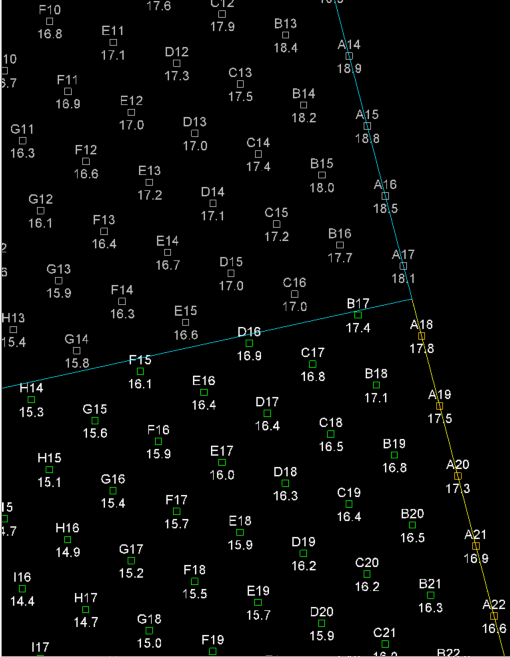
After - Using the options Use alphabetical row name and also Use echelon number.
Align by echelon
Select this option to connect echelons of the Master Blast to echelons of the Second Blast.
Matching
Automatic matching
Select this option to automatically connect the closest unmatched rows/echelons. If selected, connection lines will display to illustrate the generated connections between rows/echelons of the two blasts.
Select Yes to proceed with the merge or select No to cancel the merge operation.
Manual matching
Select this option to nominate which pairs of rows/echelons should be connected.
If selected, you will be prompted to Select the first Row object at the Connection end (Master or Second blast).
Click on the white predictive connection line between the end drillhole of one blast and its nearest neighbour along the relevant row or echelon. An extension of this connection line will then stretch as you move your mouse.
Click the connection line of the applicable row or echelon of the other blast between the drillhole nearest the first blast and its neighbour along the relevant row or echelon.
Tip: Vulcan can predict the remainder of connections for the blast merge from as little as 1 manually-indicated connection, depending upon complexity of connective relationships.
Select Yes to proceed with the merge or select No to cancel the merge operation.
Click on OK.
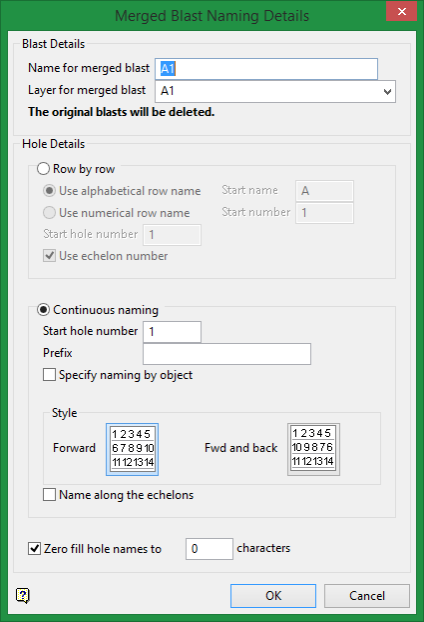
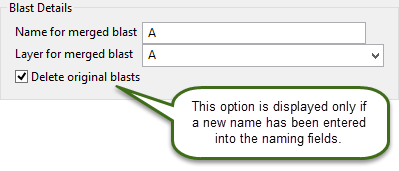
Blast Details
Name for merged blast / Layer for merged blast
Both of these fields will auto-populate. You can type new names if you do not wish to overwrite the original blast.
Ensure the accompanying checkbox for Delete original blasts is unchecked if retention of Master and Second blasts is required.
Delete original blasts
Type a new name in the Name and/or Layer fields above to enabled access to this checkbox. Uncheck if you wish to retain original blasts.
Hole Details
Row by Row
Select this option to apply naming on a row by row basis to the merged blast.
Use alphabetical row name
Select this option to apply alphabetical row name to the merged blast. Multiple characters may be used here and Vulcan will increment the final character of the string alphabetically, ie. preceding letters of string will act as a prefix.
Start name
Multiple characters may be used here and Vulcan will increment the final character of the string alphabetically, ie. preceding letters of string will act as a prefix. For example, if the string entered is 'ABCD', a hole in the first row may be numbered ABCD9 and in the second row ABCE9.
Use numerical row name
Select this option to apply numerical row naming to the merged blast. Multiple digits are permitted in this field and Vulcan will increment the numerical value of the entered number to name successive rows. For example, if the string entered here is '24562', sample hole numbers would include 245629 for ninth hole of the row numbered 24562 and 2456717 for hole number 17 on row 24567.
Start number
Enter the number for the first row of the merged blast.
Start hole number
Enter the number for the first hole number in each row.
If Use echelon number is also selected, alignment of echelon numbering may require that holes in row 1 start at an advanced point in the hole numbering sequence. This, in turn dictates the required starting hole number for subsequent rows, such that echelon numbering is honoured.
Use echelon number
Check this option to apply hole number consistently in echelon direction. For example, the hole number X in each subsequent row after the start row is offset from the previous row's hole X in an echelon alignment.
Continuous naming
Select this option to apply straight hole number, either with/without a prefix, to the holes of the merged blast.
Start hole number
Enter the start hole number.
Prefix
Alphanumeric characters may be used here to nominate a prefix for the hole names.
Specify naming by object
Check this option to nominate objects to be named.
Style
Forward
Click this option to have numbering running in the same direction for each row of the merged blast.
Fwd and back
Click this option to have numbering running in the forward direction on the first row, then opposing direction on the second row and continuing in this pattern for the merged blast.
Name along the echelons
Select this option if numbering is to proceed along echelons instead of rows.
Zero fill hole names to [number] characters
Check this box and enter the number of zeros required to zero-fill numbers to give hole names of consistent length. For example, nominating 3 zeros here results in hole names A009, B012, etc.
Click on OK to commence the merge.

