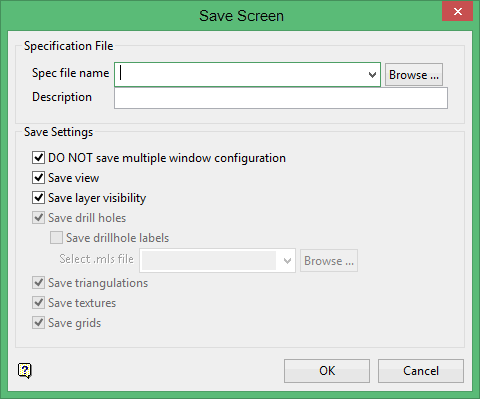
Save Screen
Save the current screen
Use the Save Screen option to save the data that is currently displayed into a nominated file ( <proj><name>_screen.dg_spec ). The resulting file will be stored in your current working directory and will be listed under the Specifications folder of the Vulcan Explorer application.
Use the Load Screen option to redisplay a saved screen. You can also load screens through the Vulcan Explorer application as well as through using the Open button ![]() on the Standard toolbar.
on the Standard toolbar.

|
Icon |
Tooltip |
Description |
|
|
New |
Allows you to create a new design database. Refer to the File > New option for more information. |
|
|
Open |
Allows you to open files. Refer to the Open option for more information. |
|
|
List Databases |
If you click and hold down the mouse button, then the Open toolbar displays. From this toolbar, you can list Refer to the File > Design Files > List Files option for information on design databases, the File > Layers > List option for information on layers and the File > Open option for information on triangulations, grid models and block models. |
|
|
Remove Layer |
Allows you to remove any loaded layers from the screen. Refer to the File > Layers > Remove option for more information. |
|
|
Remove Underlay |
Allows you to remove data that is loaded as an underlay. Refer to the File > Underlays > Remove option for more information. |
|
|
Remove All Underlays |
Allows you to remove data that is loaded as an underlay. Unlike the Refer to the File > Underlays > Remove All Underlays option for more information. |
|
|
Undo |
Allows you to reverse the last action. Refer to the Design > Undo option for more information. |
|
|
Redo |
Allows you to reverse last Undo action. Refer to the Design > Redo option for more information. |
|
|
Save |
Allows you to save the open design file. Refer to the File > Save option for more information. |
|
|
|
Allows you to create a plot of all of the currently loaded objects. Refer to the File > Plot > Plot All option for more information. |
|
|
Create Section |
Allows you to create a cross-sectional 3D view with a specified dip and width of view. Refer to the View > Create Section option for more information. |
|
|
Delete Section View |
Allows you to delete a section. Refer to the View > Delete Section option for more information. |
|
|
Help |
Launches the Vulcan online help. Refer to the Using Vulcan Help section for more information. |
Instructions
On the File menu, click Save Screen to display the Save Screen panel.

Specification File
Spec file name
Enter, or select from the drop-down list, the name of the file in which the current screen display will be saved. The drop-down list contains all .dg_spec files found in your current working directory.
To create a new screen file, enter the name of the new file (a maximum of ten alphanumeric characters). Only the name needs to be entered, the system will add the project prefix and file extension. The name may contain the minus sign (-), but no other non-alphanumeric characters. The resulting file will be stored in your current working directory.
Description
This is an optional field of up to forty alphanumeric characters and can be used to describe the specification file.
Save Settings
Use this section to specify the items you want to save.
- DO NOT save multiple windows (see View > Windows)
- views (see View > Change View)
- layer visibility (see View > Visibility)
Additional items that can be saved, but are only shown in the above panel if they are loaded, are:
- triangulations
- textures
- grids
- drill holes
Save drillhole labels
Select this option to save multi-label specification files (.mls) so that drillholes can then be loaded with labels.
Click OK.
The selected screen items are saved.
If you have not previously saved the layers to which these screen items belong, you will be asked whether or not to save them in the open design database.

