Import CSV (Databases) - Databases (update)
Use this option to update information in an Isis or ODBC database by importing a CSV file with the updated information.
Update CSV allows tables on an existing database to be updated. It searches for an occurrence of a table on the database and inserts that table as a new table if it doesn't exist. Unlike the Import CSV option, which loads the tables in the exact sequence that they appeared in the CSV table, the Update CSV option tries to keep tables sorted according to a user-specified field.
When creating a new database using the Update CSV option, the following should be noted:
- If the CSV file has been built up over time, then there may be duplicates of the same table in the file. When using the conventional Import CSV option, if there are duplicates of the same table (other than headers), then there will be duplicate copies of the table in the database. When using this option, each time a duplicate table is encountered, it will be used to update the fields on the existing table. The field values in the later versions of the table will be used to overwrite the earlier ones.
- Because the Update CSV option loads data in a sorted order according to a specified sort/match field, it is not necessary to pre-sort the CSV table.
- Although the Update CSV option will not create duplicate occurrences of tables with the same value in the sort/match field (the second will merely be used to update the first), it still checks to see if there is more than one occurrence in a group for updating purposes. Therefore, if the data has been loaded using the Import CSV option and there are several tables already in the database in one group that have the same value in the sort/match field, then these can all be updated by only one table in the CSV file through the Update CSV option.
- Update CSV creates tables are sorted according to the sort/match field. However, it is not necessary for tables to be sorted in that order on the database when updating existing database tables.
- Any data records that have a blank (empty) index field are considered invalid and are ignored by CSV Database load and CSV Database update. These invalid records are reported in the log.
When new data is inserted into the database, a database insert session is opened and closed for each separate piece of data added to the database. Import CSV on the other hand, leaves database insert sessions open while inserting new data into the database. This difference results in Update CSV having extra robustness and functionality. When new data is inserted into the database, a database insert session is opened and closed for each separate piece of data added to the database. Import CSV on the other hand, leaves database insert sessions open while inserting new data into the database. This difference results in Update CSV having extra robustness and functionality.
Instructions
On the File menu, click Import to display the Import panel.

Click CSV (Databases) in the File Format column on the left.
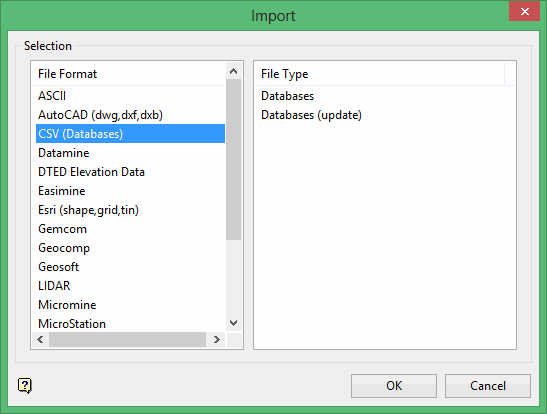
Select the Databases (update) from the File Type field on the right side of the panel.
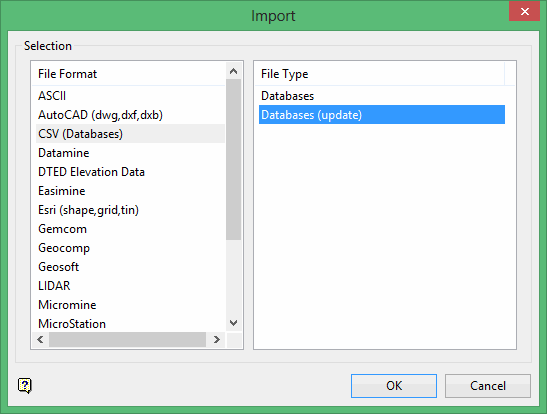
Click OK to display the CSV Update - Data Files and Database panel.
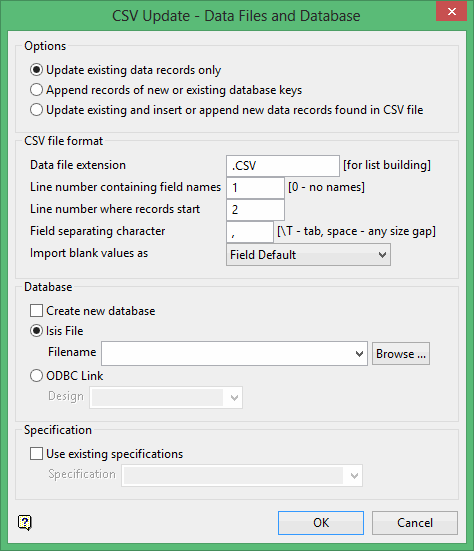
Options
Update existing data records only
Select Update existing data records only to update existing records in the database with the information from the CSV file but not add new records. If you select this option, new record information from the CSV file will overwrite the existing record information. Any new data records that do not already exist in the file will be ignored.
Append records of new or existing database keys
Select Append records of new or existing database keys to add new records to the database but not update existing records. If you select this option, any new records from the CSV file that do not already exist in the database will be appended to the database. Any existing data records will be ignored.
Update existing and insert or append new data records found in CSV file
Select Update existing and insert or append new data records found in CSV file to update existing records and add new data records from the CSV file.
CSV file format
Data file extension
Enter the extension of the data files that contain the data to be imported in the Data file extension box. The default extension is.CSV. Subsequent panels formulate a list of the data files. If the data files have different extensions, then the names can be entered into the boxes where necessary. If this box is left blank, then all files in the current working directory will be listed.
Line number containing field names
Enter the line number that contains the headers of the field names in the Line number containing field names box. This is typically the first line. If there is no header, enter '0' (zero).
Line number where records start
Enter the first line number that contains records in the Line number where records start box. Some CSV files may contain other additional information as well as a line containing the field name in the first part of the file (the header section). If this is the case, then the data records may not start until several lines into the file. Generally, however, the data starts from the second line.
Field separating character
Enter the character used to separate the fields in the data file in the Field separating character box. The default separator is a single comma (, ).
The TAB character can be used by entering \T. If a space is used, then the gap between the data field can be as many spaces as necessary. Fields may be enclosed by double quoted to allow the use of separator characters in the string.
Import blank values as
Specify how blank entries should be treated in the Import blank value as drop-down list. You have the choice of inserting a null value into the database or using the default field value (as defined in the chosen design). If a default field value has not been set, or if it has been left blank, then a null value will be used instead.
Database
Select or create the database that will be used to store the data in the Database section. You can select or create either an Isis or ODBC database.
Create new database
To create a new Isis database:
-
Select the Create new database check box.
-
Select Isis File.
-
Enter a file name for the new database in the Filename drop-down list.
-
Click Select to select a design from which to create the database. The Select Design from which to Create Database panel displays.
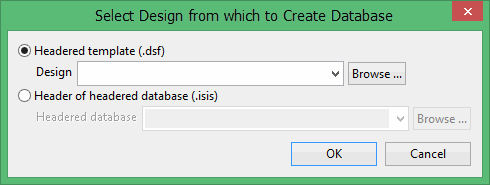
-
Select the Headered template (
.dsf) option to use an existing specification file. Select the file from the Headered database drop-down list, or click Browse to select a file from another location. -
Select the Header of headered database (
.isis) option to use the fields int he header of an existing database to populate a new design file (.dsf). Select a design file from the Design drop-down menu, or click Browse to select a file from another location.
This option assumes that all of the CSV tables that are being used contain the same data structure. All the tables should have the field names on the same line and data that starts at the same line. If this is not the case, then you can either edit the top of each table so that they are all the same structure, or you can load the tables in multiple passes one at a time beginning with the header tables. If you choose to do this, remember to clear the Create new database check box on the second and subsequent passes.
Specification
Use existing specification
Select the check box to select an existing specification and select the specification from the Specification drop-down list.
In order to Isis databases to appear in the drop-down list, the database file must be named <proj><odi>.dsn.isis where <proj> is the project code; <odi> is the optional databse identifier, which is only required if ore than one database has been created from the design; and <dsn> is the design name.
Click OK.
The Datafile to Record Connections panel displays. Use this panel to establish the data file to table connections, such as which CSV table corresponds to which table in the database. The DB Record column displays names of the tables as they appear on the design.
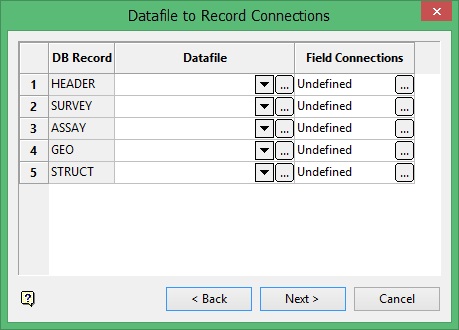
Select the file from the drop-down list in the Datafile column that contains the information for a particular table, or click Browse ![]()
The file extension specified through the first panel will control the contents of the drop-down list. For example, if you specified.csv in the Data File Extension field on the first panel, all .csv files in the current working directory display.
Click Browse ![]()
Click Browse in the Field Connections column to display the Datafile to Record Connections panel and establish the field connections for that table.
It is not necessary to establish connections for all tables. No checks are made about the minimum table requirements of the design because loading of data may happen over a number of passes. The only limitation is that a header (key) record table must be loaded if a new database is being created. Warning messages display if field connections are forgotten for connected records.
It is not necessary to connect all fields, and you may use the same field form the data file to assign data to more than one field in the database table. However, you must connect to at least one field for each table for which you have established a .csv file connection.
The following entries are also required:
-
For a header table, the key field must be connected.
-
For the other tables, the field defining the key of their associated header to that record must be entered, this is the Index field on this table field. In a
.csvtable, each line will have a field containing the index of the table group to which it belongs.
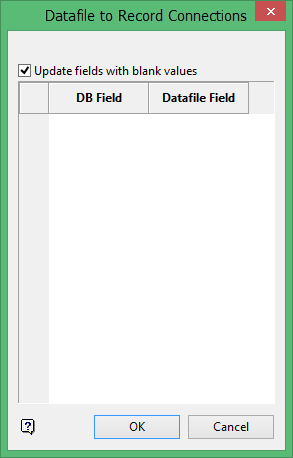
There are two types of field connection panels, one for the header table and one for the remainder of the tables. Use the header field connection panel to specify which.csv data file field should be connected with which database field.
You can also choose to Update fields with blank values. This means blank field in the .csv file will overwrite data in the database.
If you received an assay file containing only the gold value, then you can import this data into the databse. If you received another file containing only the copper values (with the other fields blank), then you could import the data file into the database without overwriting (with the blanks) the values for the other (gold) fields in the same table of the database.
The field connections panel for the remaining tables contains the same options as the header panel, plus it includes extra sections: Index field on this table. Specify the Index field on this table section the primary key from the header table.
When all of the required field connections have been made, click Finish or Back. This will either return you to the Table connection panel, or error messages will display if any required field assignments have not been made.
Cancelling finished the session.
Click Next to display the Specification Save panel.
Select the Save the specifications check box to save the connection for future use.
If you choose to save the specifications, the specifications will be saved in the CSV_SPECS file (under the CSV_load_spec s directory of your ENVIS_RESO area). You can save up to one hundred sets of specifications. You will only be able to save specifications by overwriting an existing set. You can edit the CSV_SPECS file through a text editor to delete any outdated specifications.
Click Finish.
The database is then updated or created.

