Different Methods to Start Vulcan Software
The first time that you start the Workbench, or if you have removed the vulcan.prefs file from the User Profile area, the VULCAN 3D Software User Setup Wizard displays.
Vulcan software can be started in four ways:
|
Vulcan Launcher button |
This button will be placed on your desktop during the installation. You may want to place this button on the Quick Start toolbar of the task bar. Refer to the System Administration documentation for information on creating shortcuts. Selecting the button (either by a single or a double-click depending upon your Windows setting). |
|
Double-click |
Double-clicking on a folder has the same effect as selecting the Vulcan Launcher button. |
|
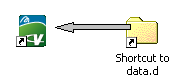
Drag and Drop |
Dragging and dropping a data folder or Project file ( |
|
Folder Properties |
Selecting a shortcut to a folder or Project file that has properties that have been set to run with Vulcan. |
If you are already familiar with starting Vulcan Software, then you can go directly to the information on the Vulcan Software Program.
Note: If your licence is in overdraft (only applicable to floating licences), a message displays informing you of this fact before the application is started. You can then choose to continue using the overdraft licence or activate the Licence Administrator.
Vulcan Launcher button
When the Vulcan Launcher button has been selected from the desktop or selected from the Start Menu, the Vulcan 3D Software panel displays. The Vulcan 3D Software panel will also be displayed when you right-click on a folder and select Open with Vulcan from the displayed context menu.
The current feature (configuration) and description displays. To change the feature, use the Licence Administrator button.
Previous data areas are displayed in the Vulcan Work Area. Highlight the required data area, by left-clicking, or double-click on Browse to navigate to the required data. Once you have selected the data, click on the application that you want to run.
To remove data areas from the Vulcan Work Area, right-click on the file and select Remove from History. You can also remove the entire history list by right-clicking and selecting Remove All.
Note: If you have been sent a new licence file, then you will need to run the Licence Administrator. Refer to the Starting the Workbench for the first time topic in the Workbench section of the documentation for more information.
Drag and Drop
Data Folder
To use drag and drop from a mapped drive, drag and drop the required data folder onto the Vulcan Launcher button. To use drag and drop from the desktop, first create a desktop button (shortcut) that represents the required data folder. Refer to the System Administration documentation for details on how to create shortcuts. Once you have created the desktop button, drag it onto the Vulcan Launcher button.
Dragging a Data Folder
The Vulcan Launcher is then displayed. The data that you have "dragged and dropped" displays in the Vulcan Work Area list. Highlight the required data area, by left-clicking. Select the application that you want to run.
Project File
To use drag and drop from a mapped drive, drag and drop the required data file onto the Vulcan Launcher. To use drag and drop from the desktop, first create a desktop button (shortcut) that represents the data file. Refer to the System Administration documentation for details on how to create shortcuts. Once you have created the desktop button, drag it onto the Vulcan Launcher button.

Dragging a Project File
Vulcan is then started.
Folder Properties
If you regularly use the same data folders with Vulcan, then create desktop icons for these folders (as described in Drag and Drop ) and then change the properties of these folders. This will allow Vulcan to run with the folders. This means that double-clicking on the folder button will have the same effect as double-clicking on the Vulcan Launcher button.
When you double-click on the data folder the Vulcan 3D Software panel is then displayed.
The installation procedure will automatically alter the properties of project files (.dg1), hence when you double-click (or single-click depending upon your Windows settings) on the project file, Vulcan will run with the data.
The Vulcan Software Program
Once Vulcan is started, by using one of the methods outlined above, then the Vulcan 3D Software panel displays. This panel contains a series of buttons representing the applications that can be started from the launcher, these applications comprise of Vulcan, Isis, Plot Utility, Workbench and Settings.
To start a particular application, highlight the data that you want to use and then click on the appropriate application button. Follow the links below for documentation on starting each application.
Starting Vulcan
Vulcan can be started in several ways, from the Vulcan Launcher, from the Workbench, from the Vulcan Explorer application and, by dragging and dropping a Project File (.dg1).
Vulcan Launcher
- Double-click on the Vulcan Launcher button, or drag and drop a data folder onto the button, or double-click on a folder, which has had its properties set to run with Vulcan.
- Highlight the Data directory that you want to use for the Vulcan session.
- Click the Vulcan button. The VULCAN 3D Software Project Setup Wizard displays.
The VULCAN 3D Software Project Setup Wizard won't be displayed if you have enabled the Skip Project Setup when using a single project file preference and your current working directory only contains a single project file. Refer to the Vulcan section of the Tools > Preferences option for more information on the Skip Project Setup when using a single project file check box.
- Select the project file or, if desired, choose to create a new project file. Refer to Creating a new Project file for more information on this option.
- Once you have selected the project file, a panel displays that lists the project work area and project file. Select Next to start Vulcan and Back to alter the project settings.
- If a design file (also known as a design database) has not been added to the project file, then the Open Design File panel displays.
Through this panel, specify the design database that is to be associated with the project file. This panel can also be used to create a new design database. Refer to the Open option (under the File > Design Files submenu) for more information.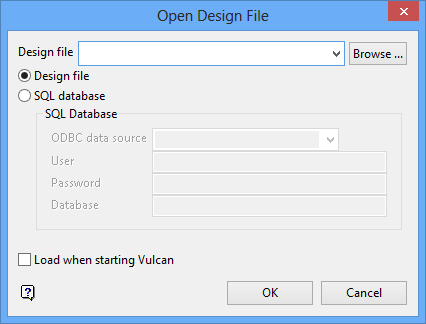
Workbench
- Start the Workbench.
- Click on the Start Button in the Application Area and select Vulcan.
- The VULCAN 3D Software Project Setup Wizard displays.
Vulcan Explorer Application
- Right-click on a project file (
.dg1) in the Specifications folder of the Explorer Application. - Select Run Vulcan.
Dragging and Dropping a Project File
Drag and drop the project file onto the Vulcan Launcher button.
Project File (.dg1)
- Double-click on a project file.
or
- Right-click on a project file and select Open with Vulcan.
When Vulcan starts, it creates the Primary Window from the mapping specifications from your project specification file. You can use the 'name' section of this file to give this coordinate system a name, otherwise the name of the file is used.
Unlike subsequent windows opened with the Open option (under the View > Windows submenu) you cannot delete this window. You can, however, hide it using the cross in the right hand top corner of the window. If you change the coordinate system inside this window, then its title changes to reflect the new system and a "(*)" is appended to indicate that this window is still the Primary Window.
It is also possible to 'wrap' the running of Vulcan inside a T shell. This means that your login.csh is sourced immediately and you can add custom startup and cleanup code.
This feature should only be used by advanced users.
You must create a file called Vulcan.csh that contains the line envis_gui.exe $*. This file, which needs to be located in your ENVIS_RESO area, should also contain the startup and cleanup code. Ensure that you have a return character at the end of your Vulcan.csh file.
![]()
Example Vulcan.csh
Once you have created this file, start Vulcan in your normal manner. The Vulcan Console tab of the Report Window displays additional information about your startup code and when you quit Vulcan it will display information about your cleanup code.
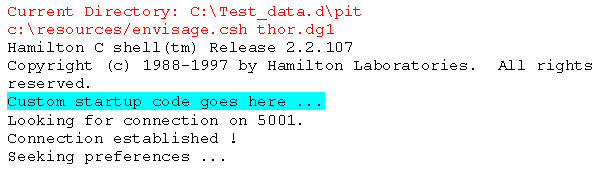
Report Window content on startup when using the above example Vulcan.csh
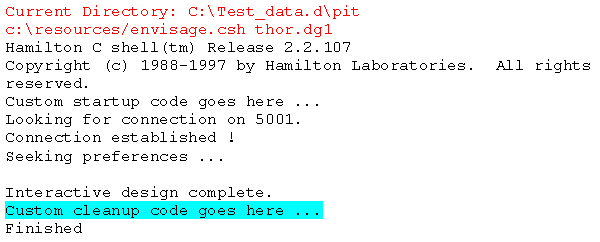
Report Window content on quitting Vulcan when using the above example Vulcan.csh
If the line style, drafting and symbol databases from earlier versions of Vulcan are also present in your ENVIS_RESO area, and the equivalent headered databases do not exist in your ENVIS_RESO area, then they will be automatically converted to the headered database format when Vulcan 9 is started for first time. The converted databases are copies of the original databases.
Starting Isis
Isis can be started in several ways, from the Vulcan Launcher, from the Workbench, with or without Vulcan running, from the Vulcan Explorer Application and, if you have drill holes loaded, then from the drill hole data.
Vulcan Launcher
-
Double-click on the Vulcan Launcher button, or drag and drop a data folder onto the button, or double-click on a folder, which has had its properties set to run with Vulcan.
-
Highlight the Data directory that you want to use for the Isis session.
-
Click the Isis button.
Workbench
-
Select Workbench start button, from the Application Area.
-
Select Isis. You will be prompted to open a database.
Vulcan Explorer Application
-
Right-click on a database in the Users Databases folder of the Vulcan Explorer Application
-
Select Edit.
Vulcan
If you have drill holes loaded (refer to Geology > Drilling for more information), then you can right-click on a particular drill hole and select Edit Database or View Database from the displayed context menu to open the Database.
Starting the Plot Utility
The Plot Utility can be started in several ways; from the Vulcan Launcher, from the Workbench, with or without Vulcan running, and from the Vulcan Explorer Application.
Vulcan Launcher
- Double-click on the Vulcan Launcher button, or drag and drop a data folder onto the button, or double-click on a folder, which has had its properties set to run with Vulcan.
- Highlight the Data directory that you want to use for the Plotting session.
- Click the Plot Utility button.
Workbench
- Select the Workbench start button, in the Application Area.
- Select Plot Utility. You will be prompted to open a plot file, which will then be displayed in the Plot Preview Window
Vulcan Explorer Application
Double-click on a plot file in the Plots folder of the Vulcan Explorer, the selected plot file will then be displayed in the Plot Preview Window. It is also possible to right-click on the plot file in the Explorer and select Plot or Preview.
You can select multiple plots by using the mouse and the Shift key (for adjacent plot files) and the mouse and the Ctrl key (for non-adjacent files).
Many of the Vulcan plotting options, such as File > Plot > Plot All, will provide the opportunity of viewing the plots, in the Plot Utility, once the file has been created.
Starting the Workbench
The Workbench can be started in two ways; from the Vulcan Launcher and from the Workbench button. From the Workbench it is possible to start all of the Vulcan programs and applications, including Vulcan, Bhgute and Gphute.
Vulcan Launcher button
-
Double-click on the Vulcan Launcher button, or drag and drop a data folder onto the button, or double-click on a folder, which has had its properties set to run with Vulcan.
-
Highlight the Data directory that you want to use for this session.
-
Click the Workbench button.
Workbench button
To use this method, you must first place a shortcut to the VWorkbench.exe ( found in the bin/exe directory of your Vulcan files) on your desktop. Refer to the System Administration documentation for information on creating shortcuts.
-
Double-click on the button.
Shell Window
A shell window can be started in two ways; from the Workbench or from the Vulcan Launcher.
Vulcan Launcher
- Right-click in the Vulcan Work Area.
- Select Launch CSH.
Workbench
- Select Workbench start button, from the Application Area.
- Select T Shell.

