Apply Sections
Use the Apply Sections option to apply road cross sections to the alignment and to create the road surface.
Instructions
On the Iroad menu, point to Edit, and then click Apply Sections to display the Road Cross Sections panel.
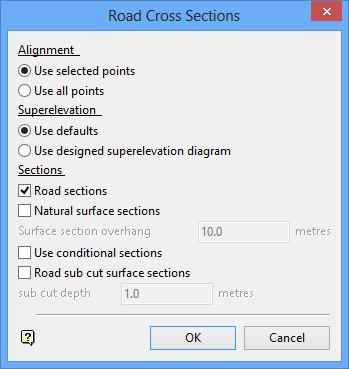
Alignment
Select Use selected points to select a start and end point on the alignment for the sections. Select Use all points to use all the points on the alignment.
Superelevation
Select Use defaults to use the default crossfalls specified through the Set Up option (under the Iroad > File submenu). Select Use designed superelevation diagram to use the superelevation diagram you have designed through the Design Superel option.
Sections
Road sections
Select this check box to generate the road sections. They are placed in their own layer (<design_name>.D).
Natural surface sections
Select this check box to generate natural surface sections at each alignment point that extends beyond the road section by the amount specified by the overhang. They are placed in their own layer (<design_name>.T). This layer can be plotted to display the pre-excavation/fill surface.
Use conditional sections
Select this check box to select conditional cross sections.
Road sub cut surface sections
Select this check box to set a sub cut for the road. This is used if the cut is in soft dirt and a certain amount of material is needed to be placed there to prevent road sinkage.
Click OK.
Select the alignment.
Confirm that the correct alignment has been selected.
You are transferred to the ROAD_SECT window. If you selected to use specific points of the alignment, then you are first asked to select these points.
Depending on the entries specified, you will be asked to select a road section and a conditional section. Any number of sections can be selected, up to the four allowed that will satisfy all conditions, i.e. left/cut, left/fill, right/cut, right/fill.
If all conditions are met, then you will not be prompted any more.
Cancel if you don't want to fill all conditions.
Note: One section may satisfy more than one condition.
If you wanted to use a superelevation diagram, then you will be transferred to the LONT_SECT window to select it.
The sections are generated. See Diagram 1 for an example.
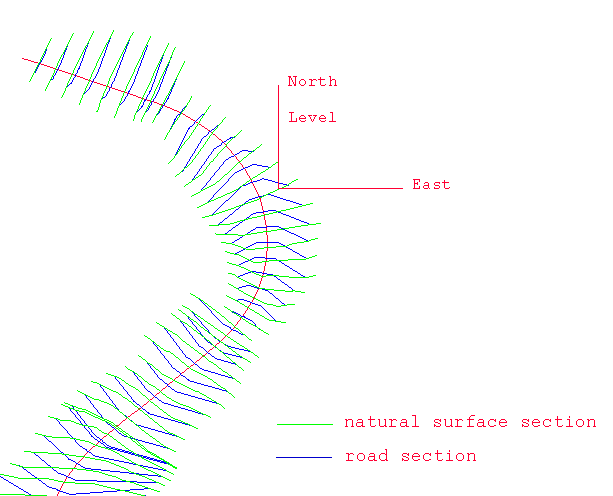
Figure 1: Road and Natural Surface Cross Sections
Each cross road section is an object with the alignment point name as the object name. The cross road sections are stored in a layer named <design_name>.D. The point names of each section indicate the point type.
| Point Names/Left Lane | Point Names/Right Lane |
|---|---|
| LBP (Left batter point) | RBP (Right batter point) |
| LV (Left verge) | RV (Right verge) |
| LS (Left shoulder) | RS (Right shoulder) |
| LT1 (Left traffic lane #1) | RT1 (Right traffic lane #1) |
| LT2 (Left traffic lane #2) | RT2 (Right traffic lane #2) |
| LM (Left median) | RM (Right median) |
| LMS (Left median shoulder) | RMS (Right median shoulder) |
| LC (Left centre) | RC (Right centre) |
Each natural surface section is also an object, with the alignment point name as the object name. The natural surface sections are stored in a layer named <design_name>.T. The point names of each section indicate the point type, and is either NSLEFT or NSRIGHT.
Each a time section is generated, it is given a different feature name (VERSION<n>). This way the sections can be grouped together by feature so that any set of sections can be deleted by feature code rather than deleting all the sections every time the design is revised.

