acQuire
Use the acQuire option to setup a link to an acQuire drillhole database which can then be accessed directly in Vulcan. This database will be linked through the acQuireDirect API. The current API supplied is read-only and does not allow writing back to the acQuire database directly.
This option creates a file called <identifier>.acq.Isis which can be referenced via the Vulcan menus as you would a regular Vulcan Isis database. However, this will be accessing and loading the acQuire database directly.
Instructions
To setup the acQuire update mode, go to Preferences > Miscellaneous in Vulcan.
On the File menu, click AcQuire to display the Setup acQuire database panel.
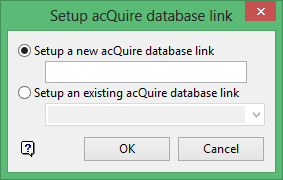
Create a new acQuire database
Select this option to create a new link to an acQuire database. Enter the name for the new link. The extension.acq.Isis will automatically be added for the final name.
Edit an existing acQuire database
Select this option to edit an existing link to an acQuire database. Enter, or select from the drop-down list, the name of the existing link.
Click OK.
The following panel displays.
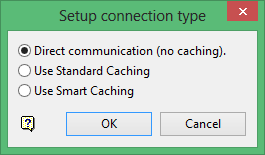
From this panel, choose the type of caching you want to use.
Direct communication (no caching)
Select this option to if you do not want to use caching. All communications between Vulcan and the acQuire database will be direct. This method is the slowest connection type and is not recommended for normal use.
Use standard caching
Select this option to pull the data from the acQuire database, where it will be cached and stored on your local machine in an Isis database. When queries occur, the cache immediately checks if it is up to date with the current acQuire database. If it is not, the cache is updated and your query will return up to date information. Note that a small or single change to the acQuire database will cause the cache on the local machine to be completely rebuilt. If dramatic changes are regularly made to the acQuire database, it is best to use this type of caching.
Use smart caching
Select this option to pull the data from the acQuire database, where it will be cached and stored on your local machine in an Isis database. When queries occur, the cache immediately checks if it is up to date with the current acQuire database. If it is not, the cache is updated and your query will return up to date information. Note that a small or single change to the acQuire database will result in the cache on the local machine being modified by only that small change. This is the preferred method for caching, except in cases where there are extensive modifications being made to the data on a regular basis.
Click OK.
The following panel is then displayed.
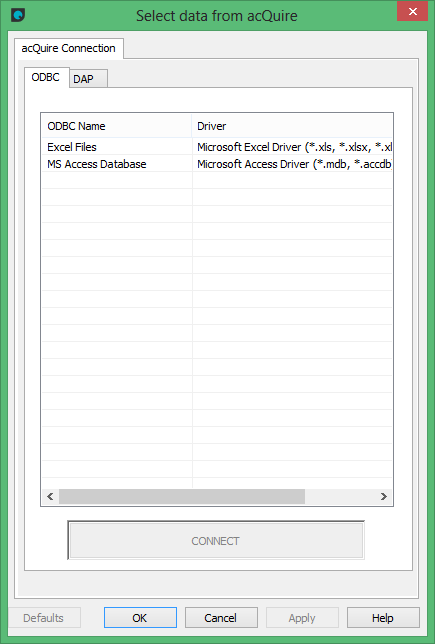
acQuire Connection
-
Select the row containing the appropriate ODBC Name and Driver.
-
Click CONNECT.
-
Enter a username and password, if required by the acQuire database.
-
Click OK.
acQuire Connection
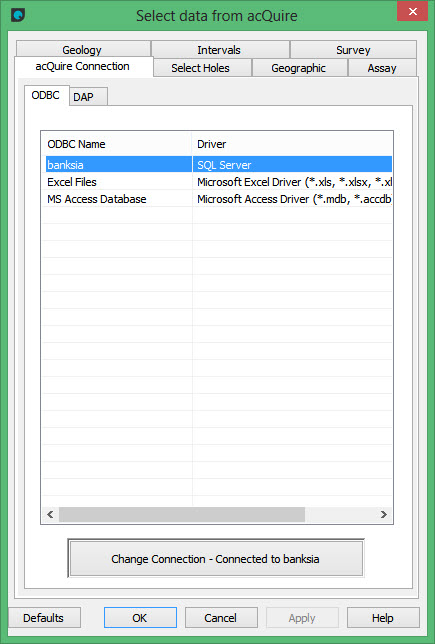
acQuire Connection
This tab displays the current connection and also to connect to another ODBC link. To change the connection, select the row containing the appropriate ODBC Name and Driver, then click Change Connection.
Select Holes
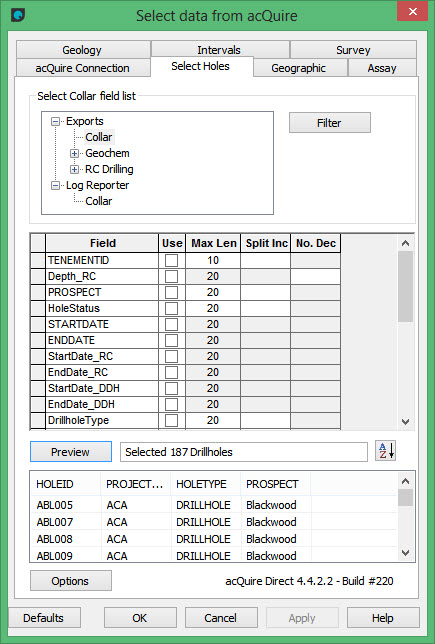
Select Collar field list
Select a form definition that best defines the drillhole information required by the client database. A form definition is based on one of the tables or group of tables from the acQuire Data Model. Each form definition defines the fields that are available for some of the objects in the acQuire work space.
Filter
Select this button to define a filter to subset the records that will be included in the data set. The acQuire Filter panel is then displayed.
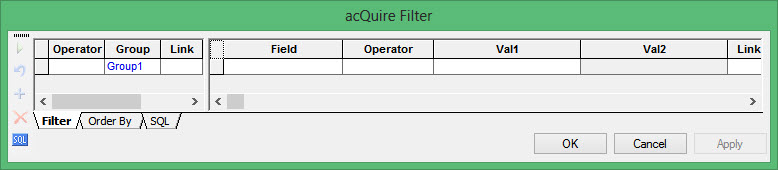
Operator
Select the operator to define a filter, or use as expressions. The following operators are available:
| LIKE | Compares strings of characters. For example: ProjectCode LIKE Merl% will be true when the filter finds a string commencing with Merl in the ProjectCode field. LIKE cannot be used for numeric fields. |
| NOT LIKE | Compares strings or characters. Will accept records that do not match the defined value. |
| BETWEEN | The expression is true if the Field is between the Val1-Val2 range (>=Val1 and <=Val2). |
| NOT BETWEEN | The expression is true if the Field is not between the Val1-Val2 range (<Val1 and > Val2). |
| < | Less than. Used to compare numeric expressions. |
| <= | Less than or equal. Used to compare numeric expressions. |
| = | Equal. Used to compare numeric expressions. |
| > | Greater than. Used to compare numeric expressions. |
| >= | Greater than or equal. Used to compare numeric expressions. |
| IS NULL | When a field does not contain a value, the expression will be true. |
| IS NOT NULL | When a field contains a value, the expression will be true. |
| IN | Where the Field is IN Val1, the expression is true. |
| NOT IN | Where the Field is NOT IN Val1, the expression is true. |
Group
The highlighted group is the group currently selected.
Link
Select a Link between the two fields or rows on the grid (AND/OR) if you have more than one field.
Field
Select the appropriate field from the drop-down list.
Operator
Select the appropriate Operator (=, <, >, etc.).
Val1/Val2
Enter Val1 and Val2. Val2 is only active if BETWEEN or NOT BETWEEN is selected as the Operator.
Link
Select a Link between the two fields or rows on the grid (AND/OR) if you have more than one field.
Field column
Displays the fields in the form definition that you selected.
Use column
Check to include the field in the output.
Max Len
Displays the current field size. Enter the maximum length to truncate Text fields. Numeric fields cannot be edited.
Split Inc
Enter the number of characters required in a field. If the number entered is smaller than the total number of characters in the field, other fields will be created to include all the data. This option is suitable for splitting up comments fields.
The naming of the fields is in the following format:
<original field>, <original field_Ext1>, <original field_Ext2>.
Note: This option is suitable for text fields only.
No. Dec
Enter the number of decimal points to display. The decimal points will be truncated to the number of decimal points entered.
Note: This option is suitable for numeric fields only.
Preview
Click this button to view the Collar records that have passed the filter (if defined).
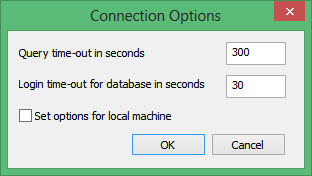
Options
Click this button to display the Connection Options panel.
Default
Select this button to apply a default profile to the selected data. The Set Default Settings panel is then displayed.
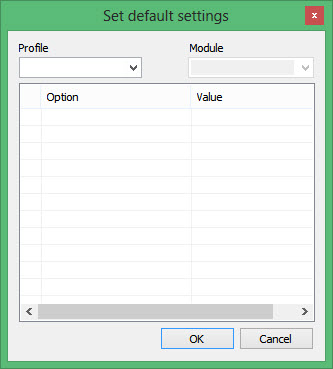
Set default settings
If you have defined a Profile (acQuire, Manage, Default Settings), you can apply a profile or template to the selection of the data. The profile has all or some of the settings that will apply to this and other tabs in the dialog. Select the appropriate profile from the drop-down list and the settings will apply. Deselect any of the options that you do not want to include.
Geographic
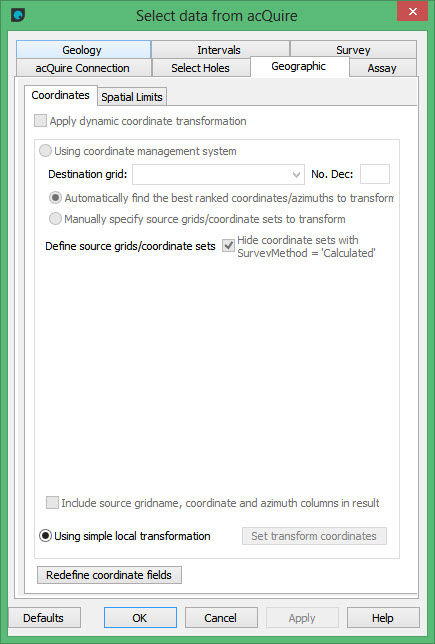
Apply dynamic coordinate transformation
Select this check box to transform coordinates from one grid system to another.
Using coordinate management system
Select this option to use the coordinate management system section of this panel. In acQuire, coordinate data of a drillhole or point can be stored in a set of virtual fields called coordinate sets. Each coordinate set is associated with a grid and is assigned a rank.
Destination grid
Select from the drop-down list the destination grid to be used. This grid defines the parameters for the transformed coordinates. The destination fields are 'East, North and RL' in the Collar data set, and Azimuth in the Survey data set.
No. Dec
Enter the number of decimal points to display. The decimal points will be truncated to the number of decimal points entered.
Define source grids/coordinate sets
Select the Coordinates Set to be applied to each grid by ticking the Use check box. If more than one coordinate set is selected, data will be selected from grid to the coordinate set with the highest rank (lowest value) in a grid.
If more than one coordinate set is selected, then the system for data selection is as follows:
- The highest order of the coordinate sets the selected list. The highest order is the first listed in the selected display.
- The highest rank of those selected. The highest rank is that with the lowest rank value.
Hide coordinate sets with SurveyMethod = 'Calculated'
Select this check box to exclude coordinate sets in the source grid list that have transformed coordinate data already written to them.
Use simple local transformation
Select this option to use the source data from the East, North and RL fields of a Collar compound definition, unless the source fields are redefined (see Redefine coordinate fields). There is no facility to transform azimuth data.
Set transformation coordinates
Select the Set transformation coordinates button to define the transformation. The Transformation Coordinates panel is then displayed
![]()
Define the transformation in terms of:
- 1 Point. This incorporates defining an angle and scale that is used to transform the coordinates. Define the points in terms of the current points (old East and North) and the destination set (new East and North).
- Use 2 Points. The definition of the points is similar to that above.
Redefine coordinate fields
Select this button to redefine the location of the source coordinate fields. This option is not available if you select the 'Using coordinate management system' option. The Redefine Fields panel is then displayed.
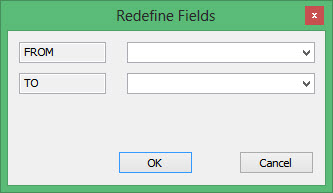
Redefine Fields
Redefine the locations of the source coordinate fields.
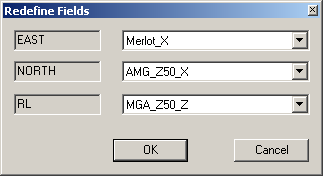
Redefine the locations of the source coordinate fields.
Assay

Select Assay field list
Select the form definition that best defines the fields that you would like included in the data set.
Filter
Select this button to define a filter to subset the records that will be included in the data set. The acQuire Filter panel is then displayed.
Operator
Select the operator to define a filter, or use as expressions. The following operators are available:
| LIKE | Compares strings of characters. For example: ProjectCode LIKE Merl% will be true when the filter finds a string commencing with Merl in the ProjectCode field. LIKE cannot be used for numeric fields. |
| NOT LIKE | Compares strings or characters. Will accept records that do not match the defined value. |
| BETWEEN | The expression is true if the Field is between the Val1-Val2 range (>=Val1 and <=Val2). |
| NOT BETWEEN | The expression is true if the Field is not between the Val1-Val2 range (<Val1 and > Val2). |
| < | Less than. Used to compare numeric expressions. |
| <= | Less than or equal. Used to compare numeric expressions. |
| = | Equal. Used to compare numeric expressions. |
| > | Greater than. Used to compare numeric expressions. |
| >= | Greater than or equal. Used to compare numeric expressions. |
| IS NULL | When a field does not contain a value, the expression will be true. |
| IS NOT NULL | When a field contains a value, the expression will be true. |
| IN | Where the Field is IN Val1, the expression is true. |
| NOT IN | Where the Field is NOT IN Val1, the expression is true. |
Group
The highlighted group is the group currently selected.
Link
Select a Link between the two fields or rows on the grid (AND/OR) if you have more than one field.
Field
Select the appropriate field from the drop-down list.
Operator
Select the appropriate Operator (=, <, >, etc.).
Val1/Val2
Enter Val1 and Val2. Val2 is only active if BETWEEN or NOT BETWEEN is selected as the Operator.
Link
Select a Link between the two fields or rows on the grid (AND/OR) if you have more than one field.
Load Sample intervals
Select this check box to include sample intervals, for example, SampleID, SampFrom and SampTo. This is Only available if no Assay virtual fields have been selected.
Redefine interval fields
Select this button to redefine the location of the source coordinate fields. This option is not available if you select the 'Using coordinate management system' option. The Redefine Fields panel is then displayed.
Redefine Fields
Redefine the locations of the source coordinate fields.
Default
Select this button to apply a default profile to the selected data. The Set Default Settings panel is then displayed.
Set default settings
If you have defined a Profile (acQuire, Manage, Default Settings), you can apply a profile or template to the selection of the data. The profile has all or some of the settings that will apply to this and other tabs in the dialog. Select the appropriate profile from the drop-down list and the settings will apply. Deselect any of the options that you do not want to include.
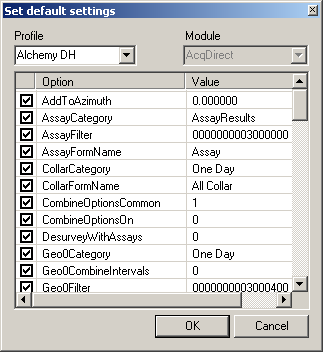
Set default settings
If you have defined a Profile (acQuire, Manage, Default Settings), you can apply a profile or template to the selection of the data. The profile has all or some of the settings that will apply to this and other tabs in the dialog. Select the appropriate profile from the drop-down list and the settings will apply. Un-tick any of the options that you do not want to include.
Geology
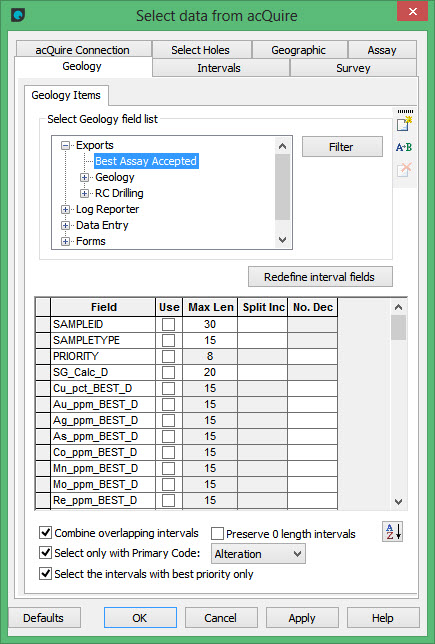
Select Geology field list
Select a form definition that best defines the geology information required by the client database. A form definition is based on one of the tables or group of tables from the acQuire Data Model. Each form definition defines the fields that are available for some of the objects in the acQuire work space.
Filter
Select this button to define a filter to subset the records that will be included in the data set. The acQuire Filter panel is then displayed.
Operator
Select the operator to define a filter, or use as expressions. The following operators are available:
| LIKE | Compares strings of characters. For example: ProjectCode LIKE Merl% will be true when the filter finds a string commencing with Merl in the ProjectCode field. LIKE cannot be used for numeric fields. |
| NOT LIKE | Compares strings or characters. Will accept records that do not match the defined value. |
| BETWEEN | The expression is true if the Field is between the Val1-Val2 range (>=Val1 and <=Val2). |
| NOT BETWEEN | The expression is true if the Field is not between the Val1-Val2 range (<Val1 and > Val2). |
| < | Less than. Used to compare numeric expressions. |
| <= | Less than or equal. Used to compare numeric expressions. |
| = | Equal. Used to compare numeric expressions. |
| > | Greater than. Used to compare numeric expressions. |
| >= | Greater than or equal. Used to compare numeric expressions. |
| IS NULL | When a field does not contain a value, the expression will be true. |
| IS NOT NULL | When a field contains a value, the expression will be true. |
| IN | Where the Field is IN Val1, the expression is true. |
| NOT IN | Where the Field is NOT IN Val1, the expression is true. |
Group
The highlighted group is the group currently selected.
Link
Select a Link between the two fields or rows on the grid (AND/OR) if you have more than one field.
Field
Select the appropriate field from the drop-down list.
Operator
Select the appropriate Operator (=, <, >, etc.).
Val1/Val2
Enter Val1 and Val2. Val2 is only active if BETWEEN or NOT BETWEEN is selected as the Operator.
Link
Select a Link between the two fields or rows on the grid (AND/OR) if you have more than one field.
Redefine interval fields
Select this button to redefine the location of the source coordinate fields. This option is not available if you select the 'Using coordinate management system' option. The Redefine Fields panel is then displayed.
Redefine Fields
Redefine the locations of the source coordinate fields.
Field
Displays the fields in the form definition that you selected.
Use
Check to include the field in the output.
Max Len
Displays the current field size. Enter the maximum length to truncate Text fields. Numeric fields cannot be edited.
Split Inc
Enter the number of characters required in a field. If the number entered is smaller than the total number of characters in the field, other fields will be created to include all the data. This option is suitable for splitting up comments fields.
The naming of the fields is in the following format:
<original field>, <original field_Ext1>, <original field_Ext2>.
Note: This option is suitable for text fields only.
No. Dec
Enter the number of decimal points to display. The decimal points will be truncated to the number of decimal points entered.
Note: This option is suitable for numeric fields only.
Combine overlapping intervals
Select this check box to eliminate the problem of overlapping intervals in the output.
If you have the following data:
| From | To | Lith | Min |
|---|---|---|---|
| 0 | 2 | X | |
| 2 | 4 | Y | |
| 0 | 6 | Z |
If you select this option the output would be:
| From | To | Lith | Min |
|---|---|---|---|
| 0 | 2 | X | Z |
| 2 | 4 | Y | Z |
| 4 | 6 | Z |
Select only with Primary Code:
Select from the drop-down list the primary code to be used. This option aids the in the selection of fields that are to be included in the client data set. The fields from the selected form definition that have a Primary Code equal to that selected, are highlighted. This is a way to subset the fields that will be available in the data set.
Default
Select this button to apply a default profile to the selected data. The Set Default Settings panel is then displayed.
Set default settings
If you have defined a Profile (acQuire, Manage, Default Settings), you can apply a profile or template to the selection of the data. The profile has all or some of the settings that will apply to this and other tabs in the dialog. Select the appropriate profile from the drop-down list and the settings will apply. Deselect any of the options that you do not want to include.
Intervals
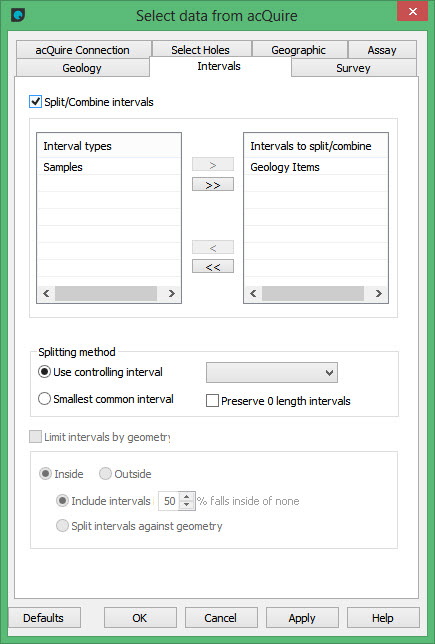
Split/Combine intervals
Select this check box to define a relationship between the way that the intervals for Sample and the Geology pages are presented in the data set.
Interval types
The list of Sample and Geology pages from which to select.
Intervals to split/combine
The selected types from the list of Interval types.
Splitting method
Use controlling interval
Select this option to split to a particular interval type. Select from the drop-down list a data set that has the intervals (From and To) that is to be included in the data set. The intervals of the other types will follow this format.
Smallest common interval
Select this option to set the smallest common interval to be the one that is included in the data set.
Default
Select this button to apply a default profile to the selected data. The Set Default Settings panel is then displayed.
Set default settings
If you have defined a Profile (acQuire, Manage, Default Settings), you can apply a profile or template to the selection of the data. The profile has all or some of the settings that will apply to this and other tabs in the dialog. Select the appropriate profile from the drop-down list and the settings will apply. Deselect any of the options that you do not want to include.
Survey
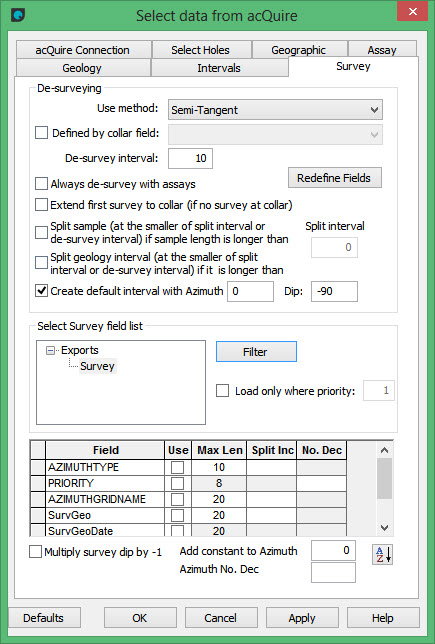
De-surveying
Use method
Select from the drop-down list the method to be used. The following methods are available from the drop-down list: Fit Spline, Semi-tangent, Back Calculation, Split Segments, and No Calculation.
Defined by collar field:
Select this check box to define by a collar field. Select from the drop-down list the Collar field (not including the primary and required fields or numeric) to be used.
De-survey interval
Enter the interval, in metres, down hole for each de-survey.
Always de-survey with assays
Select this check box to de-survey using assays. The de-survey interval will follow that defined by the De-survey interval as much as possible (see also the next definition). If a de-survey point occurs in an Assay interval, it will be shifted to the next SampTo point.
Redefine Fields
Select this button to redefine the source field for the data. By default the depth, dip and azimuth for a HoleID will be found in HoleSurvey, Depth, Dip and Azimuth. Select from the drop-down list of Survey fields if either or all of the depth, dip and azimuth are not defined in the default. Redefining the source field for azimuth could have an effect on the results if you transform the azimuth from one grid to another grid system.
Extend first survey to collar (if no survey at collar)
Select this check box to extend the first survey point back to the collar if there is no collar survey.
Split samples interval
Select this check box to split the sample interval if the sample length is longer than the defined Split interval.
It will be split at the smaller of:
- Split interval or
- De-survey interval
Split geology interval
Select this check box to split the geology interval if the length is longer than the defined Split interval.
It will be split at the smaller of:
-
- Split interval or
- De-survey interval.
Select survey field list
Select the Survey form definition that best defines the data to be included in the client view.
Filter
Select this button to define a filter to subset the records that will be included in the data set. The acQuire Filter panel is then displayed.
Operator
Select the operator to define a filter, or use as expressions. The following operators are available:
| LIKE | Compares strings of characters. For example: ProjectCode LIKE Merl% will be true when the filter finds a string commencing with Merl in the ProjectCode field. LIKE cannot be used for numeric fields. |
| NOT LIKE | Compares strings or characters. Will accept records that do not match the defined value. |
| BETWEEN | The expression is true if the Field is between the Val1-Val2 range (>=Val1 and <=Val2). |
| NOT BETWEEN | The expression is true if the Field is not between the Val1-Val2 range (<Val1 and > Val2). |
| < | Less than. Used to compare numeric expressions. |
| <= | Less than or equal. Used to compare numeric expressions. |
| = | Equal. Used to compare numeric expressions. |
| > | Greater than. Used to compare numeric expressions. |
| >= | Greater than or equal. Used to compare numeric expressions. |
| IS NULL | When a field does not contain a value, the expression will be true. |
| IS NOT NULL | When a field contains a value, the expression will be true. |
| IN | Where the Field is IN Val1, the expression is true. |
| NOT IN | Where the Field is NOT IN Val1, the expression is true. |
Group
The highlighted group is the group currently selected.
Link
Select a Link between the two fields or rows on the grid (AND/OR) if you have more than one field.
Field
Select the appropriate field from the drop-down list.
Operator
Select the appropriate Operator (=, <, >, etc.).
Val1/Val2
Enter Val1 and Val2. Val2 is only active if BETWEEN or NOT BETWEEN is selected as the Operator.
Link
Select a Link between the two fields or rows on the grid (AND/OR) if you have more than one field.
Field
Displays the fields in the form definition that you selected.
Use
Check to include the field in the output.
Max Len
Displays the current field size. Enter the maximum length to truncate Text fields. Numeric fields cannot be edited.
Split Inc
Enter the number of characters required in a field. If the number entered is smaller than the total number of characters in the field, other fields will be created to include all the data. This option is suitable for splitting up comments fields.
The naming of the fields is in the following format:
<original field>, <original field_Ext1>, <original field_Ext2>.
Note: This option is suitable for text fields only.
No. Dec
Enter the number of decimal points to display. The decimal points will be truncated to the number of decimal points entered.
Note: This option is suitable for numeric fields only.
Multiply survey dip by -1
Select this check box to multiply all survey dips by -1. If selected, all dips will be multiplied by –1.
Add constant to Azimuth
Enter the constant that will be added to the HoleSurvey.Azimuth (or another field by clicking on the Redefine Fields button).
Click OK.
A panel will display to confirm the number of holes you have selected.
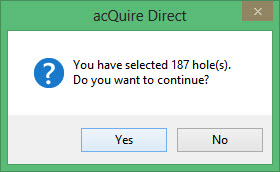
Click Yes to continue.
The following panel is then displayed.
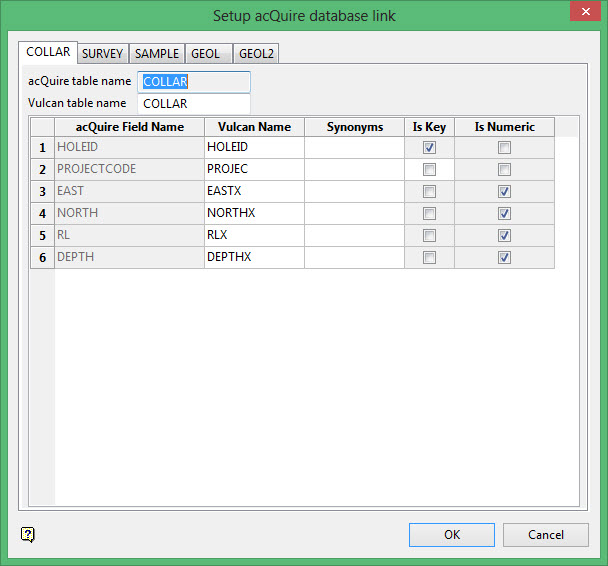
Note: The tabs on this panel are dynamic depending upon which tables/panels you pull in.
Use this panel to manually change acQuire database table/field names to a new name which will be used by Vulcan for any options which reference the table/field name such as creating drillhole legends. The acQuire database structure allows unlimited field names, however Vulcan has a limit of 6 uppercase alphanumeric characters, as a result the acQuire field names will be truncated to 6 characters.

