New Database
Creating a database
Use the New Database option to create a database. You can create three different types of databases, Isis File, ODBC Link or an Isis Library Database. For information on these databases refer to Databases.
To be able to create a database, a design for that particular type of database must exist. Refer to the New Design option for more information on creating and editing designs.
It is also necessary, if you are creating an Isis Library Database, to know the environment where the design is stored and if you are creating an ODBC Link database that you have already set up the ODBC Link.
Instructions
On the File menu, click New Database to display the New Database panel.
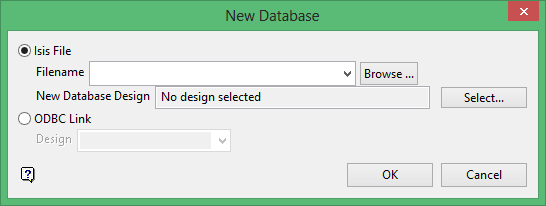
Isis File
Select this option to create an Isis database. Enter the file name, or you can select it from the drop-down list of all files in your working directory or you can browse to a location other than your working directory, in the latter two cases you are asked to confirm the overwriting of this database.
The file may be called anything.
When a new database is created, the format will be as follows: <id>.<dsn>.Isis where <id> is the identifier and <dsn> is the design name. The design name must be three characters. Note that the identifier can be comprised of the project prefix with an optional additional identifier (<id> = <proj><odi>), as was the case in previous versions of Vulcan.
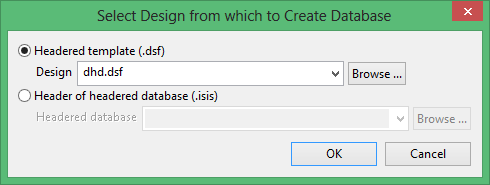
Select the design from which to create the database and then click Select to display the Select Design from which to Create Database panel is displayed.
ODBC Link
Select this option to create an ODBC link database. Enter, or select from the drop-down list, a design.
Click OK.
The database displays in a window.
Enter data by clicking in a cell and typing. It is possible to paste data from other sources, highlight the cell in which you want to paste the data, right-click and select Paste from the context menu.
You can also use the options under the Object and Table menus to manipulate the data. It is also possible to sort the records by right-clicking, to access the context menu, on a field (column) heading and selecting sort descending or sort ascending and you can insert and delete records by right-clicking on a record (row) heading.
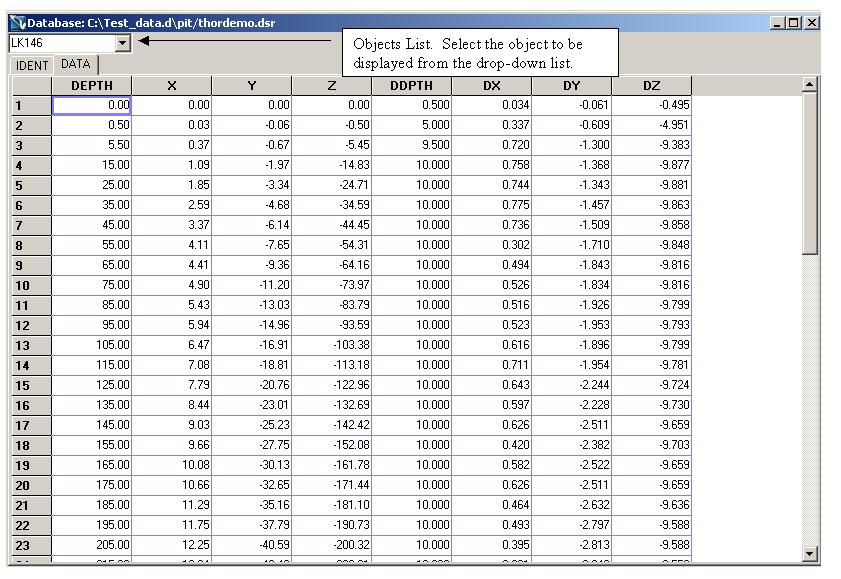
In the diagram below the database displays in Notebook form, see the Edit > Preferences option for more information. The database consists of two (2) tables, IDENT and DATA with IDENT being the header table. To move between the tables, click on the name tab, that is, click on IDENT to view the IDENT table.
Enter, or select from the drop-down list, the object that you want to display. It is possible to use wildcards (* multi-character and ? single character). The first object that matches the wildcard displays. For example, if you typed L*, then first object that starts with L displays.