From Triangles
Convert Triangular Design Objects into Triangulations
Use the From Triangles option to convert triangular design objects (created through the Dump option) into triangulations.
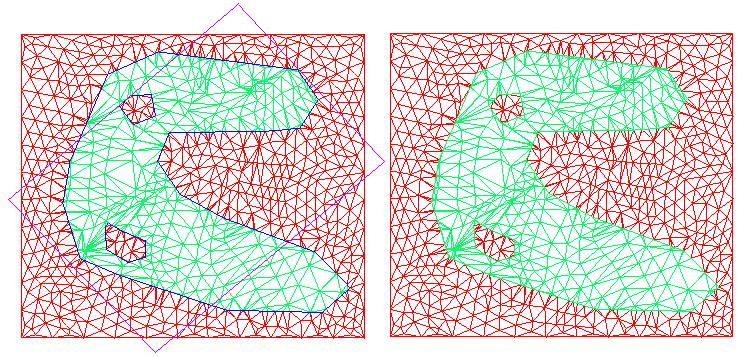
This option to create multiple triangulations. The colour of the triangular objects is used to determine to which triangulation the triangle belongs. In the diagram below, two triangulations have been created (one from the red triangles and one from the green).
1 -
Left Image - Design Data with Triangle and Higher Order Polygons
Right Image -Triangulations Extracted from Design Data (R)
This option can also be useful when importing a triangulation that has been dumped to a .dxf file. The imported layer can be converted to form multiple triangulations.
Note: The From Triangles option will not triangulate polygons; it is intended to extract triangular objects from mixed design data. We recommend that you use the Tri Polygons option (under the Model > Triangle Solid submenu) to triangulate polygons.
Instructions
On the Model menu, point to Triangle Edit, and then click From Triangles option
The Multiple Selection box displays. From this box, choose your method of selecting the objects and select the objects.
Note: Multiple features, groups and layers can be selected. Data is not, however, shaded after selection and this may make it difficult to determine what data has been selected. Multiple selection of the same layer/object will not alter the results.
The following panel is then displayed.

Triangulation Name Format
The triangulations that are extracted from the data are returned in sequential order (i.e. sorted by colour). The naming convention for these triangulations involves the use of a base name, as well as an identifier (<base name><id>.00t). The identifier will be the position of the triangulation in the sequence.
Triangulation Name
Enter the base name component of the triangulation, for example DUMP_.
Triangulation identifier length
Enter the length of the model identifier component of the triangulation name. The value entered must be between 1 and 10.
For example: If the triangulation name is DUMP_, and the identifier length set to 2, then the triangulation will be named DUMP_01.00t, DUMP_02.00t, DUMP_03.00t etc.
Triangulation Attributes
Use object colour
Select this option if you want the colour of the triangular design object to be used when colouring its corresponding triangulation.
Increment object colours
Select this option to increment the colour attribute of the chosen triangular design object. If this option is selected, then the colour of the resulting triangulation will be one colour further down the current colour palette.
In the diagram below, the triangular design object is coloured green. If the Increment object colours option was selected, then the resulting triangulation will be coloured blue.
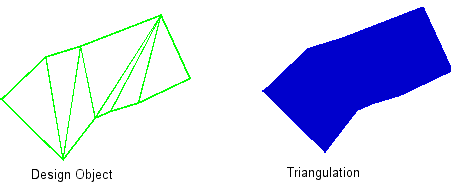
Figure 1: Incrementing object colour
Display triangulation attributes
Select this option to individually configure the display attributes of each triangulation (such as colour, translucency etc.). This option will also allow you to specify the directory in which to save the triangulation. The resulting triangulations will be saved in your current working directory by default.
Click OK.
The triangulations are then created, and the Multiple Selection box is redisplayed. Cancel when you have finished converting triangular objects. If you chose to display the triangulation attributes, then the Triangulation panel displays first. This panel displays for each of the resulting triangulations.

