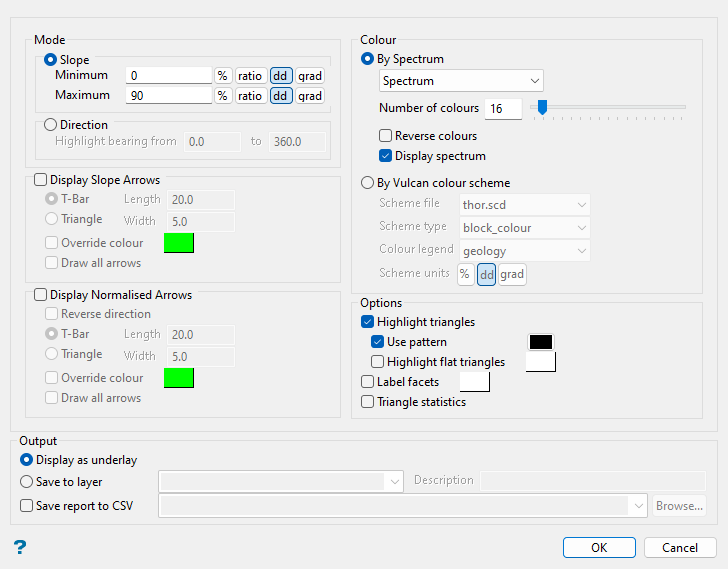
Colour by Orientation
Use this option to colour-code the dip or dip direction of the facets in a surface triangulation, display vector arrows for each facet, and label each facet showing the amount of dip. Results can be saved as a layer and also exported to a CSV file showing X, Y, Z coordinates, dip, dip direction, and surface area of each facet.
Instructions
Note: The triangulation on which you want to display the slope of triangles must be loaded into Envisage prior to selecting the Slope option.
On the Model menu, point to Triangle Surface, then click Colour by Orientation.
Follow these steps:
-
Select either Direction or Slope.
Selecting Direction will allow you to colour-code the facets based on the direction (aspect) they are facing.
-
Select a MAP colour scheme to colour the triangulation according to slope range. If required, use the legend editor (Analyse > Legend Edit > Legend Editor) to set up a map colour scheme.
Note: Be sure to select the Slope units that were used in the colour legend.
-
Enable the Highlight Aspect option if you want to colour-code the facets based on the direction (aspect) they are facing.
This is optional and does not need to be done. If you want to colour-code the facets, enter a minimum and maximum angle into the spaces provided. Any facet within these boundaries will be coloured using the selected colour legend.
Note: If you do not use this option, then the surface triangulation will remain the same colour as it was originally.
-
Select Use pattern to assign a fill pattern to the highlighted vectors.
-
Select Label facets to display the angle of individual triangles.
-
Enable Highlight Flat Triangles to assign a specific colour to all the triangle facets that are flat. You can assign a colour by clicking the Colour icon and making your selection.
Selecting Slope will allow you to colour-code the facets based on the dip (steepness).
-
Select a MAP colour scheme to colour the triangulation according to slope range. If required, use the legend editor (Analyse > Legend Edit > Legend Editor) to set up a map colour scheme.
Note: Be sure to select the Slope units that were used in the colour legend.
-
Enable the Highlight Slope option if you want to colour-code the facets based on the dip (steepness).
This is optional and does not need to be done. If you want to colour-code the facets, enter a minimum and maximum angle into the spaces provided. Any facet within these boundaries will be coloured using the selected colour legend.
Note: If you do not use this option, then the surface triangulation will remain the same colour as it was originally.
-
Select the units you wish to use by clicking one of the icons labelled Slope Units.
-
Select Use pattern to assign a fill pattern to the highlighted vectors.
-
Select Label facets to display the angle of individual triangles.
Note: Ratio displays as a single number, for example a triangle that is at a grade of 1:10 displays as 10.0.
-
-
(Optional) Enable the option Display Slope Arrows, Display Normalised Arrows, or both.
Display Slope Arrows displays the arrows parallel to the surface plane.
Display Normalised Arrows displays the arrows perpendicular (normal) to the surface plane.
Select the shape of the arrows by choosing between T-bar or Triangle. With either one, set the length and width.
Note: The length and width of the arrows use real world coordinates.
The colour of the arrows is set by the colour legend unless the option Use different colour is used.
Tip: Specify a different colour if you intend to display the arrows on pattern filled triangles. Otherwise the arrows will be displayed with the same colour as the facets and will be difficult to see.
-
(Optional) Select Surface area statistics to calculate and display the surface area in the Report Window.
-
(Optional) Select Save to layer to save the results to a layer.
-
(Optional) Select Save to CSV to save the results to a CSV file showing X, Y, Z coordinates, dip, dip direction, and surface area of each facet.
-
Click OK to complete the operation.
Note: A small message will be displayed in the report window if triangles have been skipped.

