Create
Create an animation
Use the Create option to create or edit an existing animation parameter file. An animation parameter file (<proj><name>.anim_seq ) contains a definition of each actor, as well as a list of frames for a single animation.
If this is the first time that you are using this option, we recommend that you to refer to the Overview for a further explanation of actors and frames.
Instructions
On the View menu, point to Animation, and then click Create.
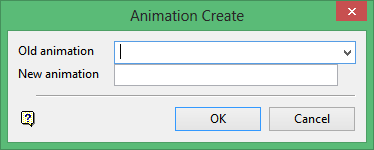
When creating an animation, you can (optionally) base it on an existing animation, (for example, same actors and frames), and then modify it to suit your purposes.
Old animation
Enter or select the name of an existing animation parameter file to edit or copy. Leave the field blank to create a new animation.
New animation
Enter a name for the new parameter file to create using a maximum of 10 alphanumeric characters. If you specified an existing parameter file in the Old animation field, the contents of that file will be copied into the new file. You can then make any required changes.
Click OK.
The Actors dialog box is then displayed. This box contains the following options:
Create actor
Creates a new actor in the animation. Unlike earlier versions, which restricted you to a maximum of 500 actors per frame, a single frame can now contain up to 5000 actors.
Modify actor
Changes an existing actor's definition.
Delete actor
Removes an actor.
Frame table
Allows you specify an optional list of allowable frames (called a frame table).
Create actor
The Add actor dialog box, which contains a list of objects (Triangulation, Layer and Grid) that can be actors, displays.
Triangulation
A Triangulation selection displays the Triangulation Actor panel.
A triangulation actor is basically any group of triangulated surfaces (2D and 3D). It can be a single triangulation or a sequence of triangulations. In both cases, Pexel files can be displayed on top of the triangulations.
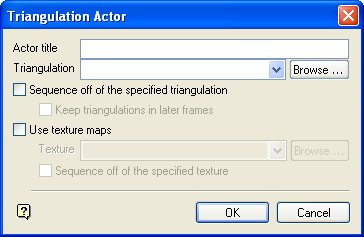
Actor title
Enter the title for the actor. The maximum size of the title is 20 alphanumeric characters.
Triangulation
Enter or select either the full triangulation file identifier (.tfi) or the prefix for a sequence of triangulations (for example, water_). Click Browse to select a file from another location. If you are specifying a sequence prefix, there is no need to enter a wildcard (for example, water_* is not valid for sequences).
Note: If you want to use triangulations with a file extension other than .00t, you will need to rename them.
Sequence off of the specified triangulation
Select this check box to use the entry in the Triangulation field to sequence animations. The entry can be used either as the prefix of each triangulation, or the system can automatically use the entry to determine sequence. Note that if this check box is not checked, you will later be asked to specify the frames for the actors.
Note: To properly sequence off the base triangulation name, the entry in theTriangulationsfield must contain one or more digits, 0 - 9, and should also contain the same number of digits.
Keep triangulations in later frames
Select this check box if you want a triangulation in a sequence to appear in all of the frames that follow its assigned frame.
Example: You may have a sequence of triangulations showing the progressive development of a mine where, as each section of the development is drawn, you may want to display it in all the following frames.
Use texture maps
Select this check box to drape texture maps over the triangulation.
Texture
Enter or select the texture name or prefix. Click Browse to select a file from another location.
Sequence off of the specified texture
Select this check box to use the entry in the Texture field as the sequence prefix of texture resources. The suffix of each texture resource (that portion following the prefix) is used as the frame name for that texture.
Click OK.
There are five possible combinations of triangulations and texture resources:
- A single triangulation with no texture resource
This is the default and the obvious case for displaying a triangulation. - A single triangulation with a single texture resource
This is a triangulation loaded with a texture resource draped over the top of it. - A single triangulation with a sequence of texture resources
In this case, the triangulation is loaded and displayed with the first texture resource draped over it. The following texture resources in the sequence are displayed by loading the triangulation as a normal underlay (not a triangulation underlay). This is because you cannot load a single triangulation more than once. - A sequence of triangulations with a single texture resource
Each triangulation in the triangulation sequence is loaded with the same texture resource. - A sequence of triangulations with a sequence of texture resources
This case requires a one to one relationship between the Pexel files in the texture resource sequence and the triangulations in the triangulation sequence.
Note: The only unusual combination of triangulations and texture resources is a single triangulation with a sequence of texture resources. In that case, the triangulations are required to be loaded into one triangulation underlay and a series of normal underlays.
-
If no triangulation or texture resources sequences (that is, sequences that have implied frames) are selected, then you will be asked to specify the frames into which the actor will appear before the animation can be saved. See the Frames for Actor panel.
Layer
-
A Layer selection displays the Layer Actor panel.
-
A layer actor is a group of layers and their objects. An actor can be a single layer, a list of layers (using a wildcard) or a sequence of layers. The objects from these layers can be separated into different frames according to layer names, feature codes etc.
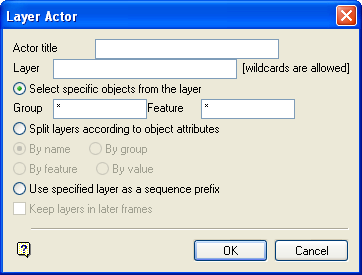
Actor title
Enter the title of the actor. The maximum size is 20 alphanumeric characters.
Layer
Specify either the wildcard selection of layers (for example, poly*) or a prefix for a sequence of layers (for example, poly_). If you are specifying a sequence prefix, there is no need to enter a wildcard (for example, poly_* is not valid for sequences).
Select specific objects from the layer
Select this option to select particular objects from the specified layers. Only objects that match the specified group and feature name are selected. All other objects are ignored. If the option is not selected, then all objects in the specified layers will be selected.
Note: When selecting specific objects, the frames into which the actor will appear will need to be specified. This is because selection of specific objects does not allow you to use implied frames (see Split layers... and Use specified layer...)
Split layers according to object attributes
Select this option if you are selecting all objects in the selected layers and want them split into different frames according to either their names, groups, features or W values. Alternately, use the suffix of each layer as the frame name (see below).
Use specified layer as a sequence prefix
Select this option if you want the entry in the Layer field to be used as the sequence prefix. The suffix of each layer (that portion following the prefix) is used as the frame name for that layer.
If there is no suffix, that is, a layer wildcard has been used, then the layer names will be used for the frame names. In the example below, "geo_" is the prefix and the characters printed in bold are considered to be the suffix.
Example: MadCap:autonum="<span style="color: #4d4d4d;" class="mcFormatColor"><b>Example: </b></span>" xmlns:MadCap="http://www.madcapsoftware.com/Schemas/MadCap.xsd">geo_1, geo_2, geo_3
Keep layers in later frames
Select this check box if using a specified layer as a sequence prefix and you want a layer in a sequence to appear in all the frames following its assigned frame. For example, you may have a sequence of layers showing the progressive creation of a dump. Once a section of the dump displays, you may want to displayed it in all the following frames.
If no layer sequence or layer splitting options (that is, ones with implied frames) are selected, then you will be asked to specify the frames into which the actor will appear before the animation can be saved. See the Frames for Actor panel.
Click OK.
If no layer sequence or layer splitting options (that is, ones with implied frames) are selected, then you will be asked to specify the frames into which the actor will appear before the animation can be saved. See the Frames for Actor panel.
Grid
A Grid selection displays the Grid Actor panel.
A grid actor is a single grid or a sequence of grids. In both cases, other grids can be colour-coded and draped on top of the actor's grids.
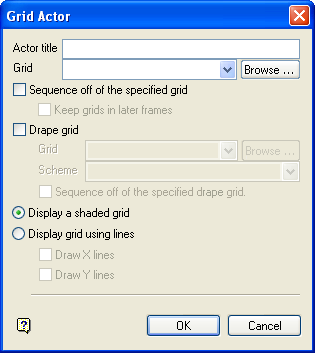
Actor title
Enter the title of the actor. The maximum size of the title is 20 alphanumeric characters.
Grid
Enter or select either the full grid file identifier (.gfi) of the display grid or the prefix for a sequence of display grids (for example, pit_). Click Browse to select a file from another location. If you are specifying a sequence prefix, there is no need to enter a wildcard (for example, pit_* is not valid for sequences).
Sequence off of the specified grid
Select this check box to use the entry in the Grid field to sequence animations. The entry can be used either as the prefix of each grid, or the system can automatically use the entry to determine sequence. Note that if this check box is not checked, you will later be asked to specify the frames for the actors.
Note: To properly sequence off the base grid name, the entry in the Grid field must contain one or more digits, 0 - 9, and should contain the same number of digits.
Keep grids in later frames
Select this check box if you want a grid in a sequence to appear in all the frames following its assigned frame.
Drape grid
Select this check box to drape other grids on top of the display grid. Specify either the full grid file identifier of the drape grid, or a prefix for a sequence of drape grids.
Grid
Enter or select either the full grid file identifier (.gfi) of the display grid or the prefix for a sequence of display grids (for example, pit_). Click Browse to select a file from another location. If you are specifying a sequence prefix, there is no need to enter a wildcard (for example, pit_* is not valid for sequences).
Scheme
Select the colour scheme (from the Contour colour legend) with which to display the drape grid.
Sequence off of the specified drape grid
Select this check box to use the entry in the Drape grid field as the sequence prefix for drape grids. The drape grid's suffix (that portion following the prefix) is used as the frame name for that grid. If this check box is not checked, then the display grid frames will be used.
Display a shaded grid
Select this option to draw the display grid as solid shaded.
Display grid using lines
Select this option to draw the display grid as lines.
Draw X lines and Draw Y lines
Select to draw X lines only, Y lines only or both X and Y lines.
Click OK.
There are five possible combinations of grids and drape grids:
- A single grid without a drape grid
This is the default and obvious method for displaying a grid. - A single grid with a drape grid
This is a grid with a drape grid displayed on top of it. - A single grid with a sequence of drape grids
In this case, the grid is loaded and displayed with the first drape grid draped over it. The following drape grids in the sequence are displayed by loading the grid as a normal underlay (not a grid underlay). This is because you cannot load a single grid more than once. - A sequence of grids with a single drape grid
Each grid displays with the same drape grid. - A sequence of grids with a sequence of drape grids
This case requires a one to one relationship between the grids in the drape grid sequence and the grids in the display grid sequence.
The only unusual combination of grids and texture resources is a single grid with a sequence of drape grids. In that case, the grids are required to be loaded into one grid underlay and a series of normal underlays.
If no display grid or drape grid sequences (that is, ones with implied frames) are selected, then you will be asked to specify the frames into which the actor will appear before the animation can be saved. See the Frames for Actor panel for more details.
If you haven't implied a frame for any of the actors, then the Frames for Actor panel displays.
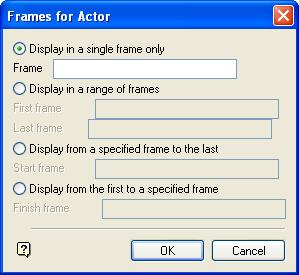
Display in a single frame only
Select this option if the actor is only to appear in a single frame. Specify the name of the frame.
Display in a range of frames
Select this option if you want the actor to appear in a range of frames. Specify both the First frame in which the actor will appear and the Last frame.
Display from a specified frame to the last
Select this option if you want the actor to appear in all frames following, and including a Start frame.
Display from the first to a specified frame
Select this option if you want the actor to appear in the frames before and including a Finish frame.
Tip: If you are going to create a frame table, make a note of your frame names.
Click OK.
You can now create another actor or you can return to the original Multiple Selection box by selecting Cancel.
If you choose to exit the entire option (from the original multiple selection box), you will be asked whether or not to save the current animation.
Modify actor
A list of all available actors in the current animation parameter file displays. Select the actor to be changed and the appropriate definition panels are then displayed. See the Create actor section for details on the panels.
Delete actor
A list of all available actors in the current animation parameter file displays. Select the actor to be deleted from the displayed list. It is immediately removed from the list.
Frame table
The following panel displays.

Frame Name
Enter the names of the frames that you want included in the animation. The order the frames appear in this list is the order in which the animation will be played. Only actors that have frames included in this list will be used. The maximum size is 20 alphanumeric characters.
Description
Enter an optional 40 alphanumeric character description of each frame.
Click OK.
The original dialog box is then redisplayed in case you want to continue editing your animation. Cancel when finished editing your animation. You will then be asked whether or not you want to save the animation.

