Begin/End Macro 
Record a series of operations
Use the Begin/End Macro option to record a series of actions. These actions can be any of the options in the Move Blocks submenu.
Refer to the Move Blocks documentation for more information about each option that can be included in a Macro. Refer to Appendix A for a description of the Dragline Macro Functions ; and the Example Macro Scripts appendix for examples of macro scripts.
This option can also be accessed by selecting the ![]() Begin > End Macro button from the Dragline - Move Blocks toolbar.
Begin > End Macro button from the Dragline - Move Blocks toolbar.
Move Block operations that require block profiles (Area Balance, Area Reshape, Area Cut and Fill, and Create Block) will only allow template objects if a macro is being recorded. You will also be forced to reposition that template. When recording macros you can select either a template or a non-template profile and you can also choose whether to reposition it.
Instructions
On the Dragline menu, point to Move Blocks, and then click Begin Macro to display the Macro Details panel.
If a Dragline specifications file (.rsp) was not opened prior to selecting this option, then the Open Dragline Specification panel displays first.
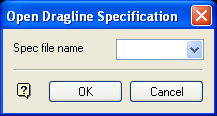
Open Dragline Specification panel
Spec file name
Enter, or select from the drop-down list, the <spec_file_id> part of the dragline specifications file name. The maximum size is 6 alphanumeric characters. Selecting a name from the drop-down list will open an existing specifications file. Entering a new name will create a new specifications file.
Click OK.
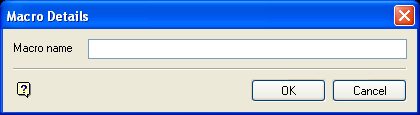
Macro Details panel
Macro Name
Enter the name of the macro that contains the recorded actions. The maximum size is 35 alphanumeric characters. The file is stored in your working directory. The full name is <name>.lava.
Click OK.
Select the option that you want to record. If the operation requires the digitising of a position, then you will be required to snap (either ![]() point snap or
point snap or ![]() object snap) onto a named position.
object snap) onto a named position.
One of the following three panels will then be displayed:
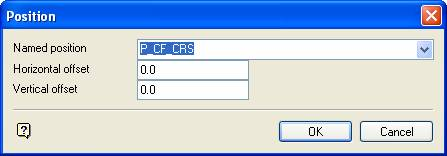
This panel appears if a position's X and Y coordinates are required by the operation, for example, the points in a 2 Point Split.

This panel appears if a position's X coordinate is required by the operation, for example, the right toe position in a Dragline - Right Toe operation.
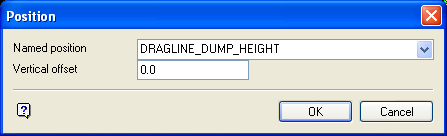
This panel appears if a position's Y coordinate is required by the operation, for example, the RL for a Bulldoze Left operation.
For each panel, the Named Position drop-down list contains a list of all of the named positions that appear at the digitised position. The horizontal and vertical offset fields enable you to offset from the named position.
Care should be taken to choose the correct named position especially when selecting a highwall profile and horizon surface intersection point.
When you have finished an option, return to the Move Blocks submenu where you can choose to End macro or select another option.
To run your macro, select the Lava option (under the Files menu). For an example of a Dragline Macro refer to the Dragline Macro Example.

