Convert/Display Coloured Points
Use the Convert/Display Coloured Points option to convert an object into a point cloud file. The object needs to have a feature code of 'COLRGBTS' and its points need to be coloured by attribute. Refer to the Colour By Attribute option (under the Design > Point Edit submenu) for more information. option to display large point datasets without requiring a design layer to be loaded. This option is useful for displaying large geophysical datasets such as aeromagnetics and gravity.
You can save multiple Z columns to a single point cloud file when converting data from an ASCII file and toggle through the colour sets using the Point Clouds toolbar.
In order to convert an object into a point cloud file, the object needs to have a feature code of 'COLRGBPTS' and its points need to be coloured by attribute. Refer to the Colour By Attribute option (under the Design > Point Edit submenu) for more information.
Instructions
On the File menu, point to Underlays, and then click Convert/Display Coloured Points.
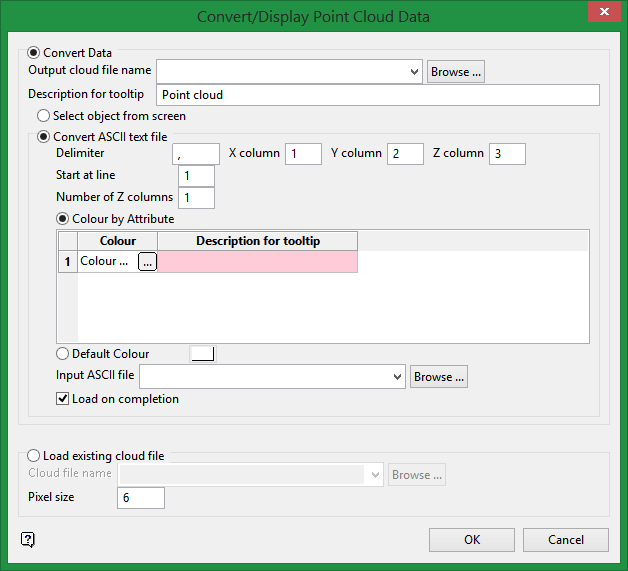
Convert Data
Select this option to convert wither existing design data or a column formatted file (for example.adc,.csv,.xyz) to a point cloud file (.cld).
Output cloud file name
Select the new point cloud file. The available drop-down list contains all .cld files found in your current working directory. Click Browse to select a vile from another location.
To create a new file, enter the file name and file extension.
Description for tooltip
Enter a description to be displayed in the tooltip of the point cloud file when creating from existing design data.
Select object from screen
Select this option to pick design data to convert from the Vulcan window.
Only point information such as the coordinate position and colour will be saved in the nominated point cloud file.
Cloud files created from objects selected from the screen are not automatically displayed following creation. To display these cloud files you will need to reselect the Convert/Display Point Cloud Data option and use the Load existing cloud file option. The applicable file can either be selected from the drop-down list or through browsing your available data directories.
Convert ASCII text file
Select this option to create a point cloud file from an existing ASCII file.
Delimiter
Enter the character that will be used to separate the columns. A comma (,) will be used by default. To create a TAB-delimited file, enter '\t'.
XYZ column
Enter the column numbers for X, Y and Z columns in the ASCII file.
Start at line
Enter the line number at which the data begins in the ASCII file.
Number of Z columns
Enter the number of columns to save to the point cloud file. The Z column will act as the first column and each successive column after that will be saved to the point cloud file up to the number of columns specified in this box.
If you set column 3 in the ASCII file to represent Z, and specified the number of columns at 4, then columns 3, 4, 5, and 6 in the ASCII file will be saved as point data in the point cloud file.
Colour by Attribute
Select this option to specify the colouring and tooltip associated for each Z column to be displayed. There should be a separate row for each Z column. Use the colour column to select the colouring mode for the points. This panel is the same as the Colour By Attribute option under the Design > Point Edit submenu. The tooltip column designates the tooltip to be displayed on the point cloud data.
Default Colour
Select the default colour for the points if you do not want to colour by attribute.
Input ASCII file
Select the ASCII file containing the raw data to be converted.
Load on completion
Check this box to load the newly created point cloud file on completion. The pixel size box will determine the point resolution on screen.
Load existing cloud file
Select this option to load an existing point cloud file. The drop-down list will contain all .cld files found in the current working directory. Click Browse to select a file from another location.
Pixel size
Enter the pixel size. All point from the cloud file will be loaded using this pixel size. For large point cloud files, use smaller pixel sizes as it is less memory intensive for viewing and rotating data.
Click OK.
Use the Convert to Object option to convert the contents of the point cloud file underlay into Vulcan design objects.

