Report Setup
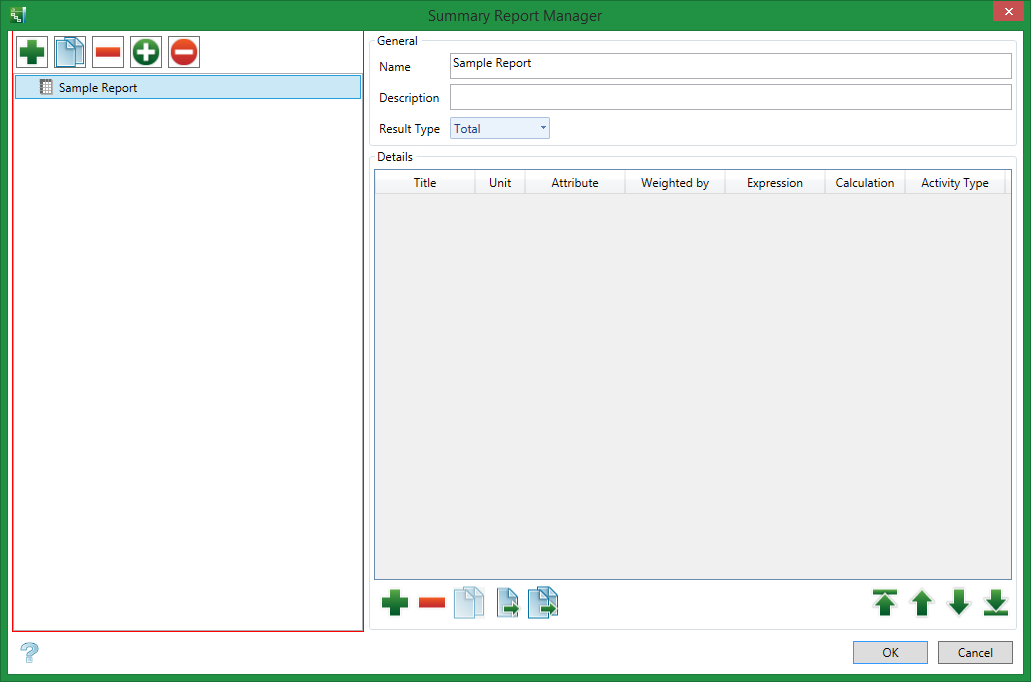
Use the Summary Report Manager panel to create, modify, or remove reports and report setup information.
Note: You can use Lava scripts to run automated tests for many of the most common options when setting up your project.
Tutorial
Instructions
On the Report tab, in the Summary Report group, click Report Setup to display the Summary Report Manager panel.
General Workflow
-
On the Setup tab, in the Summary Report group, click Report Setup.
-
Click the green + button to add a new report, or click a report name to edit an existing report.
-
Click the green + button at the bottom of the Summary Report Manager dialog box to add new rows to the Details grid. Alternately, select an existing row and click the Copy an Item button at the bottom of the Summary Report Manager dialog box.
-
Complete the Details grid with report elements.
-
Click Close when all report information is configured.
-
On the Setup tab, in the Summary Report group, select the required report as the Current report.
-
Click the Day, Week, Month and Year buttons in the Overview Area in the Gantt Chart Window to adjust the report displayed in the Summary Report Window.
-
On the Setup tab, in the Summary Report group, click Export to CSV to generate a CSV file.
-
If required, click Export to CSV on the Setup tab in the Summary Report group.
Managing Report Details
Use the icons below the Details section to add, remove, copy, or move report items.
Add a new item to the report
Click the Add ![]() icon to add a new item to the report.
icon to add a new item to the report.
Remove an item from the report
Click the Remove ![]() icon to remove the selected item from the report.
icon to remove the selected item from the report.
Copy an item on the report
Click the Copy ![]() icon to create a copy the selected item.
icon to create a copy the selected item.
Move an item to another report
Click the Move ![]() icon to move the item to another report.
icon to move the item to another report.
Copy an item to another report
Click the Copy and Move icon ![]() to copy the selected item and move it to another report.
to copy the selected item and move it to another report.
Move an item up or down in the list
Click the Up ![]() or Down
or Down ![]() icons to move the selected item up or down in the list.
icons to move the selected item up or down in the list.
Move an item to the top or bottom of the list
Click the Move to Top ![]() or Move to Bottom
or Move to Bottom ![]() icons to move the selected item to the top or the bottom of the list.
icons to move the selected item to the top or the bottom of the list.
General
Name
Enter a name for the report.
Description
Enter a brief description of the report.
Result Type
Report results can now be Totals (default), Completed amount, or Remaining amount.
Details
Title
Enter the title of the report item.
Unit
Enter the unit of measurement for the report item.
Attribute
Select the attribute of the report item from the list.
Weighted by
If the selected attribute is a custom expression, select the attribute by which it is weighted from the list.
Expression
If the selected attribute is a custom expression, select or enter the formula for the expression. To use the Formula Editor panel to enter or modify the expression, click the Formula Editor ![]() icon.
icon.
Calculation
Select the calculation method of the report item from the list.
Activity Type
Select the activity type(s) of the report item. To select activity types, click the Browse ![]() icon to display a list of the available activity types. Click on an activity type in the left column and then click the right arrow
icon to display a list of the available activity types. Click on an activity type in the left column and then click the right arrow ![]() to add the activity type to the list, or click the double right arrow
to add the activity type to the list, or click the double right arrow ![]() to add all activity types to the list. To remove selected activity types, click on the activity in the right column and then click the left arrow
to add all activity types to the list. To remove selected activity types, click on the activity in the right column and then click the left arrow ![]() to remove the activity type from the list, or click the double left arrow
to remove the activity type from the list, or click the double left arrow ![]() to remove all activity types from the list. Click OK when finished to save selections and return to the Summary Report Manager panel.
to remove all activity types from the list. Click OK when finished to save selections and return to the Summary Report Manager panel.
Resource
Select a resource for the report item from the list.
Filter
Select a filter for the report item from the list.
Decimals
Enter or select the number of decimals to use for the report item on the report.
-
Blank space in a report is a useful organisation tool. Insert a blank summary report item to create a space in the resulting report.
-
To copy a row from the Details grid, select the row, then click the Copy an item button.
-
It is possible to copy or move rows from the Details grid from one report to another.
-
Data shown in the Summary Report window is linked to the Day, Week, Month and Year selections in made in the Overview Area of the Gantt Chart window.
-
Click the Day, Week, Month or Year buttons located in the Overview Area of the Gantt Chart window to control report frequency.
-
To generate a report for non-uniform periods:
-
On the Setup tab, in the Period group, click Periods.
-
Click the green + button to add a new period.
-
Define the Start date, Start time, Increment and Number of periods to populate the Details grid.
-
On the Setup tab, in the Period group, select the Current Period.
-
-
To report average grade, select Average in the Calculation column of the Details grid.
-
Only grade type attributes can be Weighted by another attribute. On the Setup tab, in the Settings group, Click Attributes. Confirm that Grade is selected.
-
To report on an attribute already in the project, choose an Attribute from drop down list or set-up a custom Expression.
-
Attributes are calculated by Activity Type, Resource and/or Filters to further classify the data.
-
To report on only activities visible in the activity grid, click Sync Report located on the Setup tab in the Summary Report group. If Sync Report is disabled, the summary report is calculated for all activities in the project.
-
Data in the summary report varies based on whether Sync Report is selected or not selected in the Setup tab, Summary Report group.
-
Open an exported CSV file in Excel to generate informative charts.
-
Activate the summary report while scheduling or resource levelling to help identify problem areas, such as locations where the total tons mined are too high or too low.

