Contour
Contour Projected Structural Data
Use this option to display contours of structural data on a stereonet. The contours may be in the form of an underlay, layer, or grid mesh model. Only visible structural data will be included in the contouring process.
Tip: We recommend that you set up a contour colour legend prior to running the Contour option. At a minimum, you will need a legend named PRJN. This is the default that will be used by Vulcan. See Analyse > Legend Editor for information on creating a contour colour legend.
Instructions
On the Geotech menu, point to Analysis, then click Contour.
Follow these steps:
-
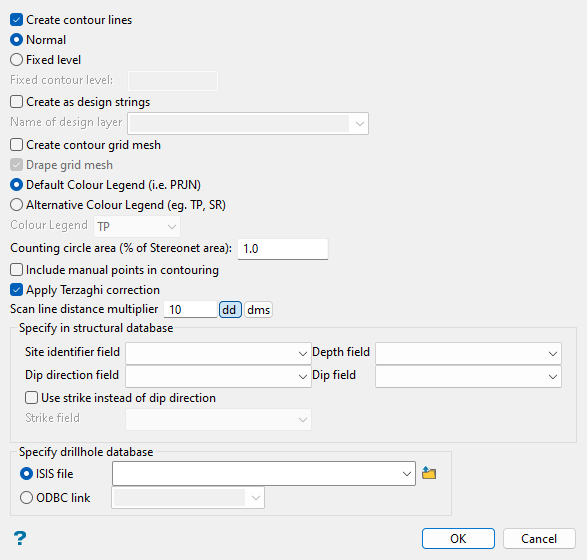
Select the Create contour lines checkbox if you want the projection contours to be in the form of lines created at either the levels related to the actual percentage values (Normal) or at a Fixed level (relative to the projection net). If Fixed level is nominated, you will need to specify the elevation at which to create the contour lines. Rotating the view will make the results of this selection evident.
-
Select the Create as design strings checkbox to create the contours as design strings, that is, they will be placed into a layer. This is necessary if you want to plot the contours. If you select this option, you will need to enter the layer name to save the contours to in the Name of design layer field. If this checkbox is not selected, then the contours will be displayed as an underlay (underlays are not stored).
-
Select the Create contour grid mesh checkbox if you want the projection contours to be saved as a grid mesh model. Upon completion of this panel, you will be prompted to select a colour for the grid mesh. The option may be used in conjunction with the Create contour lines checkbox. If this option is selected, you have the option to select the Drape grid mesh checkbox to produce a draped grid mesh model representation of the projection contours. This draped model is coloured according to the legend specified.
-
Select the colour scheme to be used for the stereonet contours. You may choose the Default Colour Legend (i.e. PRJN) option, or you may elect to use an Alternative Colour Legend (eg. TP, SR) and select from available schemes in the Colour Legend drop-down list. Refer to Analyse > Legend Editor for information on creating colour schemes.
-
Set the Counting circle area (% of Stereonet area) by entering the percentage of the stereonet area that the counting circle covers. This percentage is a means of counting the point density relative to the area of the stereonet. Increasing the area tends to make the contours more generalised. The default value is
1.0, which means that the system will count the number of points per 1 percent of the stereonet area. -
Select the Include manual points in contouring checkbox to contour any manually entered data, as well as the loaded structural data.
-
Select the Apply Terzaghi correction checkbox to apply weighting to correct for sampling bias of structural orientation data collected along a scan line (drillhole). If you select this option, you will need to enter the minimum angle to be considered in the Terzaghi correction in decimal degrees (dd) or degrees minutes seconds (dms) in the Scan line distance multiplier field.
Note: The Terzaghi weighting factor approaches infinity as the angle between a plane and the scan line approaches zero; therefore, a minimum angle is set to limit unreasonably large weighting influence. Any planes that intersect a scan line at an angle less than the Scan line distance multiplier will be limited to the minimum angle specified.
You will also need to populate the Specify in structural database section by selecting the Site identifier field, Depth field, Dip direction field, and Dip field from the drop-down lists. Alternatively, you may select the Use strike instead of dip direction checkbox to select a Strike field from the drop-down list instead of specifying the Dip direction field.
Next, in the Specify drillhole database section, nominate the geological database where the downhole survey data is stored from either the ISIS file or ODBC link drop-down lists, which include files in the current working directory. If no downhole survey data is available, then drillholes are assumed to be vertical.
ImportantThe Terzaghi correction won't be applied if the Site identifier field in the structural database is empty. A warning message displays before the contouring process is started.
The Terzaghi correction also won't be applied if the Site identifier field in the structural database is not in the geological database. An error message informing you that the hole was not weight-corrected displays through the Report Window.
- Select OK on the panel to run the option, or Cancel to exit the option without saving. After clicking OK, select the stereonet on which to apply the contours. Once selected, the points displayed on the stereonet are contoured.

