Import Georeferenced Image
Use the Import Georeferenced Image option to create a Vulcan triangulation and Image Registration file (which registers the image to the triangulation) from either a Siro DXF and its associated image, ArcGIS and its associated World File, Siro Tiff, GeoTiff files, or WMS (Web Mapping Services).
The DXF file should be generated from the SIRO (CSIRO Mine Environment Imaging Software) package and specifically linked to the image. Only JPEG (.jpg), tagged image format (.tif) images can be used.
The WMS server must have the images available in tagged image file format (.tiff) or geospatial Taggd Image File Format (.geotiff) to be able to be imported into Vulcan.
The resulting image registration file will use a different format to standard .ireg files and once created cannot be edited. You can, however, use this registration on other triangulations.
Instructions
On the Model menu, point to Image Registration, and then click Import Georeferenced Image to display the Import Image Data panel.
Image Inputs
Image type
Select the type of image file to use. The panel options will change depending on which image type is selected.
-
ArcGIS/MapInfo
-
GeoTIFF
-
ECW
-
JPEG2000
-
WMS
-
Siro DXF/Image
-
SiroTiff
ArcGIS/MapInfo
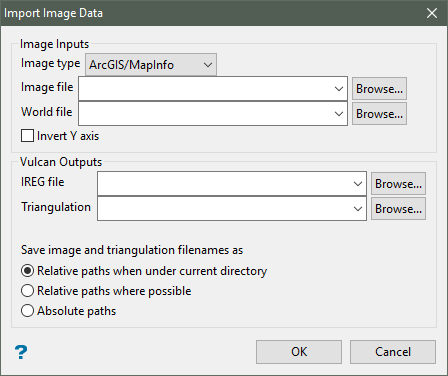
Image Inputs
Image type
Select the type of image from the drop-down list.
Image file
Select the image file. The drop-down list displays all .jpeg, .jpg and .tif files found in your current working directory. Click Browse to select a file from another location.
World file
Select the world file associated with the ArcGIS image. Click Browse to select a file from another location. This field is only displayed when the 'ArcGIS/MapInfo' image type has been selected.
The world file must follow this naming convention. If the image file name has a 3-character extension, for example image1.tif, then the world file has the same name followed by an extension containing the first and last letters of the image's extension and ending with a w, for example image1.tfw. If the extension has more or less than 3 characters, including no extension at all, then the world file name is formed by appending a w to the image file name.
Invert Y axis
Select this check box to invert the nominated image file. This check box is only displayed when the 'ArcGIS/MapInfo' image type has been selected.
Vulcan outputs
IREG file
Select an image registration file (.ireg). The available drop-down list contains all .ireg files found in your current working directory. Click Browse to select a file from another location.
To create a new file, enter the file name and file extension.
If the image is stored in a directory other than your current working directory, then the registration file contains the full path and the image should not be moved.
Click OK.
The progress of the import displays onscreen. Use the Cancel button to cancel the import. Once the data has been imported, the standard Triangulation Attributes panel displays. This panel allows you to specify display parameters, such as colour and shading, for the triangulation. Refer to the Attributes option (under the Model > Triangle Utility submenu) for more information.
The triangulation (with the image registered) will be loaded and displayed onscreen once the display attributes have been specified.
GeoTIFF

Image Inputs
Image type
Select the type of image from the drop-down list.
Image file
Select the image file. The drop-down list displays all .jpeg, .jpg and .tif files found in your current working directory. Click Browse to select a file from another location.
Vulcan outputs
IREG file
Select an image registration file (.ireg). The available drop-down list contains all .ireg files found in your current working directory. Click Browse to select a file from another location.
To create a new file, enter the file name and file extension.
If the image is stored in a directory other than your current working directory, then the registration file contains the full path and the image should not be moved.
Click OK.
The progress of the import displays onscreen. Use the Cancel button to cancel the import. Once the data has been imported, the standard Triangulation Attributes panel displays. This panel allows you to specify display parameters, such as colour and shading, for the triangulation. Refer to the Attributes option (under the Model > Triangle Utility submenu) for more information.
The triangulation (with the image registered) will be loaded and displayed onscreen once the display attributes have been specified.
ECW
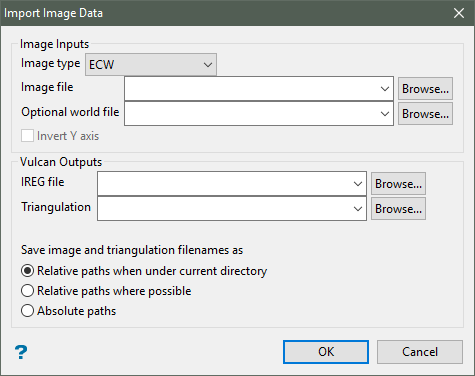
Image Inputs
Image type
Select the type of image from the drop-down list.
Image file
Select the image file. The drop-down list displays all .jpeg, .jpg and .tif files found in your current working directory. Click Browse to select a file from another location.
World file
Select the world file associated with the ArcGIS image. Click Browse to select a file from another location. This field is only displayed when the 'ArcGIS/MapInfo' image type has been selected.
The world file must follow this naming convention. If the image file name has a 3-character extension, for example image1.tif, then the world file has the same name followed by an extension containing the first and last letters of the image's extension and ending with a w, for example image1.tfw. If the extension has more or less than 3 characters, including no extension at all, then the world file name is formed by appending a w to the image file name.
Invert Y axis
Select this check box to invert the nominated image file. This check box is only displayed when the 'ArcGIS/MapInfo' image type has been selected.
Vulcan outputs
IREG file
Select an image registration file (.ireg). The available drop-down list contains all .ireg files found in your current working directory. Click Browse to select a file from another location.
To create a new file, enter the file name and file extension.
If the image is stored in a directory other than your current working directory, then the registration file contains the full path and the image should not be moved.
Click OK.
The progress of the import displays onscreen. Use the Cancel button to cancel the import. Once the data has been imported, the standard Triangulation Attributes panel displays. This panel allows you to specify display parameters, such as colour and shading, for the triangulation. Refer to the Attributes option (under the Model > Triangle Utility submenu) for more information.
The triangulation (with the image registered) will be loaded and displayed onscreen once the display attributes have been specified.
JPEG2000
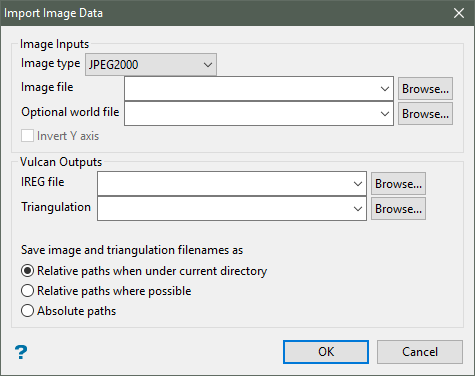
Image Inputs
Image type
Select the type of image from the drop-down list.
Image file
Select the image file. The drop-down list displays all .jpeg, .jpg and .tif files found in your current working directory. Click Browse to select a file from another location.
World file
Select the world file associated with the ArcGIS image. Click Browse to select a file from another location. This field is only displayed when the 'ArcGIS/MapInfo' image type has been selected.
The world file must follow this naming convention. If the image file name has a 3-character extension, for example image1.tif, then the world file has the same name followed by an extension containing the first and last letters of the image's extension and ending with a w, for example image1.tfw. If the extension has more or less than 3 characters, including no extension at all, then the world file name is formed by appending a w to the image file name.
Invert Y axis
Select this check box to invert the nominated image file. This check box is only displayed when the 'ArcGIS/MapInfo' image type has been selected.
Vulcan outputs
IREG file
Select an image registration file (.ireg). The available drop-down list contains all .ireg files found in your current working directory. Click Browse to select a file from another location.
To create a new file, enter the file name and file extension.
If the image is stored in a directory other than your current working directory, then the registration file contains the full path and the image should not be moved.
Click OK.
The progress of the import displays onscreen. Use the Cancel button to cancel the import. Once the data has been imported, the standard Triangulation Attributes panel displays. This panel allows you to specify display parameters, such as colour and shading, for the triangulation. Refer to the Attributes option (under the Model > Triangle Utility submenu) for more information.
The triangulation (with the image registered) will be loaded and displayed onscreen once the display attributes have been specified.
WMS
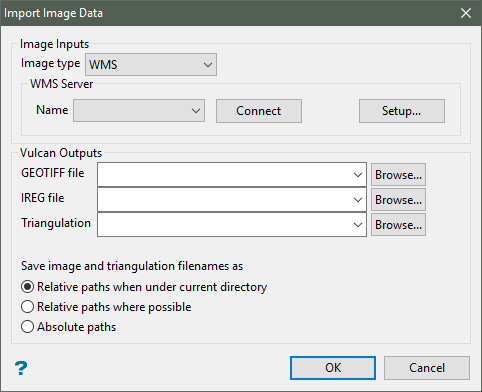
Image Inputs
Image type
Web Mapping Service (WMS) is a picture of a pixel, provided via the web. This service display geo-registered aerial and satellite imagery, hillshade/terrain images, and boundaries as straightforward images overlaid on the earth. WMS transactions are made via HTTP, and contain request information (bounding box, projection, image format and width/height in pixels) and responses containing the geo-registered pictures that serve as a basemap for mapping applications.
WMS provides an image basemap of your project area of interest, and can support image requests up to 37 Giga pixels i n size (if the WMS server supports it).
WMS does not provide any identifiable/queryable information with the images. Even though you will be able to see a hillshade or DEM overlay as an image, yo will not be able to pull out elevation information or identify pixel values.
WMS Server
This section is only available if a successful connection with the sever is complete.
Name
Name to idenfify a WMS server.
Connect
After selecting a WMS server form the list, click this button to connect with the server and retrieve the maps available in the server.
Setup
Click this button to define the WMS server.

Server Name
Name to identify a WMS server.
Server URL
Internet address of the server.
WMS Map
Map name
List of available maps in the server.
Image width/Image height
The supported formats start at 160x120 pixels until 8192x4608 pixels.
Spatial Reference System
SRS
List of Spatial Reference Systems supported by the map.
Min X, Min Y, Max X, Max Y
Mn and Max coordinates where there is information about the map. If you choose any small area inside the coordinates, only that area will be downloaded from the server.
Vulcan outputs
GEOTIFF file
Geospatial File downloaded from the server.
IREG file
Select an image registration file (.ireg). The available drop-down list contains all .ireg files found in your current working directory. Click Browse to select a file from another location.
To create a new file, enter the file name and file extension.
If the image is stored in a directory other than your current working directory, then the registration file contains the full path and the image should not be moved.
Click OK.
The progress of the import displays onscreen. Use the Cancel button to cancel the import. Once the data has been imported, the standard Triangulation Attributes panel displays. This panel allows you to specify display parameters, such as colour and shading, for the triangulation. Refer to the Attributes option (under the Model > Triangle Utility submenu) for more information.
The triangulation (with the image registered) will be loaded and displayed onscreen once the display attributes have been specified.
Siro DXF/Image
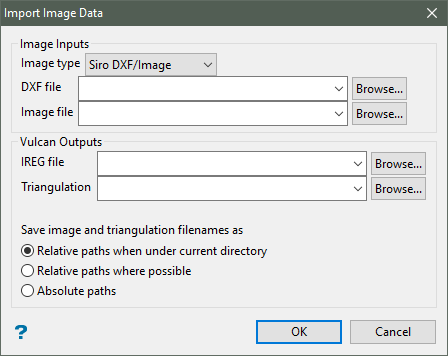
Image Inputs
DXF file
Select the DXF file. The drop-down list displays all .dxf files found in your current working directory. Click Browse to select a file from another location.
Image file
Select the image file. The drop-down list displays all .jpeg, .jpg and .tif files found in your current working directory. Click Browse to select a file from another location.
Vulcan outputs
IREG file
Select an image registration file (.ireg). The available drop-down list contains all .ireg files found in your current working directory. Click Browse to select a file from another location.
To create a new file, enter the file name and file extension.
If the image is stored in a directory other than your current working directory, then the registration file contains the full path and the image should not be moved.
Click OK.
The progress of the import displays onscreen. Use the Cancel button to cancel the import. Once the data has been imported, the standard Triangulation Attributes panel displays. This panel allows you to specify display parameters, such as colour and shading, for the triangulation. Refer to the Attributes option (under the Model > Triangle Utility submenu) for more information.
The triangulation (with the image registered) will be loaded and displayed onscreen once the display attributes have been specified.
SiroTiff

Image Inputs
Image type
Select the type of image from the drop-down list.
Image file
Select the image file. The drop-down list displays all .jpeg, .jpg and .tif files found in your current working directory. Click Browse to select a file from another location.
World file
Select the world file associated with the ArcGIS image. Click Browse to select a file from another location. This field is only displayed when the 'ArcGIS/MapInfo' image type has been selected.
The world file must follow this naming convention. If the image file name has a 3-character extension, for example image1.tif, then the world file has the same name followed by an extension containing the first and last letters of the image's extension and ending with a w, for example image1.tfw. If the extension has more or less than 3 characters, including no extension at all, then the world file name is formed by appending a w to the image file name.
Invert Y axis
Select this check box to invert the nominated image file. This check box is only displayed when the 'ArcGIS/MapInfo' image type has been selected.
Vulcan outputs
IREG file
Select an image registration file (.ireg). The available drop-down list contains all .ireg files found in your current working directory. Click Browse to select a file from another location.
To create a new file, enter the file name and file extension.
If the image is stored in a directory other than your current working directory, then the registration file contains the full path and hence the image should not be moved.
Triangulation
Select the triangulation in which the image file will be imported into. The list contains all triangulations in the current working directory. Click Browse to select a file from another location.
To create a new file, enter the file name and file extension.
Click OK.
The progress of the import displays onscreen. Use the Cancel button to cancel the import. Once the data has been imported, the standard Triangulation Attributes panel displays. This panel allows you to specify display parameters, such as colour and shading, for the triangulation. Refer to the Attributes option (under the Model > Triangle Utility submenu) for more information.
The triangulation (with the image registered) will be loaded and displayed onscreen once the display attributes have been specified.

