Surface Levels
Use the Surface Levels option to split open pits or solids into surfaces based upon a bench definition.
Instructions
On the Model menu, point to Triangle Solid, and then click Surface Levels to display the Level Surfaces panel.
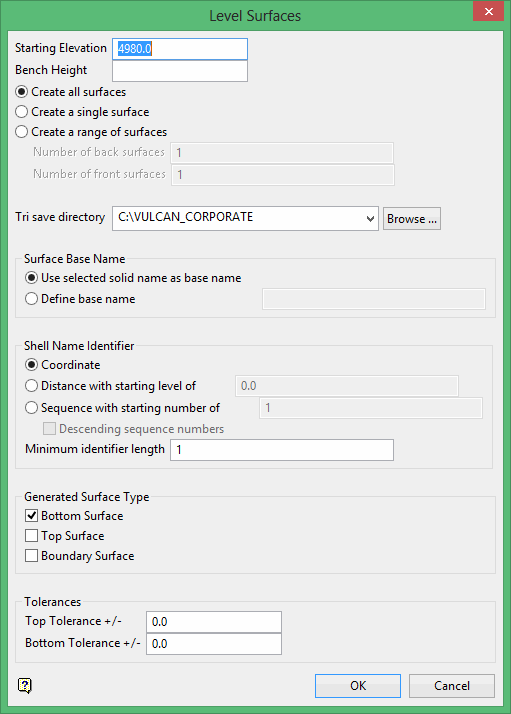
Starting Elevation
Enter the reference level for the start of the benches. Generally this is the top elevation.
Bench Height
Enter the height of the pit benches.
For example, an elevation of 500 with a Height bench of 5, the new surface will be at 495 and so on.
Create
Select the number of shells to create:
-
All surfaces
-
Single surface
-
Range of surfaces
If choosing a range, define the number of back and front surfaces to include. The original surface from which the remaining surfaces are derived (if you have selected the Create all Surfaces or Create a range of surfaces options) coincides with the nominated cutting plane.
Tri save directory
Select the directory that will be sued to store the resulting triangulations. Leave this field blank if you want to save the resulting triangulations within your current working directory. Use the Browse button if you want to nominate a different storage location.
To save your triangulations within an existing triangulation database, use the Browse button to locate the applicable.tri file. Once found, click on the file before clicking OK.
If you want to store the triangulations within a subdirectory of your triangulation database, double-click on the .tri file to display the Select Directory panel.
Once you have located the desired storage folder, click on the folder name before clicking OK.
Surface Base Name
Use selected solid name as base name
Select this option to use the name of the selected solid as the base name.
Define base name
Select this option to provide a base name for the new triangulations. The base name can contain up to forty alphanumeric characters (no spaces).
Shell Name Identifier
For the shell identifier, you can use the coordinate (which is rounded up to the next whole number), distance or sequence number. You will be required to enter a starting level when using distance.
The resulting triangulations will be named using the following naming convention:
<base_name>_<shell_identifier>.00t
where <base_name> refers to the base name (specified through the Define base name field or derived from the chosen triangulation) and <shell_identifier> refers to the chosen shell name identified, that is, coordinate value, distance, or sequence number.
Note: We recommend that you use the coordinate value as the shell identifier when working with orthogonal planes as this will result in a more concise name. Do not use the coordinate value when working with oblique planes.
Descending sequence numbers
Select this check box to reverse the naming direction when shelling, that is, top to bottom rather than bottom to top, right to left rather than left to right, etc.
Minimum identifier length
This defines the length of the shell identifier when the sequence is selected.
For example, if you define 3, and starting of 1, the output will be 001, 002, 003, and so on.
<base_name>_<001>.00t,<base_name>_<002>.00t,<base_name>_<003>.00t...
Generated Surface Type
This is the output you require. This can be selected one by one or you can select all at the same time, in this case, the option automatically adds a suffix of top, bottom, or boundary to the output triangulation name.
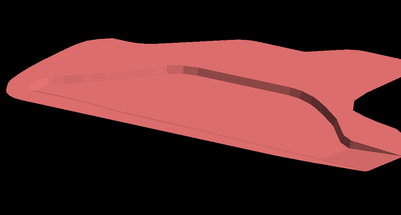
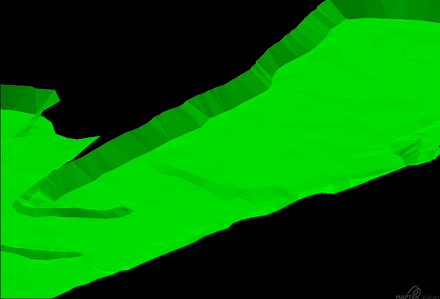
Figure 1: Top Surface
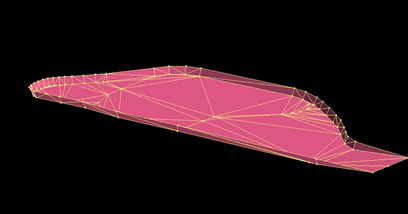
Figure 2: Bottom Surface
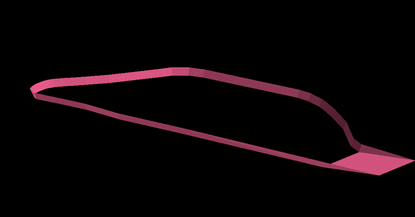
Figure 3: Boundary Surface
Tolerances
Use these options in the event that the initial surface is not amine design. In this case, the option adds some tolerance in order to generate the appropriate surface.
For example, a starting elevation of 300 with a bench of 10 metres and a tolerance of (top = 2 and bottom = 1) the option will include the information as follows:
Top Surface: 300 + 2 = 302
Bottom Surface: 200 - 10 - 1 - 289
Click OK.

