Coordinates
Load Download File as a Coordinate File
Use the Coordinates option to load a coordinate download file into a layer.
Instructions
On the Survey menu, point to Surveying, and then click Coordinates.

Apply Coordinate Offsets
Select this check box to apply the coordinate offsets. This values are defined through the Survey Total Station Settings panel. See the Set Up option for more information.
Select the coordinate file(s)
File Selection
Browse for files using the Browse button, or use the interface showing the available grid files in the current working directory.
Click on the name of the file(s) you want to select. Use the  icons to go to the last folder visited, go up one level, or change the way details are viewed in the window.
To highlight multiple files that are adjacent to each other in the list, hold down the Shift key and click the first and last file names in that section of the list.
To highlight multiple non-adjacent files, hold down the Ctrl key while you click the file names.
Move the items to the selection list on the right side of the panel.
- Click the
 button to move the highlighted items to the selection list on the right.
 - Click the
 button to remove the highlighted items from the selection list on the right.
 - Click the
 button to move all items to the selection list on the right.
 - Click the
 button to remove all items from the selection list on the right.
Wildcard
Enter any characters used as wildcards. Wildcard characters can be an * as well as regular characters.
If the topo_* were used as a wildcard, the result might be topo_area2_aerial, topo_min, or topo_with_pit.
Files of type
Use this to filter the file types that display in the search list.
Ignore base station points named
Select this check box to ignore a named point when importing survey coordinate data. Wildcards (* multi character wildcard and % single character wildcard) can be used. Any point that matches the specified name will be ignored when forming the Vulcan objects.
The BASE (base station) value is the default point name.
Base station points named must be case-sensitive.
Click Next to display the Survey Coordinate panel.

Note: The appearance of panel is dependent on the instrument selected.
Survey Name
This is an optional alphanumeric field of 20 characters for the surveyor name. The default is set to your user name.
Survey Date
The survey date is optional and, if entered, must follow the format dd-mon-yyyy, for example, '18-Mar-1999'. The default is the current system date.
Layer Name
Enter the name of the layer for the data points. Leave this field blank to use the names from the download file, that is, each survey unit will be put in a separate layer with the survey unit sequence number (up to 40 alphanumeric characters) as the layer name.
Note: The layer name cannot be left blank for CRTR400 recorders.
Layer Description
Enter a description to further describe the contents of this layer. The description can be up to 80 alphanumeric characters and may include spaces. If a description is not entered, then a default description will be used instead. If the chosen layer already has an assigned description, the description displays when the layer is selected. Existing layer descriptions can be overwritten.
Combine strings of equal code into one object
Select this check box to combine strings of equal code into one object. If this check box is checked, then all the points in the same job with the same feature code are placed into one object. If this box is not checked, then Vulcan objects will be formed based on strings of consecutive points with the same feature code.
If the check box is selected and the download job contains one job with 10 sequential crest points, then 3 toe points, then 5 crest points again (with the same code as the first 10 points), you would get 2 objects, that is, a crest with 15 points and a toe with 3 points. If the check box was not checked, then you would get 3 objects, that is, a crest, a toe and a crest.
The following option is available when combining strings of equal code into one object.
Connect these strings
By default, if the survey code defines this object as a string object and not spot data, only consecutive points in the download job are shown connected by a line on the screen. If this box is checked, and the object is a string object, then all points of that survey code will be shown connected.
Using the example above, point 14 in the download file would be connected to point 10 if the Connect these strings check box was checked. If this check box was not selected, then these two points will not be connected thus causing a line break in the crest object.
Split objects by distance
Select this check box if you want imported data to be broken into separate objects based on an input distance.
Click Finish.
Click OK.
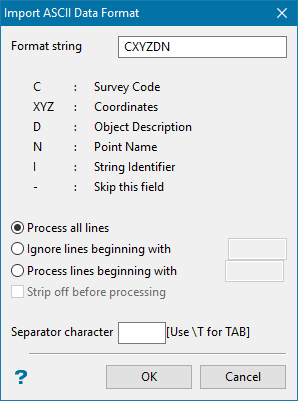
Import ASCII data format panel
Format string
This is a quick way to define the field sequence in the dataset.
If the data consists of 8 comma separated fields in the following order:
Point name, X, Y, Z, Survey code, Trace record (source of dataset), Survey name, String ID
Your format string would then be 'NXYZCD-I'. The survey name is not supported, so you would want to skip this field to get to the string ID field by using a hyphen.
Objects are broken by a change in survey code or string identifier. You can process the entire file (Process all lines); or only process the lines that begin with (Process lines beginning with) or don't begin with certain characters (Ignore lines beginning with).
Note: Check the Strip off before processing check box if you want to strip the starting characters from the line before processing. This option is only applicable when using the Process lines beginning with option.
Select OK.
The data is then imported and the progress of the importation is displayed.
The coordinates are then displayed in the Report Window of Vulcan and, if requested, stored in the nominated report file.

