Import Vulcan Field File
The Import Vulcan Field File option to import information stored with an existing Vulcan Survey Field file (.vff). The imported information can be saved in a nominated Vulcan layer.
The only instrument currently exporting to the Vulcan Survey Field file format is the Leica 1200. Other Leica instruments can be made to export to this file format, however, you will need to contact your nearest Maptek office for more information. In order to get the correct format from the Leica 1200, you will need to install the Vulcan1200.frt file (stored under the etc/examples folder of your Vulcan directory) onto your Leica instrument.
The Import Vulcan Field File option will use the standard station libraries, however, instrument library stations exported to the file will take precedence. The Import Vulcan Field File option also uses the survey codes file (survey.codes) to lookup the colours etc. to use when creating the objects from the pickup. The station library and survey codes file can be located in the folder pointed to by the SURVEY_DATA environment variable.
Refer to Appendix A for more information on the Vulcan Field Survey file format.
Instructions
- Select Survey menu
- Select Surveying submenu
- Select Import Vulcan Field File option
The following panel displays.
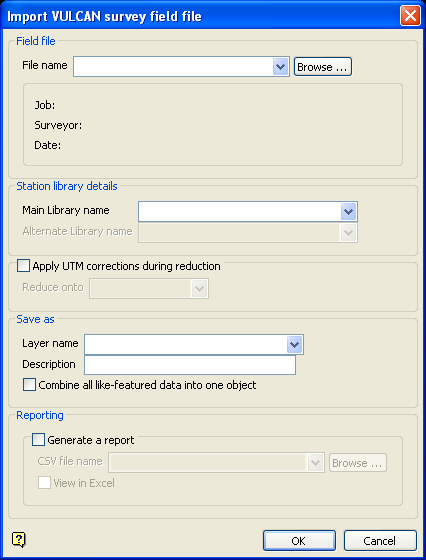
Import VULCAN survey field file panel
Field file
Select the survey field file containing the information that you want to import into Vulcan. The drop-down list contains all .vff files found in your current working directory. Click Browse to select a file from another location. Once selected, the contents of the selected survey field file will be used to populate the Job, Surveyor and Data entries.
Diagram 1 - Field File Details

Station library details
The instrument will normally export any used stations from its own internal station library into the survey field file prior to using the station, For example, as an instrument station. The coordinates of these are used by Vulcan for the reduction. Coordinates and information in the nominated survey field file can be validated against those contained in a specific station library. If needed the station library can be used to supply station coordinates for any missing stations. The main station library is always checked first, followed by the alternate library. Results from the stations validity check displays in the Report Window.
Save as
Layer name
Select the layer that will be used to store the imported information.
Description
Enter a description to further describe the contents of this layer. The description can be up to 80 alphanumeric characters and may include spaces. If a description is not entered, then a default description will be used instead. If the chosen layer already has an assigned description, the description displays when the layer is selected. Existing layer descriptions can be overwritten.
Check the Combine all like-featured data into one object check box to construct an object for each code used in a single instrument setup only.
Reporting
Generate a report
Select this check box to output the information to a nominated CSV file. You will need to specify the file that will be used to store the outputted information.
To create a new file, enter the file name and file extension.
Check the View in Excel check box if you want to view the resulting report through Microsoft Excel.
Select OK.
The information in the nominated survey field file is then imported into Vulcan. A confirmation dialog informing you of the number of successfully saved points will also be displayed onscreen.
The following panel is then displayed.
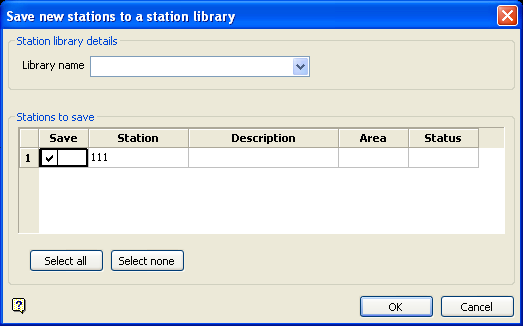
Save new stations to a station library panel
The Save new stations to a station library panel to save new stations in an existing station library. This panel is only applicable to station setups that use the MS (multiple shot) record type or have an instrument resection. Refer to Appendix A for more information on the Vulcan Field Survey file format.
Station library details
Select the station library that will be used to store the new stations. The drop-down list contains all Survey Station libraries (.stations) found in your current working directory. To create a new station library, enter the file name and file extension. By default, the resulting station library will be placed in your current working directory.
Stations to save
To save a specific station, check the applicable Save check box. If a Save check box is not checked, then the corresponding station won't be saved in the nominated station library. Use the Select all button to check all available check boxes or the Select none button to clear all available check boxes.
You also have the ability to enter a station name, a station description, the peg area and peg status for each new station saved. The station description, peg area and peg status entries are optional. The peg area can be used to record the location of the station in the mine while the peg status can be used to record the station's status, For example, temporary, control, deceased etc.
Select OK.
Results from the stations validity check will also be displayed in the Survey Field File tab of the Report Window.
Figure 1: Report Window Output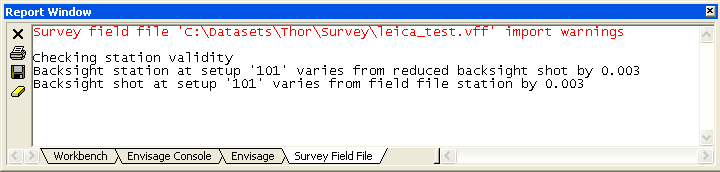
If you chose to output the information to a CSV file, then the report file will be created and stored in the specified directory. If you checked the View in Excel check box, then the newly created file will be opened and displayed through Microsoft Excel.
Use the Save option (under the File menu) to save the changes to your currently open design database.

