Display Ellipsoid
Use this option to display a search ellipsoid so that it can be verified. The resulting search ellipsoid can be displayed and, if desired, saved as a solid triangulation. Also highlight the samples inside an ellipsoid, which can be manipulated interactively.
Display a search ellipsoid so that it can be verified.
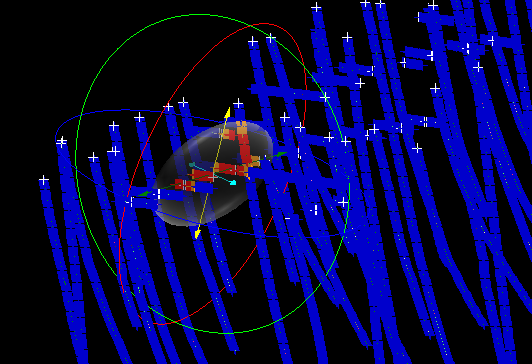
Drillhole samples within an interactive ellipsoid are highlighted.
Instructions
On the Block menu, point to Grade Estimation, and then click Display Ellipsoid to display the Search Ellipsoid Display panel.
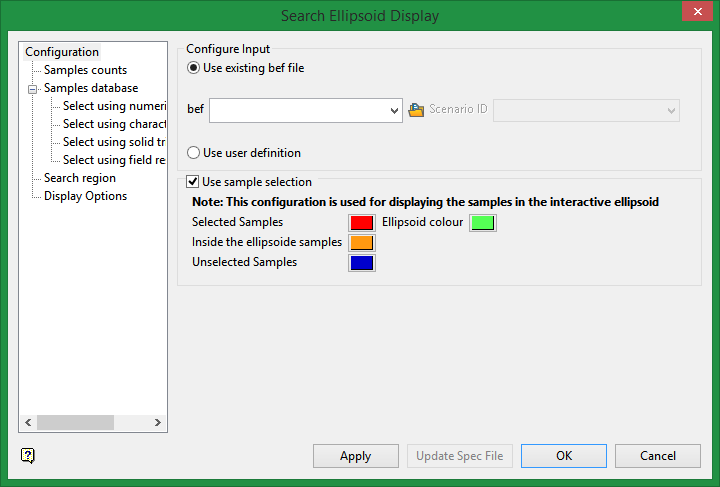
Configure Input
Select either an existing (.bef) file or set new definition parameters.
Use existing bef file
Use this option if you already have an estimation file set up with search ellipse parameters. Select an existing (.bef) file and scenario ID from the drop-down list.
Use user definition
Use this option if you do not have an existing (.bef) file, or if you wish to create a new ellipsoid.
Use sample selection
Tip: Use this option to highlight drillhole samples within an interactive ellipsoid.
These colour choices affect the display of samples that will appear within the ellipsoid.
Selected samples
Choose the colour for the selected samples.
Inside the ellipsoid samples
Choose the colour for the samples inside the ellipsoid but not selected.
Unselected samples
Choose the colour for samples outside the ellipsoid.
Ellipsoid colour
Choose the colour for the interactive ellipsoid.
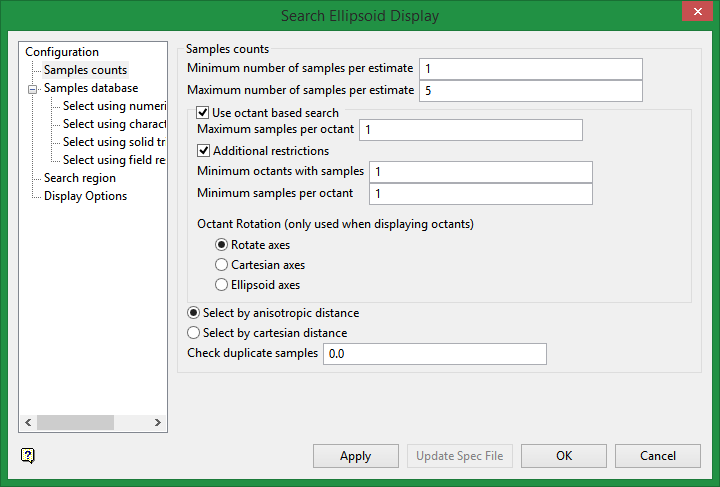
Sample Counts
Minimum number of samples per estimate
Enter the minimum number of samples that have to be found to generate an estimate. Blocks with less than this number of samples within the search ellipsoid or box are assigned the default grade value.
Maximum number of samples per estimate
Enter the maximum number of samples to be used in any grade estimation. For example, the estimation program may find 30 samples near a block centre. If you had specified a maximum of 10 samples, then only the 10 samples closest to the block centre are used. The distance to the block centre is calculated by an anisotropic distance based on the search radii. Up to 999 samples per estimate are allowed.
Use an octant based search
Select this checkbox if you want to place a limit on the number of samples that can come from a given octant. The space around a block centre is divided into eight octants by three orthogonal planes. You have a choice of plane orientations, Rotate axes, Cartesian and Ellipsoid axes.
Maximum samples per octant
Enter the maximum number of samples from each octant to be used in the estimation. Samples closest to the block centre are used first.
Note: The maximum number of samples per estimate always applies, regardless of the maximum samples per octant value.
Additional restrictions
Select this checkbox if you want to apply additional restrictions to the number of samples for octants. These restrictions comprise of minimum octants with samples and minimum samples per octant.
The minimum octants with samples enables you to specify the number of octants that must contain samples for an estimate to be generated. The minimum samples per octant enables you to specify the number of samples per octant that needs to be found to generate an estimate. These two restrictions work together. An octant is considered "filled" if it contains at least the minimum number of samples per octant. The minimum number of octants with samples requires that at least that number of octants be filled.
For example, if you set the minimum number of samples per octant to 2, the minimum number of octants to 3 and have the following number of samples per octant,
|
Octant Number |
Number of samples per octant |
Filled / Not Filled |
|---|---|---|
|
0 |
1 |
Not filled |
|
1 |
3 |
Filled |
|
2 |
2 |
Filled |
|
3 |
1 |
Not filled |
|
4 |
1 |
Not filled |
|
5 |
1 |
Not filled |
|
6 |
1 |
Not filled |
|
7 |
0 |
Not filled |
there are two filled octants. As this is less than the minimum number of octants with samples, the default value is assigned to this block.
Store octants used
Select this checkbox if you want to save the number of octants within a nominated block model variable.
Store octants information
Select this checkbox if you want to save the octants that were used by each estimated block.
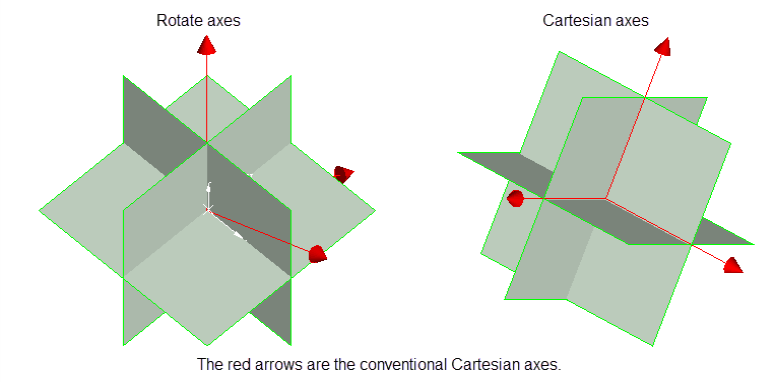
Select octant rotation type
The Rotate axes consist of three planes perpendicular to axes that have been rotated 45° about the Z axis and 35° about the X' (X axis after rotation about the Z axis), this produces a set of planes where the first has a bearing of 135°, the second has a bearing of 45° and is at angle of -55° to the horizontal and the third also has a bearing of 45°, but is at an angle of 35° to the horizontal, see the diagram below.
The Cartesian axes consist of three planes perpendicular to the conventional Cartesian axes X, Y and Z (or East, North and elevation) axes.
The Ellipsoid axes consist of three planes that are perpendicular to the major, semi-major and minor axes of the search ellipsoid.
Note: An octant search is a declustering tool used to reduce imbalance problems associated with samples lying in different directions. If there are more samples in one direction than another, then this option limits the bias.
The samples are sorted by distance (either Anisotropic or Cartesian) prior to the samples being limited. This ensures that the closest samples are kept.
Select by anisotropic distance
Select this option to use the anisotropic distance defined by the ellipsoid axes to determine the samples that are closest to the block centroid.
Select by Cartesian distance
Select this option to use the Cartesian distance to determine the samples that are closest to the block centroid.
Check duplicate samples
Enter the distance to use to check duplicate samples. Samples less than or equal to the specified distance value are considered to be duplicates, resulting in the entire grade estimation process being stopped. You can disable this feature by specifying a distance value of '-1'.
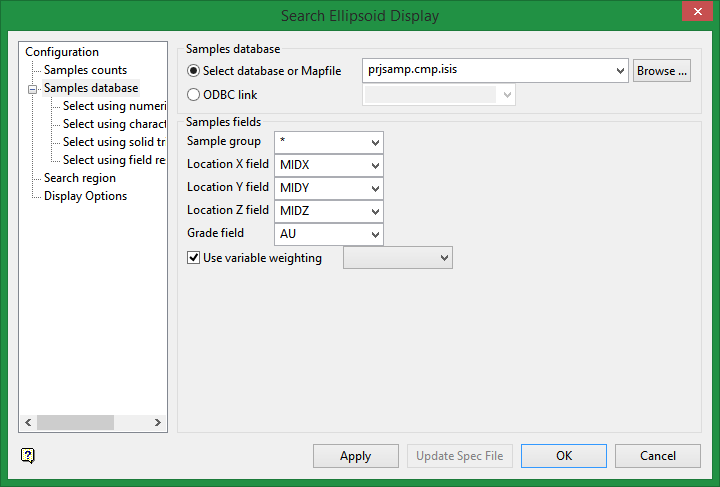
Samples Database
Select Database or Map File
Specify the name of the database or mapfile that contains the sample data. The drop-down list contains all of the Vulcan database files and mapfiles found within your current working directory. Click Browse to select a file from another location.
ODBC Link
Specify the name of the ODBC link database that contains the sample data.
Sample fields
Sample group
Enter the name of the groups (database keys) to be loaded. Wildcards (* multi-character wildcard and % single character wildcard) may be used to select multiple groups. Multiple groups only apply to Isis databases (ASCII mapfiles consist of one group).
Location X/Y/Z Fields
Enter, or select from the drop-down list, the names of the fields containing the X, Y and Z coordinates.
Grade Field
Select the field that the estimates will be calculated from.
Use variable weighting
Select this checkbox if you want to multiply the sample weights by the value of the specified weighting variable. The weighting variable may represent a specific gravity, sample length or sample weight.
For example, a block with two samples is to be estimated. The first sample has a grade value of 2 and a weight variable of 1. The second sample has a grade value of 5 and a weight variable of 2.5. The weights, from ordinary kriging, are 0.8 for the first sample and 0.2 for the second sample. Without variable weighting the estimated grade is:
(0.8 × 2 + 0.2 × 5) = 2.6
With variable weighting the estimate is:
(0.8 × 1 × 2 + 0.2 × 2.5 × 5) ÷ ( 0.8 × 1 + 0.2 × 2.5 ) = 3.15385
If the variable weighting is 0 for a block, then the default grade value is stored.
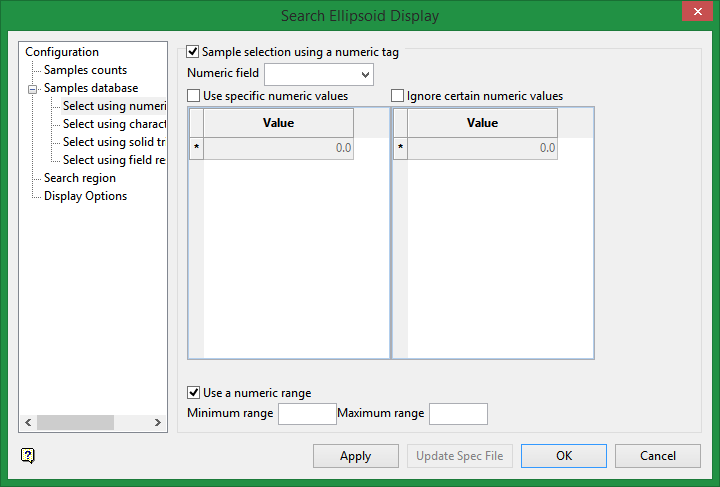
Select using a Numeric tag
Select this checkbox to limit the samples to a specific numeric field. Once the numeric field has been specified, it is then possible to nominate whether to include or ignore those entries that contain specific numeric values.
For example, you may have a database field named 'BOUND' and the entries in this field are '1', '2' and '3', representing, respectively, ore, waste and internal waste.
Use specific numeric values
To use only value '1', select the Use specific numeric values checkbox and specify '1' as the specific value. The value can be entered through the Value column.
Ignore certain numeric values
To ignore specific values, select the Ignore certain numeric values checkbox. The specification of the value(s) to be ignored can be entered through the Value column.
Use a numeric range
Select this checkbox to ignore a whole range of values, for example,. '0 to -9999' to ignore all negative values. It can also be used to ensure any rounding errors are caught. You will need to enter the minimum and maximum for the range.
Note: The selection methods accumulate, that is, if more than one method is chosen, then the samples must satisfy each selected method before being included. Within a method, however, selection is based on the OR selection criterion except for field restrictions, which allows AND/OR selection criteria.
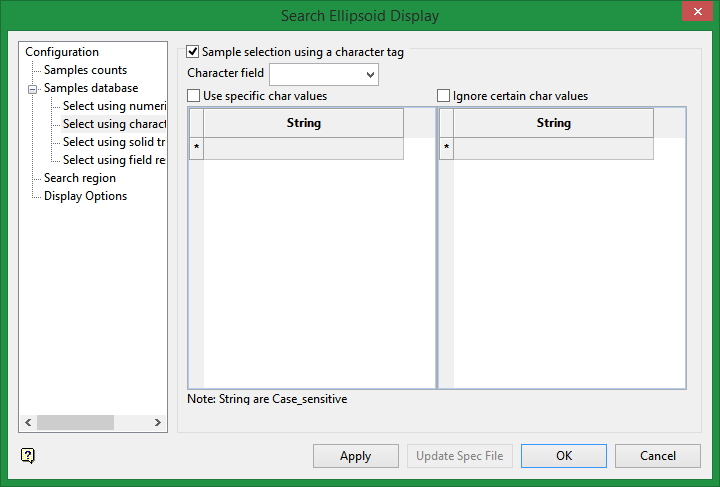
Select using a character tag
Select this checkbox to limit the samples to a specific character field. Once the character field has been specified, it is then possible to nominate whether to include or ignore those entries that contain specific character strings.
For example, you may have a database field named BOUND and the entries in this field are 'ore', 'waste', and 'internal waste'.
Use specific character values
To use only the character string 'Ore' you would need to check the check this box and specify 'Ore' as the specific string. The strings to use are specified through the Value column, which is enabled once the Use specific character values checkbox has been selected.
Ignore certain character values
Enable the Ignore certain character values checkbox if you want to ignore specific character strings. The strings to exclude are specified through the Value column, which is displayed below the Ignore certain character values checkbox.
Note: The selection methods accumulate, that is, if more than one method is chosen, then the samples must satisfy each selected method before being included. Within a method, selection is based on the OR selection criterion except for field restrictions, which allows AND/OR selection criteria.
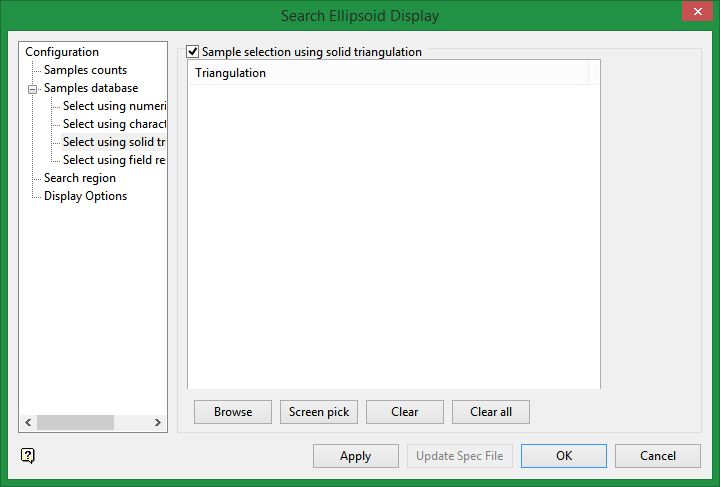
Select using solid triangulations
Select this checkbox to limit the samples by triangulation. If this checkbox is selected, only the samples that fall within the nominated triangulations will be included. This checkbox must be selected to add the necessary triangulations.
Adding triangulations to the Triangulations list
Click Screen Pick to select a triangulation that is currently loaded on the screen.
Click Browse to display the Open panel and select the triangulations you want to load.
Select the required triangulation files and add them to the selection list on the right side of the panel.
-
Click on the name of the file(s) you want to select.
-
To select a triangulation file from another location, click Browse.
-
To highlight multiple files that are adjacent to each other in the list, hold down the Shift key and click the first and last file names in that section of the list.
-
To highlight multiple non-adjacent files, hold down the Ctrl key while you click the file names.
-
Move the files to the selection list on the right side of the panel.
-
Click the -> option to move the highlighted files to the selection list on the right.
-
Click the >> option to move all the files to the selection list on the right.
-
Click the <- option to remove a highlighted file from the selection list.
-
Click the << option to remove all files from the selection list.
-
Click OK to add the triangulation to the Triangulations list.
Removing triangulations from the Triangulations list
-
To remove a triangulation from Triangulations list, click the triangulation name and click Clear Selected.
-
To remove a group of triangulations, hold down the Ctrl key and click on each triangulation that you want to clear. Click Clear to remove all the selected triangulations.
-
To remove all of the triangulations,click Clear All.
Note: The selection methods accumulate, so if more than one method is chosen, the samples must satisfy each selected method before being included. Within a method, however, selection is based on the OR selection criterion except for field restrictions, which allows AND/OR selection criteria.
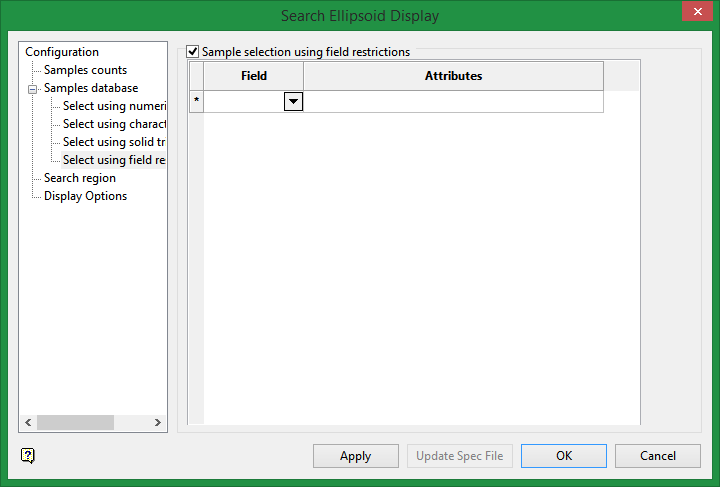
Select using field restriction
Select this checkbox to limit the samples to those with fields that match certain selection criteria. Select a Field from the drop-down list and enter applicable selection criteria in the Attributes column.
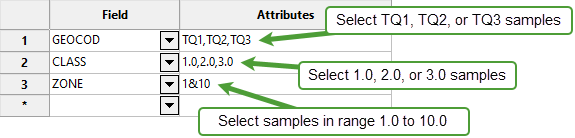
Include spaces in the entries in the Attributes column only if spaces are included in the desired field values.
When entering a range, always enter the smallest number specified before the largest number.
-792&-720 since -792 is smaller than -720. This range is evaluated as -792.0 ≤ VALUE < -720.0.
Note: The selection methods accumulate, that is if more than one method is chosen, then the samples must satisfy each selected method before being included. Within a method, however, selection is based on the OR selection criterion except for field restrictions, which allows AND/OR selection criteria.
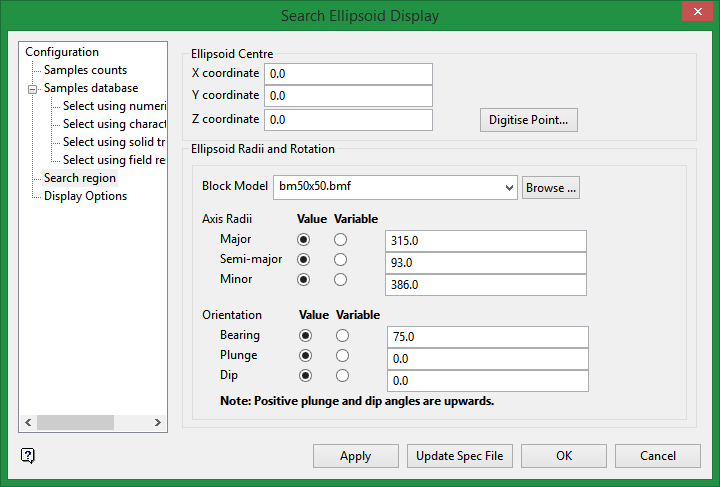
Ellipsoid Centre
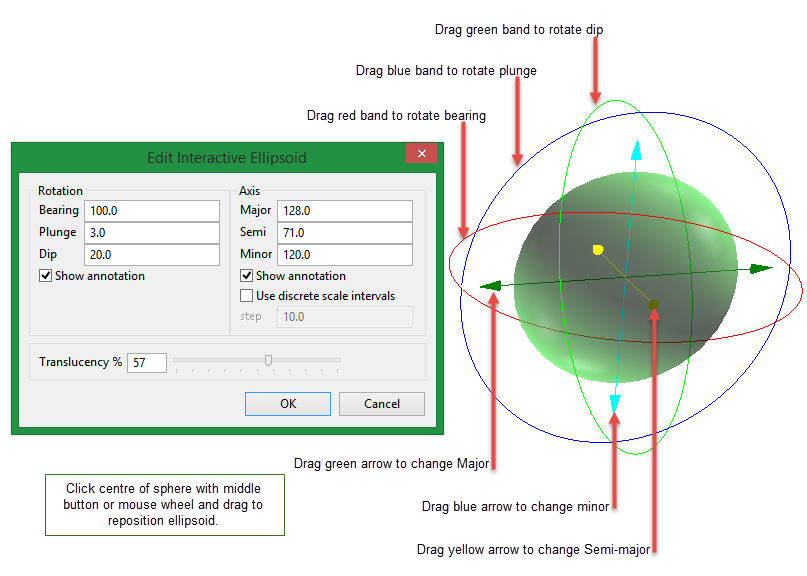
Pick ellipsoid centre from screen
Select this checkbox to indicate the ellipsoid centre onscreen (once the Search Ellipsoid Display panel has been completed). If this checkbox is not checked, then you will need to enter the centre coordinates through the available fields.
Digitise Point
Select this option to fill in the ellipsoid centre coordinates by picking a point from the screen.
Ellipsoid Radii and Rotation
The axis radii and orientation can either be a value or a block model variable. A block model must be selected to enable the variable option. If specifying a variable for an axis radius or orientation, the final value used will be the value of the selected block model variable obtained at the block containing the ellipsoid centre.
If only values will be entered for the axis radii and orientation, a block model does not need to be selected.
The octant rotation option specified how the octants displays. This is only relevant if the ellipsoid displays as a solid and as octants (see Display options below). There are three typed of octant rotations: Rotate axes, Cartesian axes, and ellipsoid axes.
Axis radii
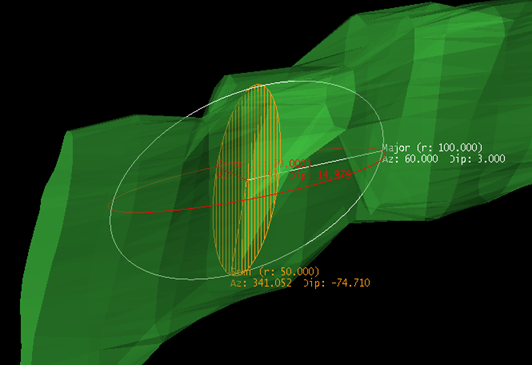
Enter the dimensions of the search box. The search box has sides with length twice the numbers given.
The major axis radius is the search distance along the axis of the ore body.
The semi-major radius is the search distance in the ore body plane perpendicular to the ore body axis.
The minor axis radius is the search distance perpendicular to the ore body plane.
The search radii are true radii. If you set your major search radius to '100', then the ellipsoid has a total length of 200. The following diagram shows the relationship between the axes with the ellipse in the default orientation (bearing 90°, plunge and dip 0.00°).
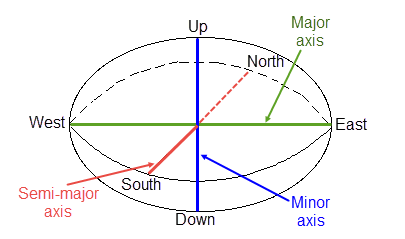
Relationship between Radii Search distances
Orientation
The Bearing, Plunge and Dip values are angles, in degrees, that specify the orientation of the search ellipsoid and orientation of variogram structures. Care must be taken with these parameters as there are several common misunderstandings about the meaning of these parameters.
To understand these parameters, imagine an ore body with a primary axis. To find the bearing of the ore body, project the ore body axis straight up onto the surface plane and call this line the bearing line. The bearing is the angle clockwise from north to the bearing line.
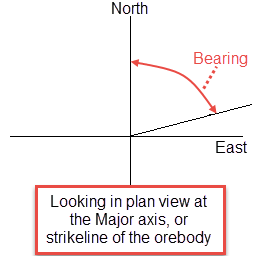
Bearing
Plunge is the angle between the horizontal plane and the ore body axis. Note that the plunge should be negative for a downward pointing ore body.
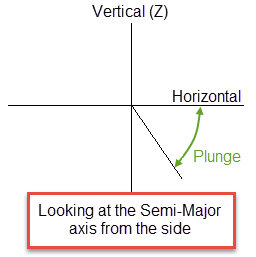
Plunge
To find the dip of an ore body, imagine the ore body is located in a plane. First rotate around the Z axis by the bearing so that the ore body is pointing north. Then rotate around the east-west axis by the plunge so that the ore body is level with the ground. At this point the ore body is parallel to the north-south axis. The dip is the angle of rotation to bring the plane into the horizontal plane. Looking north, if the plane must be rotated clockwise around the north-south axis, then the dip is positive (other software packages may use the opposite convention).
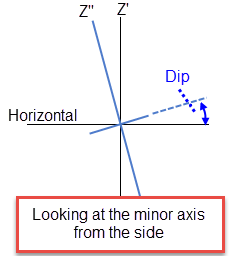
Dip
Note: The terms bearing, plunge and dip have been used by various authors with various meanings. In this panel, as well as kriging and variography, they do not refer to true geological bearing, plunge, and dip. The terms X', Y', and Z' axis are used to denote the rotated axes as opposed to X, Y, and Z which denote the axes in their default orientation.
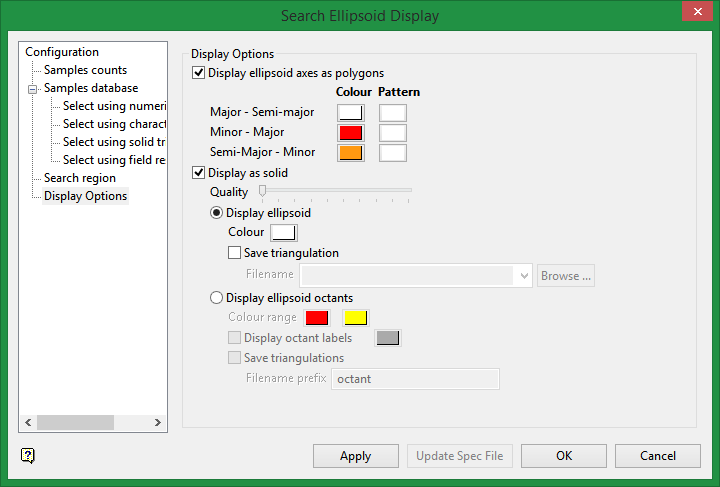
The Display Options tab has two sets of options: one related to displaying ellipsoid axes, and the other related to displaying triangulations.
Display ellipses as polygons
Select this checkbox to display the ellipses that represent the resulting search ellipsoid. You will have the ability to select a colour and a fill pattern for each of the ellipses.
The resulting search ellipsoid displays in the 'DIG$DLLIP' layer and the objects representing the three ellipses will be assigned object names of 'Major-Semimajor', 'Minor-Major', and 'Minor-Semimajor. The contents of the 'DIG$ELLIP' layer cannot be saved in your currently open database. Use the Copy option (under the Design > Layer Edit submenu) to store the ellipsoid polygons into a layer.
Display as solid
Select this checkbox to display the resulting search ellipsoid as a solid triangulation. The triangulation can be temporary, in which case it displays as an underlay, or saved to a triangulation file. The ellipsoid can be displayed as single triangulation or as eight separate octants.
Solid resolution
This field controls the precision/resolution of the resulting triangulation. The higher the resolution value, the less discretised the ellipsoid but the larger the file size and the graphic requirements to display it.
Colour
Select the colour that will be used.
Save triangulation
Select this checkbox to save the displayed search ellipsoid as a solid triangulation. The list contains all triangulations in the current working directory. Click Browse to select a file from another location. Selecting an existing file will prompt you to confirm that you want to overwrite the file's original contents.
To create a new file, enter the file name and file extension.
To save a triangulation within an existing triangulation database, use the Browse option to locate the applicable '.tri' file. Once found, double-click on the file to display the Select Triangulation panel.
To replace an existing triangulation, click on the desired triangulation and click OK. To create a new a triangulation, enter the file name and file extension and click OK. Selecting an existing file will prompt you to confirm that you want to overwrite the file's original contents.
If the Save solid checkbox is not checked, then the resulting triangulation displays as an underlay.
Display ellipsoid octants
Select this option to display the octants as a solid when loading an ellipsoid. The octants can be displayed as a solid using a single colour or each octant can be individually coloured using a colour range.
Note: Numbering of octants is based on the division of the spaced into eights of a sphere. The top half and bottom halves are each divided into 4 parts. 1 is opposed to 3 and 2 is opposed to 4. 1 is also opposed to 7 diagonally, 5 to 7, and 6 to 8.
Colour range
Select the colour range.
Display octant labels
Select this checkbox to display text labels showing the octant number next to each octant. Click on the colour option to select a colour for the labels.
Save triangulations
Select this checkbox to save the displayed search ellipsoid as a solid triangulation. The list contains all triangulations in the current working directory. Click Browse to select a file from another location. Selecting an existing file will prompt you to confirm that you want to overwrite the file's original contents.
Only the file name prefix can be specified. If a prefix of 'octant' is chosen, then triangulation with filenames 'octant1.00t, octant2.00t,..., octant8.00t' will be created.
Click Apply to view ellipsoid. If you selected the option to use a sample selection, then an interactive ellipsoid will be displayed. If you are not using a sample selection, then the standard ellipsoid will be displayed.
Note: The parameters entered through the Search Ellipsoid Display panel will be stored in memory until the current Vulcan session is closed.

